


Intro
Many users think that configuring W3 Total Cache plugin is hard because there are a lot of settings that they do not understand. In this tutorial I want to explain the settings and show you how to configure this plugin easily.
W3 Total Cache is a powerful, flexible and free caching plugin for WordPress. But it allows not only optimizing your website caching, but also minification, connects with your CDN, maintains monitoring etc.
But before all, W3TC plugin improves website speed tremendously. Unfortunately, some people are sort of afraid of its complexity.
I want this tutorial to become the best place for not very technical WordPress users to learn quickly about the settings of a free version of W3 Total Cache. And to help you configure the plugin as easy and quick as possible for maximum speed of your website.
Besides, this article will help you to get knowledge about caching which is useful if you are manage your website by yourself.
I will keep this article up-to-date as the setting of W3TC plugin evolves.
So, feel free to return to this article now and then when you need it to get even better performance.
If you notice that W3 Total Cache has changed and I’ve missed it, please let me know. And I will update the article.
This article was last updated on February 20, 2022
The main idea of my article is to make W3 Total Cache plugin closer to non technical people and give you necessary knowledge so that you could benefit from the power of this plugin.
Also, I want to make W3TC as simple for you as possible by giving you presets of W3 Total Cache settings. You can use them to set up your W3 Total Cache in practically one-click with no head ache.
In this tutorial you can learn and get these major points:
- Whether you need to use a caching plugin.
- What is caching and how it makes your website faster.
- How to set up W3 Total Cache plugin. It’s easy. Including set-and-forget option. (This is especially for you if you’re on a shared hosting.)
- What the W3 Total Cache settings mean (useful for deeper insights and tuning whether you are on shared hosting or not).
- What kind of hosting providers work best with W3 Total Cache plugin
- You can get the W3 Total Cache settings which fit shared hosting and import them. The settings are safe and efficient that suit most WordPress website owners.
The aims of this tutorial:
- To let you know what kinds of caching and other related techniques exist to make your website faster.
- To let you configure W3 Total Cache as easy as possible (especially users on a shared hosting can benefit).
- To let you understand W3 Total Cache settings.
- To let you get rid of fear of using W3 Total Cache plugin.
The tutorial is broken down into sections according to W3 Total Cache settings. It will let you easily go through the tutorials and set up the plugin on your website.
By the way, if you just want recommended settings without much explanations, then you may want to look at this section. There are recommended settings for shared hosting in one place and (downloadable W3TC settings to save your time.
Besides, the W3 Total Cache plugin continues to improve. So changes its user interface. If you notice that this article is outdated, feel free to let me know and I’ll update it.
What a caching plugin does in general (not limited to W3TC)
In short, a caching plugin like W3 Total Cache does the following:
- WordPress is based on a dynamic content (PHP. JavaScripts, SQL) which is processed slowly. A caching plugin creates a static layer between your WordPress website and your visitor. Static layer is processed much faster than dynamic content. It means you website becomes faster with a caching plugin.
- Also, a caching plugin helps to avoid server requests to the same elements (HTML, images, CSS, JS) once the elements have been requested before. It’s the core functionality that gives less CPU (and in most cases less RAM) load on your server. It means performance boost for your website.
- Your website becomes faster for a visitor also thanks to browser caching. It means that browsing within your site becomes much faster for a visitor.
- Advanced options of a caching plugin optimizes performance of other parts such as CSS and JavaScripts. It gives even more speed for your website.
- Besides, it helps to improve cooperation with CDN (in case you use it).
In other words, the most important function of a caching plugin is to take a part of your dynamic website which does not change very often and put it in a cache as a static content. And your visitors’ browsers process this static content (a cached version of your website) much faster. Note that your original website files are NOT modified except .htaccess file.
To put it dead simply and short, with a caching plugin you website becomes faster for your visitors and your website brings less load to your hosting server.
Here’s the image illustrating how a caching plugin makes your WordPress website faster.
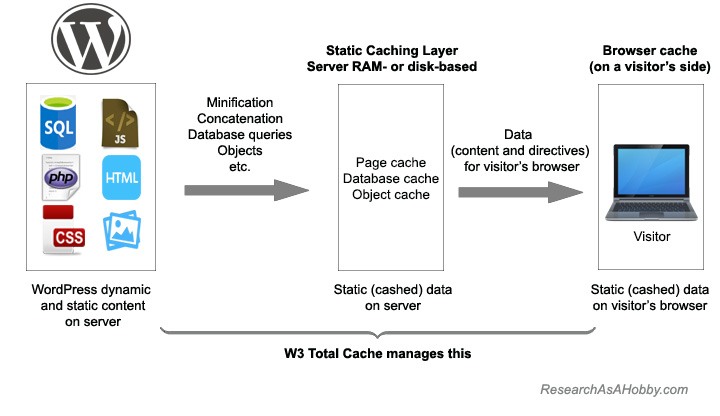
W3 Total Cache is between your WordPress site and your visitor’s browser
Whether you need to use a caching plugin
Using a caching plugin is a no-brainer. No doubt it makes your WordPress website faster on any hosting. But there are some nuances.
Fully managed hosting can let you not worry at all
If you use a fully managed hosting, then there are chances that caching is what your host cares of. And in this case you don’t need (or even can’t) use a caching plugin. You host optimizes caching of your website for you.
I suggest checking out WP Engine (there’s my review) if you are interested in this hassle-free approach.
Advanced shared hosting have their own caching solutions
Some hosting providers have their own caching plugins which are optimized for the particular server environment. It’s recommended to use these caching solutions since they are more efficient and in many ways are simpler to use.
I can recommend an affordable host which have such custom caching solution: A2 Hosting (my review).
Recommended settings for a caching plugin by your host
Although it’s quite rare, but still worth mentioning. In quite rare occasions hosting providers recommend specific settings for caching plugins. You can find it out by searching for it on your hosting company’s website. You can use a Google search query like this:
site:yourhost.com caching plugin
(replace yourhost.com with the URL of your hosting website)
The most frequent case dealing with caching plugins
In most cases you have to take care of caching your website on your own. Using any caching plugin is no doubt advantageous on a WordPress website of any size and any traffic.
Among free WordPress caching plugins there are two heavy-weight leaders: WP Super Cache and W3 Total Cache. I compare their performance on my test site during a whole month in this post.
W3 Total Cache plugin is believed to be the most versatile plugin. The plugin has a lot of settings and this makes it flexible and powerful. At the same time a lot of settings makes it less attractive for some beginner users.
I want to keep its functionality advantage and soften its user interface disadvantage. I do this in this post by explaining the W3 Total Cache plugin settings and presenting the recommended settings. It will help even a total beginner use the advantages of this plugin.
Do you have to use W3 Total Cache plugin?
Although this article is devoted to W3 Total Cache plugin and I favor this free plugin, it does not mean that you have to use it. It may appear that using another caching plugin may be more attractive to you for some reason.
Anyway, the information in this article will be useful if you want to make your WordPress site faster using any caching plugin.
Can a caching plugin break your site?
There are some chances that a caching plugin may result into not expected behavior of some parts of your website. It can happen more often with e-commerce sites or when some specific plugins are used. In this case it needs a deeper research on how to configure a caching plugin for a specific e-commerce theme.
By the way, to avoid issues with a caching plugin on your e-commerce site, you can simply a fully managed hosting which fully takes care of your website performance.
Another option to avoid issues with caching and make your site as fast as possible is to use a hosting that supports its own caching solution. As I’ve mentioned above, I highly recommend A2 Hosting (my review) in this case.
However, with most WordPress websites using a caching plugin does not bring much (and in most cases any) head ache, but makes your websites significantly faster.
Before getting into understanding and configuring W3 Total Cache
Configuring W3 Total Cache plugin can be done easily. If you use a shared hosting there is just a couple of settings that you need to pay attention to. Everything else can be left by default.
However, in this chapter you will know about all settings of this plugin. And it will help you tune the plugin to a maximum performance. Also, in the download section you can get W3 Total Cache presets for different hosting configurations to make the configuration process even easier.
Besides, testing cache settings can be not convenient on your live website because there’s a risk that something will break down. In order to avoid these risks you can create a testing copy of your website to experiment with caching settings. If you are interested, here’s my tutorial how to create a clone of your website on a separate domain or subdomain for free.
And of course, make sure you have a backup of your website before making any changes on your live site.
Also, before installing W3 Total Cache you need to remove (not just deactivate) any other caching plugins.
Using W3 Total Cache plugin
Just a couple of words about how you use W3TC plugin:
- You install and activate it.
- Right after that your website becomes cached via W3TC plugin and much faster even with the default settings which are fine in many cases.
- You can make minor changes in W3TC settings to help your website get even better performance (you can read about it in this article).
- When you specified the W3TC settings that work fine for your website, there are a couple of things you will want to do in W3TC from time to time. From time to time you may need to clear, empty or purge the cache. From a WordPress user’s perspective, all these actions do the same. Just different words are used.
You will learn more why clearing the caches is needed further in General Settings section of this article. I talk about different caches there.
The easiest, universal and quick solution is to click “Empty all caches” button in the Dashboard of the W3TC plugin. Or you can also click “Purge All Caches” or “Purge Current Page” in the W3TC top panel in the WordPress dashboard.
Another option is to use Cache Preload option. But anyway, there may be cases when you will need to clear all caches to refresh the caches.
And since there are different types of caches used in W3 Total Cache, you can empty specific caches if you use them: memcached cache, opcode cache, disk cache. Also you may need to update media query string (it may be needed by developers).
Here’s how you can clear the caches in W3TC (you can click it to enlarge):

W3 Total Cache: Dashboard / Clearing the caches
Apart from a clearing the caches options, in the W3TC dashboard you can see your installation and server configuration information by clicking “Compatibility check” button.
This information can be used by developers and advanced uses for fin-tuning W3 Total Cache settings. Here’s how it looks like:

W3 Total Cache: Dashboard / Compatibility check information window
1. General Settings
Here are the screenshots of the recommended W3TC General Settings with some notes. The screenshots are combined in one place from the below subsections.
See more details in the section below.
1.1. General
In a general case, it’s recommended not to do anything in this section.
However, you can use its functionality when you need it.
Here is a screenshot of the general settings tab of W3 Total Cache with my notes (you can click it to enlarge):

W3 Total Cache: General Settings / General
In the subsections below you can see more details.
1.1.1. Toggle all caching types on or off (at once)
Default value: Not selected
Recommended value: Not selected
Explanation: Selecting this option simply makes all caching settings on this page selected. In other words, it’s like a command “Select all”. In rare cases one may want to use this command. It’s recommended to configure the settings manually.
1.1.2. Preview mode
This functionality lets you test the W3 Total Cache settings before they are applied. Preview mode is a sort of a staging site for your W3 Total Cache settings.
However, you can use this functionality when you need it (see below for details).
For example, you want to test some settings (e.g. minification). But you don’t want to break your live website if something goes wrong. So, you enable the preview mode and change the W3 Total Cache settings without the fear of breaking anything down. And you can preview your website with these new settings.
Only you as an administrator can see the changes in the preview mode. All other visitors will see your website with old W3 Total Cache settings.
If you are satisfied with the new settings, you can deploy them (apply to your live website). Or, if the new settings are not good, you can disable the preview mode. No changes will be applied to your live website then.
The screenshots with the notes (you can click to enlarge):

W3 Total Cache: General settings / General / Preview Mode

W3 Total Cache: General settings / General / Preview Mode is activated
Preview mode is quite useful functionality, but it’s limited in use. Its main drawback is that you can’t test your website with the new W3 Total Cache settings from a visitor’s position. You can test it only from your administrator account.
Testing your website from a visitor’s position is important since your website may be displayed differently for the administrator and for other visitors due to different caching. Also, testing speed makes much more sense (and much easier and more correct) from a visitor’s perspective, not from an administrator’s account.
That’s why for testing purposes you may want to copy your whole website to a new subdomain or domain. You are welcome to use this tutorial that lets you do it for free.
However, for a quick test Preview mode in W3 Total Cache plugin can be still a good solution.
1.2. Page Cache
Here is a screenshot of the general settings of W3 Total Cache for Page Cache with notes and recommended settings:
W3 Total Cache: General settings / Page Cache
See more details in the subsections below.
Also, in this section you will find recommendations and explanations for the detailed Page Cache settings.
A page of a WordPress website contains dynamic content: PHP scripts, JavaScripts and SQL queries. Executing this dynamic content is very resource heave and takes a lot of time. Page cache allows to form a part of the web page in a static format. It allows to serve the visitors much faster and with less load to server.
With page cache enabled a website content displays faster for a visitor. It’s one of the most efficient ways to improve your website performance.
By the way, the other one super efficient way to make your site faster is utilizing browser cache.
Just in case: page cache is not only about “pages” as a WordPress item, but also about posts, categories, feeds etc. i.e. about content displayed/delivered to a user.
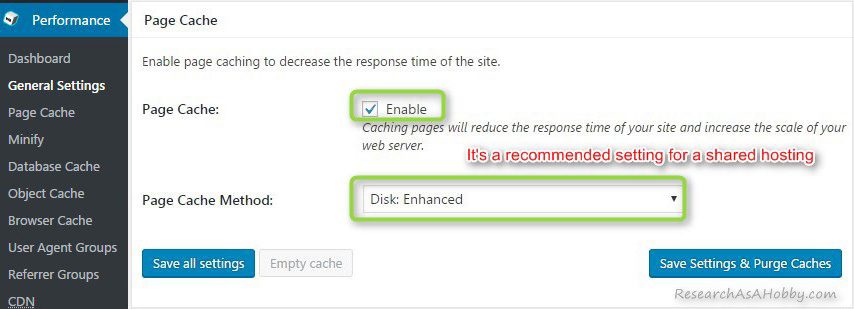
1.2.1. Page Cache
Default value: Not selected
Recommended value: Selected
Explanation: This is one of the core and the most powerful features in the caching plugin. Even with this option alone enabled, it gives your website the most significant speed boost.
By the way, if you enabled Page Cache in the General Settings, then there are more page cache settings for fine-tuning available on Page Cache tab in W3 Total Cache plugin (see this section). But if you don’t want to sink into the detailed settings it’s fine to leave them by default.
1.2.2. Page Cache Method
As mentioned above, Page Cache turns a WordPress dynamic content into a faster static content. And this static content can be placed and served differently.
Here are the options that W3 Total Cache offers:

W3 Total Cache: General settings / Page Cache Methods
Default value: Disk: Enhanced
Recommended value: Disk: Enhanced
Explanation: This is the best option for shared hosting. It gives the most speed increase for your website. By the way, when using a dedicated server or VPS, consider also RAM-based caching options (see below).
Let’s see how the page caching methods differ. This information may seem too technical if you are a beginner user. So, fell free to skip it and go to the next setting of W3 Total Cache.
If you are on a shared hosting, you have two choices:
- Disk: Basic is the option that invokes a PHP script (advanced-cache.php) which does the hard caching job.
- Disk: Enhanced option is the more efficient way of caching. This method does not invoke PHP scripts, but solves the caching task in a much more elegant way by creating a static version of a web page via modifying .htaccess file. It lets your web server deal with a static (cached) version of your web pages directly. Some tests reveal that the Enhanced method makes a website 2.5 times faster compared to Basic method.
Basic caching method can be used on a shared hosting if for some reason Enhanced method can’t be used or Enhanced method gives poor results. For instance, your hosting complains that you consume too much resources using W3 Total Cache. However, in this case I suggest changing your host rather than using Basic caching method.
All these methods are disk-based. It means that a static (cached) version of your website is stored on disk. It requires additional disk space, but it’s not a problem nowadays. And since today’s hostings use fast SSDs, these disk-based caching methods are even more efficient.
RAM-based caching on shared hosting?
Another way of caching is based on RAM. On some advanced shared hosting plans RAM-based caching options can be also available.
Theoretically a RAM-based caching can be more efficient since it puts a cached versions of your website into a server’s shared memory. And it works much faster than when a website is cached on a disk.
However, RAM-based caching may requires a lot of additional RAM (“how much” depends on your website size). And it needs additional monitoring of your RAM performance. That’s why using Disk:Enhanced caching method is the recommended and the most reliable option when using shared hosting.
If you are on a virtual or dedicated server, there are the following caching options:
- Opcode: Alternative PHP Cache (in short, APC and APCu). It’s a performance enhancing extension for PHP. It caches PHP code into a shared memory. Note that APC is outdated and not supported since 2012. APCu is a supported forked version of APC which supports PHP 7. It’s one of the fastest caching methods and recommended in PHP 7 environment.
- Opcode: eAccelerator. It’s a PHP accelerator and optimizer. Basically, the principles of its work is the same as any Opcode options – to cache compiled PHP code. eAccelerator has not been updated since 2012. It makes not much sense to use it with WordPress nowadays.
- Opcode: xCache. In general, xCache used to be the most recommended and beloved Opcode choice for WordPress before PHP 7. Unfortunately, xCache does not support PHP 7 (and it’s likely it will not support it). Since modern hosts migrate to PHP7 to give WordPress sites a significant performance advantage, xCache loses its positions as a generally recommended caching option. You may want to try and test it comparing with APC / APCu option.
- Opcode: WinCache. This caching option is for Windows servers. Anyway, I don’t see any feasible reasons why to use WordPress on a Windows server.
Running WordPress on several servers is arguable, but may be justified in some cases (e.g. for the purpose of load balanced configuration). Here are the caching options in this case:
- Memcached. This is a distributed caching system that makes decreases database load. It’s a reliable and efficient.
- Redis. This is a newer and more sophisticated database caching system. It allows to store data in a wide range of formats. Its performance is comparable to Memcached.
Both options are great and have their specific pros and cons. Memcached is believed to be a simple option that you may want to consider by default. And if you need something special, then Redis comes into play.
1.3. Minify
Minification is the most error-prone setting in many cases because it depends on a particular configuration of your WordPress site’s software. It can’t be set up automatically. So, this topic requires a separate tutorial, especially when it regards fine-tuning your website performance using CSS and JS optimization.
A word of caution
If one day you find you that a design or functionality of your website is broken, then one of the possible reasons is misconfigured minification settings. And this is not about W3 Total Cahce minification settings. It’s about minification/optimizaion of JavaScript, CSS, HTML in general.
If you realize that this chapter will sound too technical for you, don’t worry, you are not alone 🙂 This is one of the most complicated stuff in website performance optimization. And in many ways, there are no set-and-forget settings.
But there’s a good compromise. There are the less risky settings that gives you the best performance improvement. And I will show you how to get it easily.
Anyway, even if you set everything up and it works fine for now, it does not mean it will work fine forever. For example, in future you install or update a plugin or a theme that will not work because of the CSS/JS/HTML minification/optimization settings you made or because of code changes in the updated parts of your website. That’ why minification is something you need to consider in your website troubleshooting all the time.
What is minification?
In a narrow meaning, minification means optimizing your .CSS, .JS files as well as feeds and .HTML code by removing any characters which are not necessary from the source code. For example, line breaks, extra whitespace, comments are removed. And it decreases the size of these files or code and let you website load faster.
Apart from minification itself, some other operations with .CSS and .JS files can be considered under the minification section in W3 Total Cache plugin.
For example, moving calls to CSS and JS files to a different part of the page; inlining the JS and CSS code into HTML code. It helps render the page faster. However, this is not technically a minification, but optimization.
Also, improving rendering above the fold time is also connected with minfication topic. It requires actually a careful CSS and JS optimization. However, it goes out of the scope of this tutorial.
Recommended minification setting in W3 Total Cache
Since I try to simplify the process of W3 Total Caching setup in this tutorial for you, I suggest the following three options which are quite simple and safe:
- Option 1 is simply to disable and ignore minification stuff. If you are a beginner and feel already overwhelmed reading this section, then relax and use this option. You may lose a chance to make your site faster by 10% or so, but at least you don’t get an extra head ache with troubleshooting your website.
- Option 2 and Option 3 give you similar results if you want to use basic minification. A beginner may cope with it quite easily. So, if you consider yourself a beginner, but you feel okay after reading the above information in this section, then go ahead, you can do it. Also, if you have a very busy site, it’s recommended to use Option 3.
- Option 3 (using Autoptimize plugin) is recommended for advanced use for eliminating render-blocking JavaScript and CSS in above-the-fold content. Also it’s recommended for websites with high traffic, since there are opinions that W3TC’s minification is not very efficient on busy sites. I don’t cover Autoptimize in this tutorial though.
Option 1: Simply ignore minification
This is a set-and-forget option. No risk of breaking anything on your website. By default minification is not enabled, so you don’t need to do anything.
By the way, the most well-known alternative to W3 Total Cache plugin, WP Super Cache does not have minification settings at all. And it makes the latter plugin less troublesome (but less efficient at the same time).
The screenshot with the setting (you can click it to enlarge):

W3 Total Cache: General settings / Ignore minification (the safest option)
Default value: Not selected
Recommended value: Not selected
Explanation: This is one of the most troublesome features in the caching plugin. To be on the safest side it’s recommended to keep it disabled. Enabling it requires testing (see below).
Option 2: The safest try – minify CSS and then JS
You can enable one or two the most basic (and the safest) settings: CSS and JS minification/combining. According to the plugin authors, it can give you upto about 10 percent percent speed improvement (and better Google PageSpeed Insight rank). There’s a risk that it will break your website design or functionality of your theme or plugins. Especially it’s javascripts what brings harder-to-find issues in the optimization process the most often.
To mitigate the risks you will need to check if your site is fine after you save these minification settings in W3 Total Cache. I also recommend enabling CSS and JS minification separately one after another and each time checking if your site is not broken.
So, I suggest doing these steps:
1. Enable Minify setting in the General Settings:
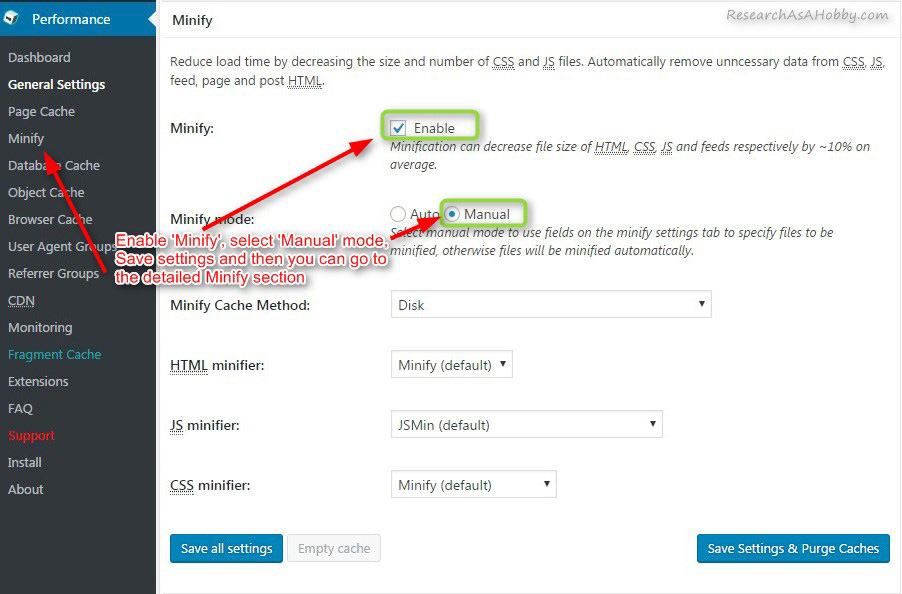
W3 Total Cache: General settings / Minify / Enable
Default value: Not selected
Recommended value: Selected
Explanation: Although it’s one of the most troublesome features in the caching plugin, it requires just a bit testing to find out if it works well for your site effortlessly. Se the steps below for additional information.
Leave other settings in the Minify section as shown on the screenshot above.
2. Enabled CSS minification (go to the Minify section in the Performance dashboard). Also, feel free to leave all other CSS minificaion-related settings by default (especially if you are on a shared hosting).

W3 Total Cache: Minify / CSS / Enabled
Default value: Selected
Recommended value: Selected
Explanation: This setting is valid only if Minify option on the General Settings tab is enabled (see previous step)
3. Enabled Javascript (JS) minification (it’s also in the Minify section in the Performance dashboard). You can leave other settings in this section by default.
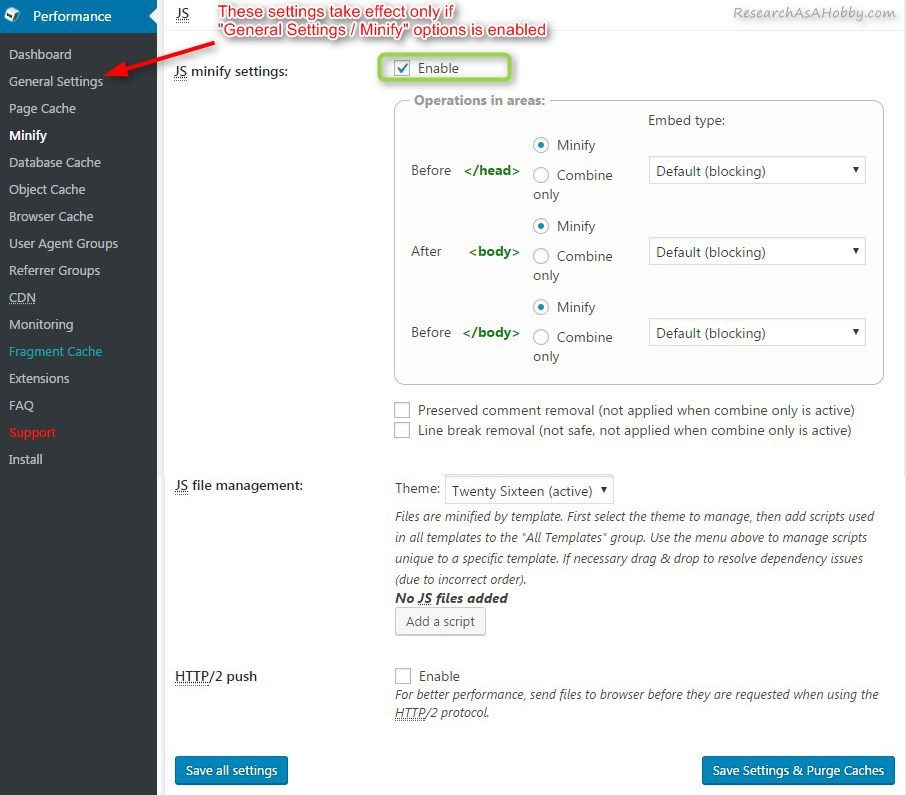
W3 Total Cache: Minify / JS / Enabled
Default value: Selected
Recommended value: Selected
Explanation: This setting is valid only if Minify option on the General Settings tab is enabled (see previous step)
4. Check if your website is fine. To do that open your website in a new browser window in incognito or private browsing mode to avoid interference of previous sessions.
If you find out that your site stopped functioning as expected (e.g. your site’s design is broken or some plugin stopped working correctly), then simply disable JS (see Step 3) or/and CSS minification (see Step 2). After you disable the setting(s) don forget to save the settings and purging the caches. Disabling CSS or/and JS should bring your website back to normal again.
If neither CSS or JS minification works for you, then you can simply use Option 1 (i.e. disable minification at all).
Other settings in Minify section are for more advanced use. And I don’t cover them in this W3 Total Cache tutorial. A separate special tutorial on CSS and Javascript optimization would be a better place for this stuff. Anyway, with the current option (Option 2) you already have a good portion of what you could get from minification after all.
Option 3: Disable minification in W3 Total Cache and enable in Autoptimize plugin
Autoptimize is a free plugin, It is a neat and efficient way of managing minification of your WordPress site.
This option goes out of scope of W3 Total Cache settings. However, it’s one of the most favorite ways if dealing with minification of many WP users. Dealing with advanced minification is more efficient and easier with Autoptimize than with W3 Total Cache.
Users also love to use Autoptimize plugin to eliminate render-blocking JavaScript and CSS in above-the-fold content. It’s an advanced technique though. And it’s not recommended for beginners.
To use Autoptimize, you need to disable minification in W3 Total Cache (see Option 1).
In this tutorial I will not go in details how to setup or use Autoptimize in an advanced mode. But I’ll mention about basic Autoptimize setup process. It’s pretty simple and very similar to Option 2, i.e.:
- Disable Minify option in W3 Total Cache plugin.
- Install and activate Autoptimize. By default JavaScript and CSS will be optimized with basic default settings.
- Clear all caches (in both W3 total Cache and Autoptimize).
- Open a new a new browser window in incognito/private browsing mode and see if your site is fine.
- If your there’s something wrong with your website, disable JavaScript optimization, then repeat step 3 and 4 (clear caches and test your site).
- If still your site is broken, then you have two options. Either go into advanced Autoptimize settings and exclude specific CSS/JS from optimization (it’s not for total begginers though). Or just delete/disable the Autoptmize plugin and ignore JS/CSS/HTML optimization.
And if your site is fine, then you can go a bit further and enable HTML optimization in Autoptimize.
Also don’t forget to test if your site works as expected after this.
1.4. Opcode Cache
WordPress software is written in PHP programming language. Opcode Cache precompiles PHP and stores it in the shared memory. It makes your website much faster, especially if it’s a large and busy website.
On shared hosting this option is unlikely to be available.
However, from the version PHP 7 Opcode Cache is included in the language itself. And it makes closer that day when all WordPress sites will be running in PHP 7 environment.
The good news is that WordPress itself is already compatible with PHP 7. And theoretically any WordPress site can migrate to a more efficient PHP 7 and benefit from a better performance. But one of the practical problem is that far not all plugins and themes are compatible with PHP 7. And it makes impossible for a lot of WordPress sites move to a PHP 7 environment even if a hosting allows it. Anyway, this is the topic for another article.
As regards using Opcode Cache on your website, the recommendation is simple – use it if it’s available on your hosting. If it’s available, Zend Opcache is more preferable (since it’s more reliable and performant) than Alternative PHP cache (APC / APCu).
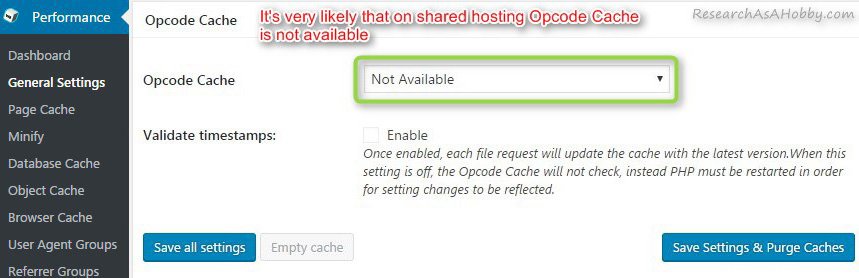
W3 Total Cache: General Settings / Opcode Cache
Default value: Not available
Recommended value: Zend Opcache
Explanation: Zend Opcache is more reliable and efficient. However, on a shared hosting it’s likely that Opcode Cache is not available at all.
As regards Validate timestamps setting, when it’s enabled, PHP files are checked whether they have changed. And if they have changed the new version of PHP files is compiled and put into the Opcode Cache.
So, if your PHP code is not supposed to change very often, then it’s better to disable this option. But if you are developing and changing PHP code, then you should enable this option.
By the way, here’s more technical information about Opcode Cache and how it works.
If you don’t do PHP development, you don’t need to enable Validate timestamps setting. But each time when you update your WordPress or update/install a plugin or your theme you need clear all cache (including Opcode cache) via W3 Total Cache plugin.
Default value: Not selected
Recommended value: Not selected
Explanation: Selecting this option makes sense on a development environment.
1.5. Database Cache
WordPress website utilizes database quite a lot. And database caching allows to decrease database usage. Database caching allows to cache database request results.
Database caching can make your site faster if the time needed to get data from the database is more than the time needed to get data from the cache.
So, if you are on a shared hosting, then RAM-based caching is likely to be unavailable for you. And disk-based caching is not that efficient. In other words, if you are on a shared hosting, it’s recommended not to use database caching.
Moreover, using disk-database caching (on a shared hosting) can make your site slower. This is so because getting data from the database can be faster than getting cached data from the disk.

W3 Total Cache: General Settings / Database Cache
Default value: Not selected
Recommended value: Not selected
Explanation: On shared hosting database caching on disk may may your site slower.
By the way, if you enabled Database Cache in the General Settings, then there are more database cache settings for fine-tuning available on Database Cache tab in W3 Total Cache plugin (see this section). However by default the detailed Database Cache settings are fine. You can leave them as is.
To get some real-life data on an average shared hosting, I’ve tested my website’s database speed. I did fifty tests using Query Monitor plugin to estimate database performance of my website. And I found out that the average time it takes to get data from the database is less than 0.05 (zero, point, zero, five) seconds, whereas the full page loading time was more than three seconds. Obviously, it absolutely did not make any sense to bother about database caching in my case. (FYI: my site’s size is 700 MB, database’s size is 50 MB, the tested page had 75 database queries).
Of course, it may turn out that getting data from the database on your hosting may take some more time. But anyway, if you have a more or less typical WordPress site on a shared hosting, it’s very unlikely that the database is the bottleneck of your website performance.
However, if you are on a VPS or a dedicated server, then using RAM-based database cache can be justified. By the way, in this case using Object Cache (see the next section) which also caches database queries can be more advantageous.
1.6. Object Cache
Object Cache allows to get data from the database more efficiently. Its purpose is similar to what Database Cache does. But compared to Database Cache, Object cache is more efficient as it allows to process fewer requests.
As a rule of thumb, Object Cache is not worth using on shared hosting for the same reason as Database Cache, i.e. database is often not the performance bottleneck, but disk input-output operations.

W3 Total Cache: General Settings / Object Cache
Default value: Not selected
Recommended value: Not selected
Explanation: On shared hosting object caching on disk may may your site slower.
However, like Database Cache, it can be beneficial to use if you are on VPS or dedicated server, get a lot of traffic, have a lot of comments. Also, if you know that database is the bottleneck of your website performance, then Object Cache (like Database Cache) is beneficial to use. But in this case it’s recommended to use Opcode, Memcached or Redis options. I described them above.
If you enable Object Cache, there are more settings on Object Cache tab that you can use for fine-tuning. But you can also leave them by default if you don’t want to mess up with it.
1.7. Browser Cache
Browser Cache is one of the most efficient options a caching plugin can offer. Its power in moving a part of your website such as stylesheets, javascripts, images and HTML pages to a visitor’s browser when the visitor opens your website the first time. And thanks to that your visitor’s browser doesn’t need to download this data again. And it means fewer requests to your server.
It makes the visitor’s browsing experience much faster. Opening other pages of your website and especially visiting the pages the visitor already visited become very fast.
Browser Cache is highly recommended to use.
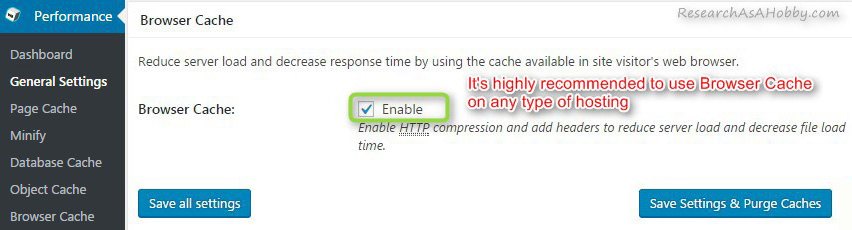
W3 Total Cache: General Settings / Browser Cache
Default value: Selected
Recommended value: Selected
Explanation: This option makes your website faster by caching data in your visitors’ web browsers. Highly recommended.
If you enable Browser Cache, there are more settings on Browser Cache tab that you can use for fine-tuning. But you can also leave them by default if you don’t want to mess up with it.
1.8. CDN
CDN, or Content delivery Network, is a separate topic that is worth another article.
CDN improves website performance by storing static files (CSS, JavaScripts, images, download files) on different servers distributed around the globe. It allows to serve your visitors faster by keeping some static resources of your website closer to the visitors.
Generally, it’s recommended to use CDN. But it’s not free. And not always it brings you any speed benefits.
How much does faster do CDN make your website? It depends on many factors including your hosting server location, on your visitors location, on your traffic, on how many images you use, on your images size, on your hosting speed. But in general, if your website is quite typical (not very popular, not many images) then you may not even notice difference in speed with CDN compared to without CDN.
Also, if you are on a shared hosting, or have a limited budget, then using CDN may be too expensive and not justified for you.
However, if your websites has a ton of visitors, CDN is a great way to reduce bandwidth, parallel requests to static resources of your website and thus make your site faster.
By the way, I would avoid free CDN plans as they can bring more issues than benefits. However I have not used free CDN plans myself; I’ve analyzed reviews of the advanced users.
Besides, CDN may filter out malicious traffic to your website, e.g. protect you from DDoS attacks and even hacking bots. From this perspective, Sucuri Firewall which I use is the most outstanding product for a low budget (I’ve got a review of it in the article in which I compare website security products). As a great bonus I get a nice speed improvement (here’s my research on it)
As a resume:
- Use CDN if you can afford it.
- Using CDN on a low-traffic or not profitable website may be not that attractive considering the cost of a CDN service. Using a better hosting instead can make your site much faster for less price.
- CDN is efficient on high-traffic websites, on websites with pages which have a lot of static resources (first of all, if you a have a lot of images).
- CDN can also play a role of a additional security layer for your website (depends on CDN provider).

W3 Total Cache: General Settings / CDN
Default value: Not selected
Recommended value: It depends
Explanation: If you can afford getting a CDN service, it’s recommended to use one. But it’s not always justified due to relatively high costs and possibly no or little speed improvement.
Detailed setting and connection parameters to your CDN service are located on CDN dashboard tab.
1.9. Reverse Proxy
This section may be too technical if you are a beginner user. In this case just leave the W3 Total Cache setting of Reverse Proxy by default. It’s more than very likely that you will not lose anything.
Anyway, you are welcome to read this section, especially if you want to become a more advanced WordPress user.
Okay, if you keep on reading, here we go.
Speaking simply, a reverse proxy is a proxy server that retrieves resources from one or multiple servers and provides the data to a user visiting your website.
In other words, it’s an intermediate layer between your website and a visitor. Reverse Proxy is useful for the following reasons:
- It can make your site faster by compressing and caching the entire content of your website. Reverse proxy caches not only static content (like a CDN does), but also dynamic content.
- It can distribute your website load between multiple servers.
- It can be an additional security level for your website.
- It can provide other functionality (e.g. integrating with external systems; displaying a version with correct language in multilingual website depending on a client IP geolocation; performing A/B tests on different versions of your site etc).
However, these options depend on the reverse proxy server configuration and options, not on W3 Total Cache settings. I.e. if your hosting provider includes a reverse proxy functionality, then you can benefit from it.
By the way, reverse proxy for WordPress sites is often based on Varnish Cache. And Varnish Cache is the technology that is likely to lose its popularity. One of the reasons is that Varnish Cache does not support SSL.
Alternative to Varnish Cache which is based on Apache server is using NGINX as a reverse proxy. In this case Apache server will serve WordPress (web server back end), and NGINX will serve as a reverse proxy (static web server front). It gives the best of the two worlds – better performance and still easy WordPress configuration.
- WP Engine (my short review) has developed EverCache architecture which utilizes NGINX to speed up and scale websites.
- A2 Hosting (my short review) benefits NGINX-based architecture for better performance of the hosted websites. There’s also efficient pre-configured plugins (A2 Optimized and A2 Optimized Site Accelerator) which are designed specifically for this host.
And now back to W3 Total Cache settings of reverse proxy. It just allows to specify reverse proxy servers for your website:

W3 Total Cache: General Settings / Reverse Proxy
Default value: Not selected
Recommended value: Yes (if your hosting offers this)
Explanation: It’s unlikely that a shared hosting offers Reverse Proxy option based on Varnish Cache. But if it’s available, it’s recommended to use it. Alternatively you may want to benefit NGINX-based reverse caching (see above).
1.10. Monitoring
W3 total Cache can integrate with a third party performance monitoring service called New Relic. This is a paid service which is very unlikely to be available for integration on shared hosting.
If you use a VPS or manage your own hosting environment then you may want to use New Relic, but I don’t give you any recommendation about it in this article.
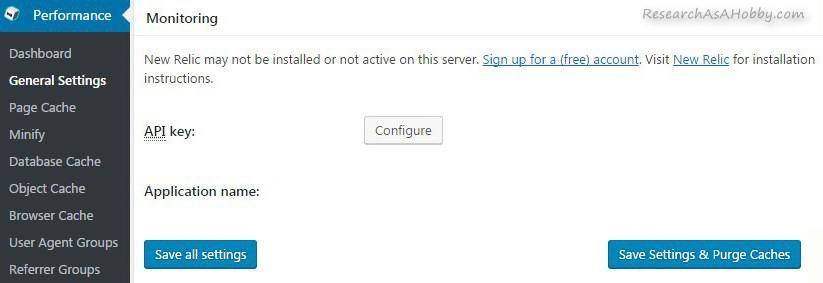
W3 Total Cache: General Settings / Monitoring
Default value: Not configured
Recommended value: It depends on your needs and budget.
Explanation: It’s very unlikely that a shared hosting offers integration with New Relic service. And if you use VPS or Dedicated server, make decision on you own if you want to use it.
1.11. Fragment Cache
It’s not very likely that you will need Fragment Cache. It is usually developers who are interested in this functionality.
Basically, Fragment Cache is a intermediate caching technique that is less global than full page caching, but more than no caching. I described full page caching above and this is the recommended option in most cases.
Technically, Fragment Cache allows to cache specific pieces of PHP code. These pieces are supposed to be the most heavy ones. And a developer may want to use Fragment Caching rather than simply Page Caching for specific reasons. For example, optimizing what is cached, manipulating size or time of living of the cache.
To put it simply, a practical use of Fragment Cache is when a part of a page remains dynamic whereas the most of the page is cached. In other words, Fragment Cache can be used when Page Cache can’t be used.
Anyway, if you are not a developer-level user trying to optimize caching of your particular theme, then it’s recommended to ignore Fragment Cache.
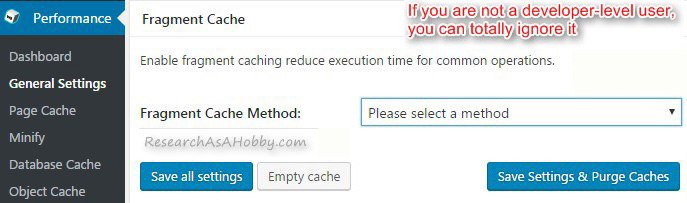
W3 Total Cache: General Settings / Fragment Cache
Default value: Not enabled
Recommended value: Not enabled.
Explanation: If you are not a developer-lever user, you can ignore this option.
Besides, there’s Late Initialization option that is connected with Fragment Cache.
If you’re a developer or dealing with your WordPress theme or a plugin coding, be aware that WordPress functions will not be available if Fragment Caching is used.
By the way, additional features of Fragment Cache are available in W3 Total Cache Pro version.
1.12. Licensing
You need this setting if only you’ve purchased a Pro version of W3 Total – Cache. Otherwise, simply ignore it.

W3 Total Cache: General Settings / Licensing
Default value: Not specified
Recommended value: Not specified
Explanation: Ignore this if you use a free version of the plugin.
1.13. Miscellaneous
Here is a screenshot of the general settings of the whole Miscellaneous section of W3 Total Cache with notes and recommended settings:
All settings in this section are recommended to leave by default except anonymous tracking which can be disabled.
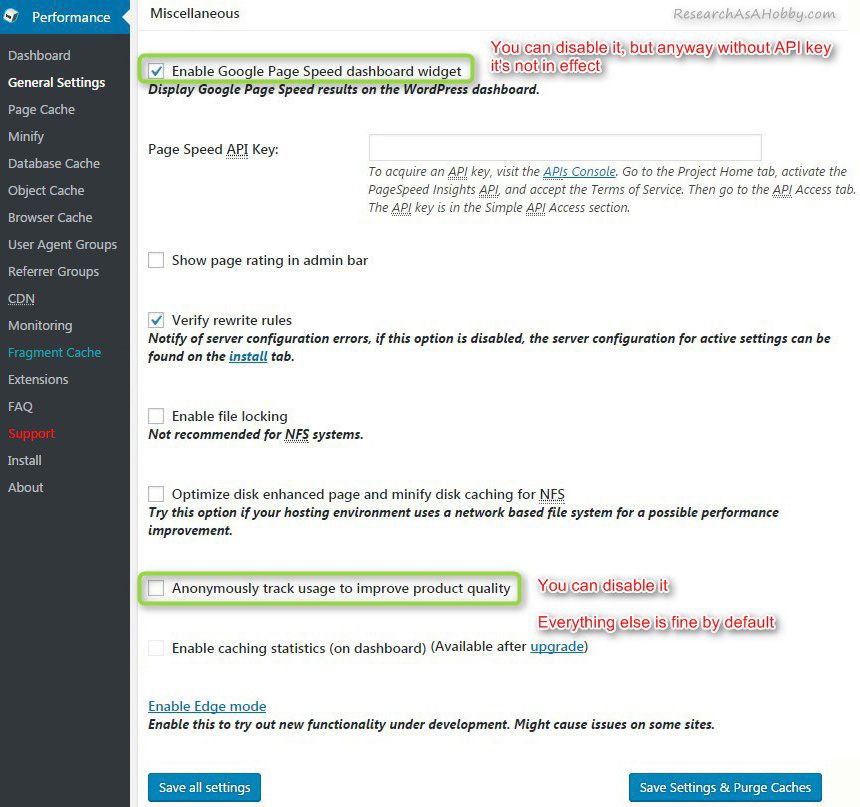
W3 Total Cache: General Settings / Miscellaneous
Below you can find more information regarding each of the settings displayed on the image above.
1.13.1. Google Page Speed dashboard widget and Page Rating
This option allows to display results of your website performance tests inside your WordPress dashboard. T e tests are run using Google PageSpeed Insights.
In general, I don’t recommend using it unless you have a clear purpose to use it. This is an additional functionality that adds up to your WordPress administrator interface. And thus, it can slow down your website.

W3 Total Cache: General Settings / Miscellaneous / Page Speed widget and Page Rating
Default value: Enabled
Recommended value: Leave as is.
Explanation: Ignore this. Anyway, without API Key this setting has no effect.
Default value: Not specified
Recommended value: Not specified
Explanation: Since you don’t want to use this functionality, you don’t need to specify this API Key. Leave it as is.
Default value: Not selected
Recommended value: Not selected
Explanation: Ignore this. Anyway, without API Key this setting has no effect.
1.13.2. Verify rewrite rules
This option allows to notify you in your WordPress dashboard if your rewrite rules are missing in the .htaccess file. These rules are needed for W3 Total Cache proper functioning, as well as for many other things.
It’s recommended to keep this option enabled. It does not affect your website performance.

W3 Total Cache: General Settings / Miscellaneous / Verify rewrite rules
Default value: Selected
Recommended value: Selected
Explanation: This option checks if the .htaccess file contains the code which is required for proper server configuration and W3 Total Cache functioning. And it warns you if the code is missing.
1.13.3. Enable file locking
Generally, file locking is a mechanism that can restrict multiple processes or users to access the same file at the same time. It can be useful on very busy sites to avoid access conflicts. However, enabling it can cause file access issues of a different nature. As a ordinary user (especially on a shared hosting) you can ignore this setting and leave it disabled.

W3 Total Cache: General Settings / Miscellaneous / File locking
Default value: Not selected
Recommended value: Not selected
Explanation: You may consider this setting only on websites with a lot of simultaneous traffic. Ignore it if you are on a shared hosting.
1.13.4. Optimize disk enhanced page and minify disk caching for NFS
This option is recommended to select if only you use hosting based on network file system (NFS). It can be a case if you are hosting at Amazon Cloud or trying to use multiple servers for load balancing or scaling.
Otherwise, just ignore this setting and leave it unselected which is a default option.

W3 Total Cache: General Settings / Miscellaneous / Optimize disk enhanced page and minify disk caching for NFS
Default value: Not selected
Recommended value: It depends (but in most cases ignore it)
Explanation: This can be beneficial if your hosting is NFS-based. Anyway, if you have never heard about NFS before, then it’s more than likely that you don’t need this option.
1.13.5. Anonymously track usage to improve product quality
If you want to help W3 Total Cache team (W3 Edge) improve the plugin, then you can leave this setting selected. This sends your plugin usage data to the developers. It should not make your site noticeably slower.
However, you have a choice to opt out.
To be honest, I prefer to opt out this option on my production websites just in case. And I leave it by default (i.e. selected) on my tests sites.
W3 Total Cache: General Settings / Miscellaneous / Anonymously track usage to improve product quality
Default value: Selected
Recommended value: it’s up to you
Explanation: If you leave this option selected, the plugin is supposed to send some usage data to W3TC developers. This should not affect your website performance to a noticeable extent.
1.13.6. Enable caching statistics (on dashboard)
This option is available on a paid version of W3 Total Cache.
Default value: Not available
Recommended value: It depends
Explanation: If you have a Pro version of W3 Total Cache, you may want to enable this option to see the statistics. Otherwise, ignore it.
1.13.7. Edge mode
If you need to use a new feature of W3 Total Cache which is not in an official release yet, then enabling Edge Mode will give you this opportunity. I don’t recommend using this option unless you have a clear purpose of using a new feature which is still under development or not tested enough.

W3 Total Cache: General Settings / Miscellaneous / Edge mode
Default value: Not enabled
Recommended value: Not enabled
Explanation: Ignore this option, unless you want to trynew plugin features which have not been tested well enough.
1.14. Debug
This option allows to add information about particular caches at the end of the source code of your website’s pages. This can be useful as a source of a debug information.

A sample of a W3TC cache debug information
This makes your site slower.
If you are not a developer or advanced user, ignore this functionality (leave everything by default).
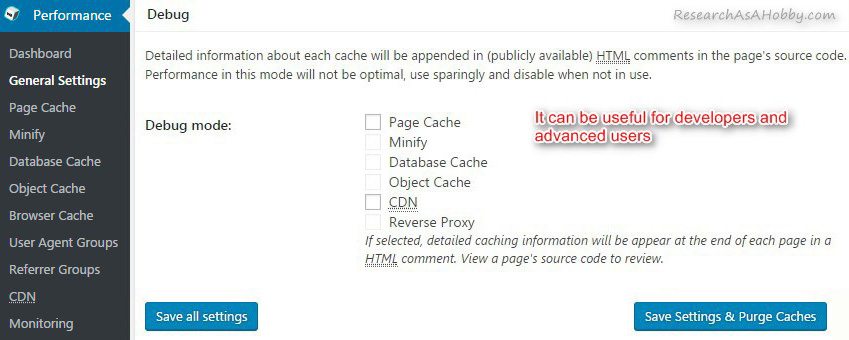
W3 Total Cache: General Settings / Debug
Default value: Not enabled
Recommended value: Not enabled
Explanation: Ignore this option, unless you want to trynew plugin features which have not been tested well enough.
Also, a system information available via Compatibility Check can provide useful debug information as well.
By the way, if you are interested in this functionality, you may want to use it not on your live website, but on its copy. You can create a copy (a clone) of your website on a new subdomain or domain for free this way.
1.15. Import and Export Settings
This is a service functionality for W3 Total Cache. You can export your W3TC settings to a file. And then import them back if you don’t like the new settings.
Also, you can use someone else’s settings to avoid the step-by-step process of setting up W3 Total Cache plugin by yourself.
By the way, in the download section below you can use my pre-defined W3 Total Cache settings that you can import.
There’s also Restore Default Settings option that you can use if you want to set up W3 Total Cache from scratch.
That’s it with General settings! In fact, this can be enough and your website is already good to go. Good job! However, if you want to dig deeper and fine-tune your website performance considering your website particularities, you are welcome to see more detailed W3 Total Cache settings. I explain them in the chapters below.

W3 Total Cache: General Settings / Import and Export Settings
Explanation: Use it to export your active settings to a file, import settings from a file or revert to a default W3 Total Cache settings.
2. Page Cache
Now I’ll explain the detailed settings of Page Cache for W3 Total Cache plugin. The general settings I’ve explained in the section above.
Page Cache settings in this section take effect if only you enabled Page Cache in the General Setting.
Let’s look at Page Cache setting closer in the sections below.
Here are the screenshots with notes with all the recommended detailed Page Cache settings for W3 Total Cache plugin. The images are combined from the below subsections.
Let’s see the subsections in details.
2.1. General
It’s recommended to leave all the general Page Cache settings as is, i.e. by default, except one setting. In most cases you may want to enable Cache feeds option which is not enabled by default.
Here’s the screenshot with the recommended Page Cache settings for W3 Total Cache:
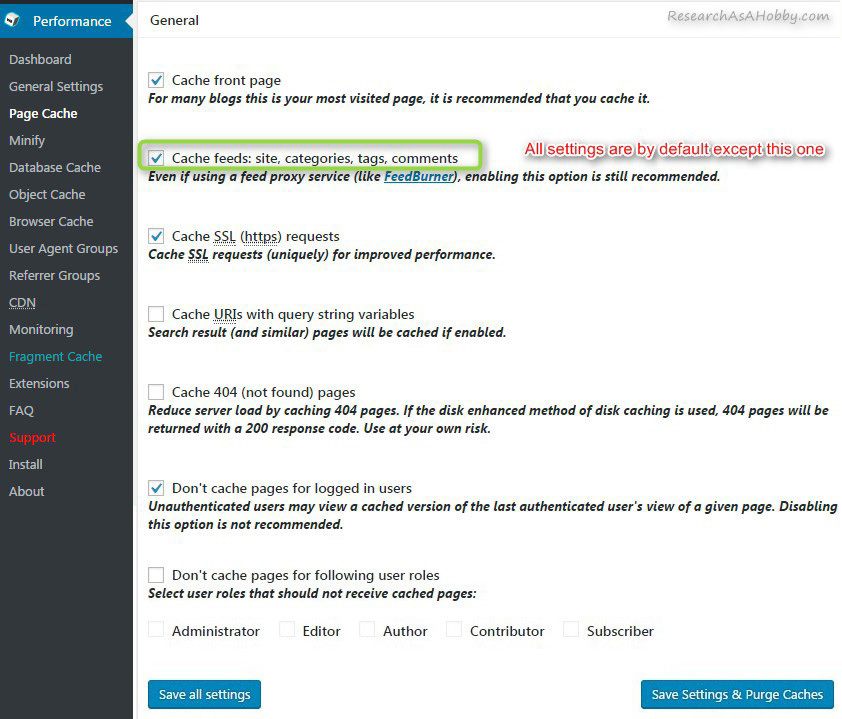
W3 Total Cache: Page Cache / General
Below I explain briefly each of the individual settings of the General Page Cache section.
2.1.1. Cache front page
In most cases it’s recommended to cache your front page.

W3 Total Cache: Page Cache / General / Cache front page
Default value: Selected
Recommended value: Selected
Explanation: Only in specific cases you don’t want to cache your front page.
However, in some cases you may want to disable front page caching. For example, there are some elements on your front page that refresh too often (or are random) to be cached. For instance, it can be images or logos which should not be cached to display properly.
2.1.2. Cache feeds: site, categories, tags, comments
Your website feeds contain the latest updates of your site content. And although feeds don’t make much buzz as they used to do, they are still a part of a website infrastructure and widely used by RSS readers and web crawlers. And it’s recommended to cache feeds to decrease the server load.

W3 Total Cache: Page Cache / General / Cache feeds
Default value: Selected
Recommended value: Selected
Explanation: If you don’t have a specific purpose to disable it, it’s recommended to keep it selected.
2.1.3. Cache SSL (https) requests
If you use SSL, then this option is recommended. SSL is becoming more and more popular. So, keeping it enabled is recommended. And if you don’t use SSL at the moment, it’s safe to when it’s enabled.
Also, it’s recommended to cache SSL requests when some of your pages are secure (https) and some pages are ordinary (http).

W3 Total Cache: Page Cache / General / Cache SSL (https) requests
Default value: Selected
Recommended value: Selected
Explanation: It’s recommended to keep it enabled even if you don’t use SSL.
By the way, unique caching means that W3 Total Cache cahces up to two versions of a page: non-secure (http) and secure (https).
Anyway, if you don’t want to cache specific SSL pages (e.g. with a shopping cart), you can keep “Cache SSL requests” enabled, but exclude the pages at this setting.
2.1.4. Cache URIs with query string variables
Not going into technical details, an example of URI with query string looks like this:
example.com/over/there?name=parameter
Such request structure can be used for logically defined operations such as searches, filters, sorting. If a user performs these operations very often with specific parameters, then it makes sense to cache such requests.
For example, you’ve got a popular website about mobile devices. And there’s a search form on your site. You know that your visitors search for “android” very often. So, when a user requests “android” in the search box, a query string may look like this: “?search=android”. In order to make the search faster, it makes sense to cache the search results. And selecting “Cache URIs with query string option” can be helpful here.
By the way, Cache URI’s with query string option is disabled if you use Disk: Enhanced page caching method. So, if you are on a shared hosting and need caching URIs with caching strings, select Disk: Basic page caching method.
Anyway, the cases when it’s worth caching URIs with query strings are not so often as it may seem. In most cases the operations which require query strings are not frequent. Moreover, the required Disk: Cache page caching option instead of Disk: Enhanced is rarely justified.
Possible alternatives to URIs caching with query strings, in case you want to cache database-intensive requests, can be Object cache or Database cache.

W3 Total Cache: Page Cache / General / Cache URIs with query string variables
Default value: Not selected
Recommended value: Not selected
Explanation: It’s recommended to keep it disabled. Only if the searches, filters, sorting etc are with the the same parameters and very frequent, then it makes sense to try using this option.
2.1.5. Cache 404 (not found) pages
The point of page caching is to make the pages load faster. From this perspective, 404 error pages generated as a result of a broken link or a wrong URL could also be cached.
But on the other hand, these error pages are not regular pages. And they are more like errors which you should fix (in case of broken links) or handle properly (e.g. making a custom user-friendly and creative 404 error pages for wrong URLs). Also, there should be not many 404 error pages hits on your website. Visitors are not supposed to hit the error pages often.
Besides, caching errors does not sound like a good idea to me in general.
So, by default it’s not worth caching 404 error pages.

W3 Total Cache: Page Cache / General / Cache 404 (not found) pages
Default value: Not selected
Recommended value: Not selected
Explanation: It’s recommended to keep it unchecked. Error pages are not regular pages and should be handled specifically for better user experienced rather than cached.
2.1.6. Don’t cache pages for logged in users
It’s recommended not to cache pages for logged in users. The reason is that some users experience a buggy behavior when pages are cached for logged in users. Admin bar may appear for visitors who are not logged in. This is still not fixed, and the description of the option explicitly warns you about it:

W3 Total Cache: Page Cache / General / Don’t cache pages for logged in users
Default value: Selected
Recommended value: Selected
Explanation: It’s recommended to keep this option selected. Caching pages for logged in users may lead to unwanted behavior.
In case you have a membership site, you want to cache pages. In this case, it makes sense to use another caching plugin.
2.1.7. Don’t cache pages for following user roles
This option makes sense to use if previous option (“Don’t cache pages for logged in users”) is disabled. If you left the previous option enabled, then no logged in users will get cached pages. And this option can be let unchecked. See the recommended selection:

W3 Total Cache: Page Cache / General / Don’t cache pages for following user roles
Default value: Not selected
Recommended value: Not selected
Explanation: The previous option (“Don’t cache pages for logged in users”) keeps you covered and makes using this option redundant. But if you want more granual control, this setting can be used instead of the previous one.
2.2. Aliases
This W3TC option can be useful to you if you have multiple domains which “link” to the same WordPress installation. For example, you have yourdomain.com (where your WordPress website is actually installed) and yourdomain.net (where a user sees the same website content as at yourdomain.com). And visitors can see in their browsers any of the domain names. It looks to a user as if there are two identical websites. But there’s only one WordPress installation. And technically, both domains are mapped to one WordPress installation.
In this case this W3 Total Cache setting can help you set up the caching.
So, if you use alias hostnames, you can use this W3TC setting. Otherwise, just ignore it.
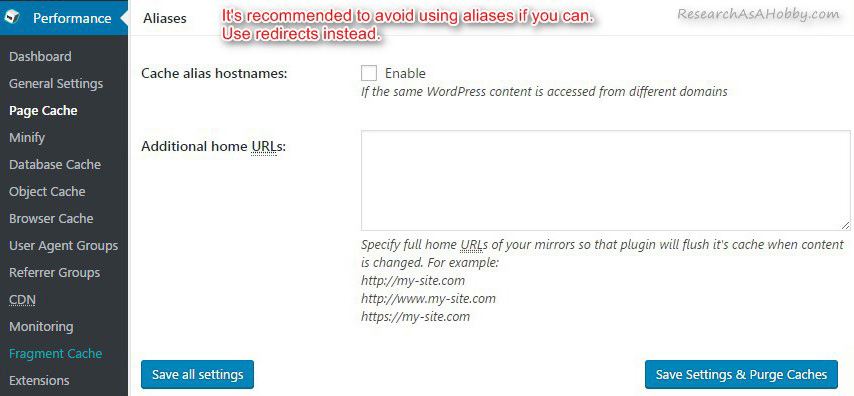
W3 Total Cache: Page Cache / Aliases
Default value: Not selected
Recommended value: Not selected
Explanation: Even if you have multiple domains, use 302 redirects instead which is simpler and safer for SEO.
Default value: Empty
Recommended value: Empty
Explanation: Again, I suggest using redirects instead of aliases (mirrors).
Anyway, if you have multiple domains and one WordPress installation, I’d recommend using 302 redirects using simple .htaccess directives instead of domain mapping. So that when visitors enter any of your domain names or home URLs (e.g. yourdomain.com, yourdomain.net, www.yourdomain.com or www.yourdomain.net), they would be redirected to your primary canonical domain (e.g. yourdomain.com). Using redirects is simpler to manage and much safer for your SEO to avoid duplicate content.
2.3. Cache Preload
Before I go to recommended settings for the Cache Preload section of W3 Total Cache plugin , let me explain briefly what cache preloading is.
When a visitor opens a page which has never been opened before (or have not been opened after you cleared/emptied the cache) it takes a long time to load the page the first time. The reason is that it needs time to “fill” the cache first. And only then the cached page is delivered fast to the visitor.
The process of such “filling” the cache is called cache preloading. And “to prime the cache” is another way to say “to preload the cache”.
So, if automatic preloading (priming) the page cache is not enabled, then the first visitor experience slow page speed loading. And only subsequent requests or other visitors will get fast page speed loading.
In other words, page cache helps to make your website faster for all visitors but the first one. And preloading the page cache helps to make your website faster even for the first visitor of a page (a post).
Now let’s see what the setting “Preload the post cache upon publish events” does for you.
As you update or publish a new post (or a page), the cached version of this post which makes the loading speed faster is not created yet. The cached version of the post is created as soon as the first visitor visits this post. So, the first visitor will experience a slow page loading (because it takes time to create a cached version of the page). And other visitors of this page will experience faster page loading (because the cached version of the page is already created).
If you want this post be fast even for the first visitor, enable “Preload the post cache upon publish events” setting.
Now let me explain “Automatically prime the page cache” option to you.
As its name says, it automatically primes (preloads, fills) the cache of the pages.
Why would you need it? Here are examples:
- You cleared/emptied/purged the cache of all the pages.
- You have not used the W3 Total Cache cache plugin before.
- You migrated your website to a new (sub)domain.
- You restored your website from a backup.
- Other cases when page cache becomes cleared or outdated.
Okay. But why can’t you prime (preload, fill) the page cache for all the pages at once?
It’s so because this operation is quite server resources heavy. And if you had the option to preload the page cache for the whole website at once, then it could knock down your server. That’s why the W3TC plugin offers the option to preload the page cache in batches of a certain number of pages with intervals between processing the batches.
As regards a sitemap, it’s used as a source of the pages to cache and to prioritize the order how the pages will be cached.
Alright, and here goes the recommended settings of Cache Preload section for atypical shared hosting users:

W3 Total Cache: Page Cache / Cache Preload
Default value: Not selected
Recommended value: Selected
Explanation: If you want to improve performance of your website for the first visitor in the cases when the page cache was cleared/outdated, this is a recommended setting.
Default value: 900 seconds
Recommended value: 900 seconds
Explanation: The default value is a safe choice for most cases including a shared hosting. The smaller the interval is, the faster your website’s page cache will be primed, but the more frequently your server will be loaded with caching preloading.
Default value: 10
Recommended value: 10
Explanation: The default value is a safe choice for most cases including a shared hosting. The bigger the number of pages per interval, the faster your website’s page cache will be primed, but the more your server will be loaded during caching preloading sessions.
Default value: Not specified
Recommended value: Your sitemap URL (it may look like http://yoursite.com/fitemap.xml)
Explanation: Sitemap provides the list and the order of the pages of your site to be cached.
Default value: Not selected
Recommended value: Selected
Explanation: It lets prime automatically the cache for the page (or the post) which is published or updated.
2.4. Purge Policy
When you publish a new post, edit existing post or someone adds a comment, the new data is saved into the WordPress database. In order to make this new data visible for your visitors, the page cache of the changed pages should be “refreshed” (purged). And then the page cache can be either preloaded (see this section) or simply loaded the normal way as a visitor opens that page in his/her browser.
Another point is that when you create or modify a page, not only that page is affected. But also other pages may be affected. For example, archive posts and front page are also often affected.
So, the process of “refreshing” (purging) the page cache after you add or modify a post may affect several pages. And the Purge Policy section of W3 Total Cache contains settings to deal with it.
Here are the recommended settings for the whole Purge Policy section. By the way, you don’t need to change anything there, all the settings are fine by default as on the screenshot below (you can click it to enlarge):
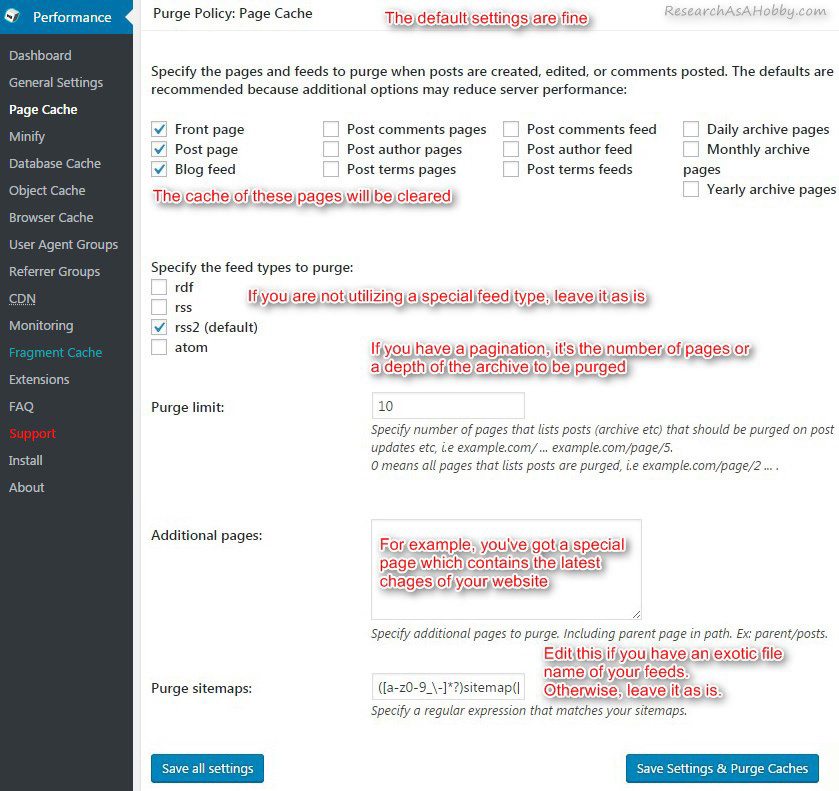
W3 Total Cache: Page Cache / Purge Policy
Default value: Items selected: Front page, Post page, Blog feed
Recommended value: Items selected: Front page, Post page, Blog feed
Explanation: The defaults are recommended. If you don’t have a specific functionality that requires purging other pages, leave it as is.
Default value: rss2 (default)
Recommended value: rss2 (default)
Explanation: If you use a specific syndication, then you may want to select it. Otherwise, the default is fine.
Default value: 10
Recommended value: 10
Explanation: This setting is needed if you selected additionally feeds, archive pages etc in the above setting (“Specify the pages and feeds to purge…”). If your website has tons of posts, it’s not recommended to set this value to “0” (purge all pages). Otherwise it may load your server too much.
Default value: Empty
Recommended value: Empty
Explanation: If you have additionally page(s) which are changed when you create/modify posts or add comments, then specify these pages here to purge their page cache.
Default value: ([a-z0-9_\-]*?)sitemap([a-z0-9_\-]*)?\.xml
Recommended value: ([a-z0-9_\-]*?)sitemap([a-z0-9_\-]*)?\.xml
Explanation: It’s a regular expression that specifies any XML file which contain “sitemap” word in it. By default your sitemap file’s name is “sitemap.xml” If your sitemap has a different name which does not contain “sitemap”, you need to modify the expression accordingly.
2.5. Advanced
Advanced section of Page Cache in W3 Total Cache plugin can be used to customize specific settings and exceptions.
If you are a quite typical WordPress website owner, it’s not likely you may need it. But if you are a developer or trying to troubleshoot caching (e.g. for particular plugins or themes, or for certain devices or browsers) this section can be useful for you.
Here are the recommended settings (everything is by default). The image is clickable.

W3 Total Cache: Page Cache / Advanced
I explain these advanced settings of Page Cache section below one by one.
2.5.1. Late initialization
Late (or lazy) initialization is a method of initializing objects in programming when an object is not created in the memory until another object refers to it.
This initialization method is used in fragment caching. If you don’t use fragment caching. Ignore this setting. Leave it unchecked. And if you want to use late initialization feature, it assumes you can do some code changes.

W3 Total Cache: Page Cache / Advanced / Late initialization
Default value: Not selected
Recommended value: Not selected
Explanation: This option helps if you use fragment caching. Otherwise, leave it unchecked.
By the way, Late Initialization is not available if you use recommended Disk: Enhanced in General / Page Cache setting. (You can use Disk: Basic option instead.)
2.5.2. Late caching
Late caching is the approach of caching the page with a delay. It allows to load a part of WordPress content before W3 Total Cache processes caching.
Late caching can be used in some specific case, for example for geo-targeting purposes.

W3 Total Cache: Page Cache / Advanced / Late caching
Default value: Not selected
Recommended value: Not selected
Explanation: This option can be used in specific cases when some software dealing with your website requires not cached data.
By the way, Late Caching is not available if you use recommended Disk: Enhanced in General / Page Cache setting. (You can use Disk: Basic option instead.)
2.5.3. Garbage collection interval
Garbage collection comes also from a programming world. “Garbage” is the objects in memory or on the disk which are not (and can not be) used anymore.
As a rough example, assume there was a page which was cached, but after some time this cached version became outdated. So, it needs removing and cleaning up the memory or a disk space. The process of removing this outdated cached data in W3TC is called Garbage collection.
Garbage collection should be run time after time because of activity on your website and server. The default value of the Garbage Collection interval in the W3TC is fine.

W3 Total Cache: Page Cache / Advanced / Garbage collection interval
Default value: 3600 seconds
Recommended value: 3600 seconds
Explanation: The default value is fine also for a shared hosti
Decreasing the default value (i.e. making garbage collection run more often) can be justified is you site gets a lot of traffic as it allows to clean up disk faster. But at the same time, it loads your server more since garbage collection is comparatively a resource-intensive task.
2.5.4. Comment cookie lifetime
When a visitor enters his or her credentials (name, email, website) on your website to leave a comment, a cookie is created in the visitor’s browser. This cookie allows the visitor to stay authenticated during a definite time which is determined in W3TC by comment cookie lifetime value. And when authenticated, the visitor can enter comments without re-entering the credentials.
The default WordPress value for comment cookie lifetime is 30,000,000 seconds. Using W3TC setting can reduce this parameter value. It can help to improve your website performance in case you have tons of simultaneous visitors posting their comments and viewing your content.

W3 Total Cache: Page Cache / Advanced / Comment cookie lifetime
Default value: 1800 seconds
Recommended value: 1800 seconds
Explanation: The default value is fine. Reducing this value can help with your website performance if you have a lot of commenters at the same time.
2.5.5. Accepted query strings
URLs with query strings are not cached by default. And if you have not enabled it in the setting above, all your pages which have query strings are not cached.
But in some cases you want to cache just specific pages which are popular. And these pages may have query strings. For example, a page gets as a query string the location or other parameter(s):
http://yoursite.com/stores/?location=los-angeles
Since your visitors visit this URL very often, you want it to be fast. So, you may want to cache this page with this query string. And then you add it to “Accepted query strings” field.
However, if you don’t have such pages, then ignore this setting in W3 Total Cache.

W3 Total Cache: Page Cache / Advanced / Accepted query strings
Default value: Empty
Recommended value: Empty
Explanation: If you have specific pages with query strings that are popular, you can add them. Otherwise, ignore this option.
2.5.6. Rejected user agents
User agents are the terms coming from a programming sphere. A user agent is software (e.g. a browser or a web crawler) which accesses your website.
Sometimes you don’t want to provide some user agents the cached version of your website. The reasons can be specific. For example, your website does not work as expected on some mobile devices. So, adding a rejected user agent for particularly those mobile devices can help you avoid unexpected behavior.
However in general, if you are not a developer or advanced user trying to solve some issue, you are not likely to need this setting.

W3 Total Cache: Page Cache / Advanced / Rejected user agents
Default value: Empty
Recommended value: Empty
Explanation: If you are not a developer, it’s recommended to leave this setting as is (i.e. empty).
2.5.7. Rejected cookies
If you are a developer or an advanced user making a WordPress theme or a plugin work properly, there may be pages that you don’t want to cache. But if these pages may be defined not explicitly with URLs but via cookies.
In this case you just specify these cookies in Rejected cookies field.
Anyway, in most cases, especially if you are not a developer, you will not need to deal with it.

W3 Total Cache: Page Cache / Advanced / Rejected cookies
Default value: As provided in W3TC by default
Recommended value: The default values
Explanation: If you are not a developer, it’s recommended to leave this setting as is.
2.5.8. Never cache the following pages
This setting allows simply to list the pages which you don’t want cache with W3 Total Cache. It can be useful if the page can’t function properly when caching is enabled. For example, it regards some e-commerce experience like shopping carts.
When adding entries to this exception list, apart from specifying particular page URLs, you can also use regular expressions. They allow to specify the masks for the page URLs which may simplifies the task a lot.
Examples of using regular expressions in “Never cache the following pages” setting (taken from W3TC FAQ):
Do not cache page/directory and sub pages:

/directory*
Do not cache pages under a directory:
/directory/.+
Do not cache pages that contain specific text:
/.*text.*
Do not cache pages that is named child in directories:
.+/child
Do not cache any pages named child:
*/child
Anyway, by default you don’t need to change the default settings.

W3 Total Cache: Page Cache / Advanced / Never cache the following pages
Default value: As provided in W3TC by default
Recommended value: The default values
Explanation: Normally it’s recommended to leave this setting as is.
2.5.9. Cache exception list
This setting is a logical addition to the previous setting (“Never cache the following pages”). The cache exception list can be used to list the pages which are the exceptions from that previous setting. In other words, this list contains the pages and files that should be always cached even regardless of being included in the previous settings.
Like in the previous settings, you can use regular expressions to specify files/pages in the Cache exception list.
The default settings are fine in most cases.

W3 Total Cache: Page Cache / Advanced / Cache exception list
Default value: As provided in W3TC by default
Recommended value: The default values
Explanation: Normally it’s recommended to leave this setting as is.
2.5.10. Specify page headers
This section may also be useful only for programmers or technically advanced users dealing with specific caching cases.
You can specify HTTP headers to make the appropriate pages cached.
In most cases you can leave everything by default.

W3 Total Cache: Page Cache / Advanced / Specify page headers
Default value: As shown on the image above
Recommended value: As shown on the image above
Explanation: Normally it’s recommended to leave this setting as is.
3. Minify
Changing anything in this section of settings makes sense if not only Minification is enabled in the General Settings / Minify section, but also if you specified Manual mode of minification there. (See the screenshot above)
Minifiction is a separate topic that I’d rather put outside of this article.
Anyway, as you could read above, I’ve constrained myself in this article with just three options regarding minification (no minifcation; default automatic minification; and using another plugin specifically for minification).
All these three minification options I suggest in this article do not assume changing anything in the advanced settings of Minify. That’s why the chapter you are reading right now is not practically needed if you decided to go with one of the three options. But you may still continue reading this chapter if you want to get acquainted with W3TC minification settings closer.
If you feel lost right now, just go back to this chapter to see my suggested approaches to minification.
Okay, let’s go further.
You get the recommended settings of minification by default.
Here are they on the screenshot.
In most cases they are what you need. And you don’t need to change any setting there.
Let’s see what detailed options and settings are available on this W3TC settings tab.
3.1. General
The recommended General setting of the Minify tab of W3 Total Cache plugin are as follows:
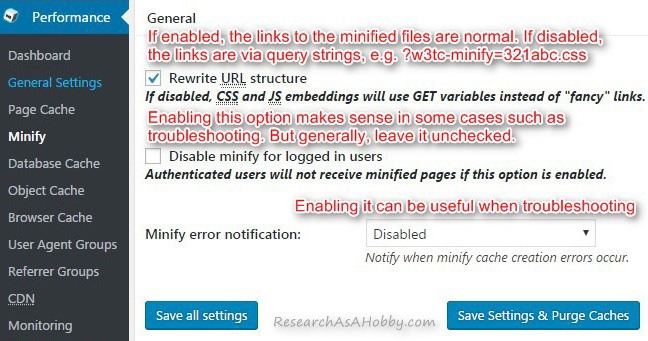
W3 Total Cache: Minify / General
These settings are given by default. So, you don’t need to change anything in most cases. Just leave them as is.
Some more words about each of the General settings below.
3.1.1. Rewrite URL structure
Rewriting URL structure is applied to minified files. It’s recommended to leave this option enabled since it’s a little bit more efficient. But in case of issues (e.g. the minification file not found), you can try disabling this setting.

W3 Total Cache: Minify / General / Rewrite URL structure
Default value: Selected
Recommended value: Selected
Explanation: With this option enabled the file names of minified resources looks nicer. Also this way the performance is a little bit better.
For you information, here is an example. Here’s how a link to the minified CSS file looks like in the page’s source code when Rewrite URL structure is enabled:

Minification in W3TC: Rewrite URL structure is enabled
And here’s an example of the same page when this option is disabled:

Minification in W3TC: Rewrite URL structure is disabled
3.1.2. Disable minify for logged in users
By default minification for logged in users is enabled. It lets you as the administrator of your website see the same content after minification as your visitors.
You may want to disable minificatoin for logged in users in some specific cases such as troubleshooting of your website design issues.
Normally it’s recommended to leave this setting as is:

W3 Total Cache: Minify / General / Disable minify for logged in users
Default value: Not selected
Recommended value: Not selected
Explanation: It’s recommended for logged in users to experience the same behavior of your website as other visitors.
3.1.3. Minify error notification
This setting can be useful for monitoring how well minification in W3TC works.
So, from this perspective, enabling minification error notifications is a good idea whether you get error messages in your administrator dashboard or by email.
But at the same time, if you are not a developer or advanced user who can troubleshoot errors (or at least narrow them down), then enabling error notification will not help you much.
So, for not very technical users I’d recommend to leave this setting disabled.

W3 Total Cache: Minify / General / Minify error notification
Default value: Disabled
Recommended value: Disabled
Explanation: It’s not likely that a not very technical user will understand errors if they arise. However, enabling it can be useful for more technically skilled users.
And you you can enable this option in the following case. Your site gets broken because of minification. And you are comfortable with troubleshooting the errors. You can also try finding out the CSS or JS file causing the error. And then you can exclude these files from minification (see corresponding subsections in the Advanced section of Minify settings below about how to exclude files from minification).
3.2. HTML & XML
By default minification of this section is not enabled. It’s connected with higher possibilities of breaking something on your site. HTML-minifiers misbehave in some cases. And although HTML minification helps improve website performance, it’s not always worth doing it because of the risks.
So in a general case, it’s safer and easier not to minify HTML. However, you can try and see if it works fine for you.
Here are the recommended settings:

W3 Total Cache: Minify / HTML & XML
Default value: Not selected
Recommended value: Not selected
Explanation: Not enabling HTML & XML minification is a safe option. That’s why it’s by default and recommended. More technically confident users may try enabling it and playing with it.
Here are some thoughts on the options which are not enabled on the image above.
As regards inlining CSS/JS. Inlining assumes taking the code of external files (CSS, JS) and inserting it automatically into the HTML code of page.
The efficiency of it is not so obvious. Especially “above the fold” practice raises some questions. The developers do not really have a common view on this matter (you can read the comments below this article).
On the one hand it reduces calls to external files (and therefore also reduces latency) which is good for mobile experience. And when carefully implemented it may improve user experience(e.g. by inlining above the fold). Besides, Google encourages webmasters to it.
But on the other hand, inlining increases size of all the page of your site which is bad. And also, it does no good for caching. Besides, the most dangerous drawback is that when implementing popular “above the fold” inlining, this makes it awfully difficult to maintain the website.
As a resume to CSS and JS inlining, in a general case I’d suggest to avoid it.
But in some cases it may worth it. For example, your website contains just several pages; you’ve got a lot of CSS/JS files that are used on each page.
Don’t minify feeds option can be useful if you see that your feeds get broken in a result of minification.
As regards removing line breaks, it’s also potentially dangerous.
HTML optimization includes removing comments from the code.
So, Ignored comment stems field can save you if you use some plugins or other code which depend on specific comments. You can specify there the terms of the comments. It will leave them in the page code unchanged to let the page function properly.
This is another reason why enabling HTML optimization is tricky.
3.3. JS
In this article I review the W3TC settings of JavaScript minifaction/optimization only within the simple approach that I present in the chapter “Option2: The safest try – minify CSS and then JS”. This implies using the default settings in this (JS) section.
I suggest some simple approaches to minification that not very technical users can utilize. And within these approaches there’s no need to go deeper in the JS minification settings of W3TC in this article.
So simply go to the chapter and follow the steps if you want to utilize minification provided by W3 Total Cache.
In short, within myOption2 I suggest simply disabling JS minification if it break your site.

W3 Total Cache: Minify / JS
Default value: Selected
Recommended value: Selected
Explanation: Although this is a recommended option, you may need to uncheck it in case it breaks your site’s functionality. JavaScript and CSS minification requires testing.
I don’t review other options in JS section as it goes out of scope of this article. From a practical point of view, it’s beyond what a not technical user can do in most cases.
3.4. CSS
The same approach as in JS section above. I.e. as a not technical user, if you want to utilize W3TC minification functionality, I suggest simply leave CSS minification enabled if it’s fine, and disabling CSS minification in case it brings issues to your website design.

W3 Total Cache: Minify / CSS
Default value: Selected
Recommended value: Selected
Explanation: Although this is a recommended option, you may need to uncheck it in case it breaks your site’s functionality. JavaScript and CSS minification requires testing.
Troubleshooting of CSS minification issues goes out of the scope of this article.
If you feel a bit lost at this point, you can go back to “Recommended minification setting in W3 Total Cache” part of my article where I explain my suggested approaches to minification with W3TC for not very technical users.
3.5. Advanced
This section contains the W3TC settings which are fine by default if you don’t troubleshoot what CSS or JS file(s) break your site. In other words, if you follow Option 2 which is one of my suggested minification approaches for not technical users, then you don’t need to change anything in this section.
However, if you go further in minification and want to troubleshoot your CSS and JS minification, this section can be useful for you.
The recommended advanced settings of minification:

W3 Total Cache: Minify / Advanced
Default value: 86400 seconds (24 hours)
Recommended value: 86400 seconds (24 hours)
Explanation: By default your minified CSS and JS files will expire in the cache every 24 hours. If you change your CSS/JS files (e.g. upgrade a plugin which affects your website design or functionality), and you don’t purge your cache after that, the changes will be automatically applied in the cache in 24 hours.
Default value: 86400 seconds (24 hours)
Recommended value: 86400 seconds (24 hours)
Explanation: As CSS and JS files expire in the cache or get orphaned, they become useless. To clean the disk from this garbage the system automatically performs garbage collection. Making it more frequent can make sense on busy websites ( in order to clean up the disk faster). But this is resource-intensive process. And too frequent can be bad and not justified. The default value is fine in most cases.
Default value: Empty
Recommended value: Empty
Explanation: If you are not very technical user, you may want rather disable minification completely, than troubleshooting it. So, for non-technical uses it’s recommended to leave this setting as is (i.e. empty). However, if you feel confident, feel free to specify here the pages that are broken when JS or CSS resources are minified.
Default value: Empty
Recommended value: Empty
Explanation: If you are not very technical user, you may want rather disable JavaScript minification completely, than troubleshooting it. However, if you feel confident, feel free to specify here the JavaScript files that result into breaking of you site functionality when these JS files are minified. Finding such files foes out of scope of this article. So, for non-technical uses it’s recommended to leave this setting as is (i.e. empty).
Default value: Empty
Recommended value: Empty
Explanation: it’s similar to the previous setting. If you are not very technical user, you may want rather disable CSS minificationcompletely, than troubleshooting it. However, if you feel confident, feel free to specify here the JavaScript files that result into breaking of you site functionality when these JS files are minified. Finding such files goes out of scope of this article. So, for non-technical uses it’s recommended to leave this setting as is (i.e. empty).
Default value: Empty
Recommended value: Empty
Explanation: There is a big variety of mobile and desktop devices and browsers out there. Some of them may not process minified content properly. If you are aware of such issues with your website, you can specify the user agents which are related to the devices or browsers. And yourwsbite will display nd function properly for such devices or browsers. By default you can leave it as is (i.e. empty).
Default value: Empty
Recommended value: Empty
Explanation: When using external JS libraries, combining (concatenating) them is one of the optimization tactics. Using it requires testing. By default you don’t need to use it. Leave it as is (i.e. empty).
Default value: Not selected
Recommended value: Not selected
Explanation: This setting helps specifying external libraries (see the previous setting – “Include external files/libraries”. You may need it only if you optimize external JS libraries using W3TC.
4. Database Cache
If you enabled Database Cache in the General settings, in this section you can fine-tune detailed database cache settings of W3TC.
By the way, in most cases you don’t need to change anything there, as the default settings are already fine:
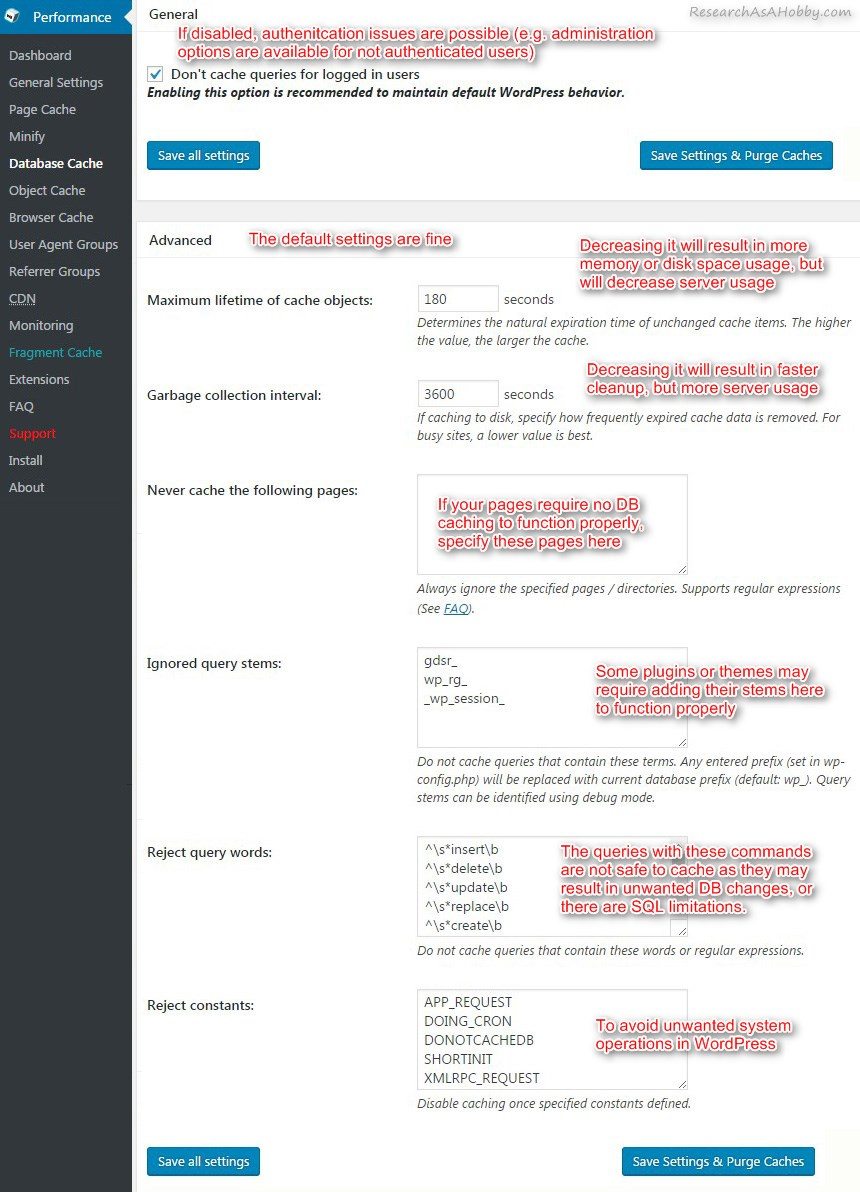
W3 Total Cache: Database Cache
let’s see in short each of the setting in this section.
Default value: Selected
Recommended value: Selected
Explanation: Logged in users (e.g. administrator) needs to have fresh data that may change constantly. Caching can do more harm than good then.
Default value: 180 seconds
Recommended value: 180 seconds
Explanation: Since database queries cache may take a lot of disk space, it’s recommended not to increase this value too much. Decreasing the value may result in increase of database server load for more frequent cache refreshing.
Default value: 3600 seconds (1 hour)
Recommended value: 3600 seconds (1 hour)
Explanation: More frequent garbage collection would allow better clean up the disk from outdated cache, but it would result in more server load. In most cases the default value is fine.
Default value: Empty
Recommended value: Empty
Explanation: Specify the pages here which you don’t want to utilize database cache. It can be used if you troubleshoot database caching issues which result into broken functionality of some your pages.
Default value: As provided in W3TC by default
Recommended value: The default values
Explanation: Some queries are better not to cache. The queries like that need to return always actual data. Some WordPress themes or plugins require no caching for some database queries to function properly. And you can specify the stems when troubleshooting in debug mode (database cache debug option. By default you don’t need to change anything in here.
Default value: As provided in W3TC by default
Recommended value: The default values
Explanation: Some database queries should not or can not be cached because of its database modification nature or SQL limitations.
Default value: As provided in W3TC by default
Recommended value: The default values
Explanation: Some system operation in WordPress should not be cached to avoid unwanted behavior connected with database, cookies, updating web resources, resource management etc.
5. Object Cache
If you enabled Object Cache in the General settings, in this section you can fine-tune detailed database cache settings of W3TC.
By the way, in most cases you don’t need to change anything there, as it’s very likely that the default settings are already good to go for you:
The recommended (and default) settings are:

W3 Total Cache: Object Cache
Default value: 180 seconds
Recommended value: 180 seconds
Explanation: Since database queries cache may take a lot of disk space, it’s recommended not to increase this value too much. Decreasing the value may result in increase of database server load for more frequent cache refreshing.
Default value: 3600 seconds (1 hour)
Recommended value: 3600 seconds (1 hour)
Explanation: More frequent garbage collection would allow better clean up the disk from outdated cache, but it would result in more server load. In most cases the default value is fine.
Default value: As provided in W3TC by default
Recommended value: The default values
Explanation: Groups in this field provide ways of managing data within the cache across multisite installation. Don’t worry about it if you are not a developer.
Default value: As provided in W3TC by default
Recommended value: The default values
Explanation: Data in these groups will not be put into a cache to allow getting the actual data from the database. Don’t worry about it if you are not a developer.
Default value: Selected
Recommended value: Selected
Explanation: It helps to make your administrator dashboard faster, especially if you have multiple users working in WordPress dashboard. The drawback though is that caching wp-admin requests may result in some unexpected behavior such as displaying outdated data.
Default value: Selected
Recommended value: Selected
Explanation: Transients is the data that exists in memory (in cache) for current WordPress activity. It makes the website faster. However, when the cache is cleared or expires, the heavy numerous database requests should run again to re-fill the cache. In order to avoid these resource intensive database requests, it’s recommended to save transient data into database. It results in much less database load when the cache is cleared or expires.
6. Browser Cache
Browser cache, like page cache, is one of the most efficient ways of making your website faster for your users and visitors.
The main part of W3TC Page Cache is HTTP caching. It allows to hand over some data and data processing from your server to your visitors’ browsers. And once a visitor opened your website, some elements of your site are copied to your visitor’s device (a computer, a mobile device). And browsing experience of your visitor becomes much faster.
It all sounds great, but within some time these resources (CSS, JS, image files etc) become outdated. And when a visitor visits your website again, his or her browser needs to know whether it should request fresh resources from your website.
If the resources on your website has not changed since the last visit of your visitor, then the visitor’s browser will use the version of the resources it already has (and it’s what makes browsing experience fast). Otherwise, the browser needs to refresh its cache by reload the resources from your website.
And there are several ways how a browser can find out whether it needs to re-load the resources from your website. W3 Total Cache offers these options (see in the sections below).
You can see how to enable browser cache in W3 Total Cache in the section above. And in this section you’ll know how to fine-tune it.
By default the browser cache settings are already fine (i.e. recommended in most cases). There’s only two things you may want to change in most cases:
- It’s better to disable cookies for static files
- It’s advised to disable GZIP compressions in the section “Images and other files”
So, the recommended settings for the Browser Cache section are on this screenshot.
Please note that if you have a very popular site or have a multiple servers installation, then you might want to set more efficient or specific settings to chase the best performance possible in your particular case. The settings I recommend in this article are fine and the easiest for most websites though, especially for non-technical users.
However, if you need a deeper tuning of your browser caching directives, I suggest looking at these discussions that I’ve found interesting and useful. May help you make your choice and understand browser caching better: Etag vs Expires, Expires vs Cache Control, Etag vs Last-modified, Max Age and mutable content.
There are four sections in W3TC Browser Cache settings: General, CSS & JS, HTML & XML,Media& Other Files. Most of the settings are repetitive.
Let’s see the settings in each section.
6.1. General
Some options in the General section replicates in the other sections. So, if you select some options in General section, then the same options will be selected in the other sections.
And here are the recommended (and also default) settings of the General section of W3TC Browser Cache.
By the way, here is an easy-to-read article on HTTP caching. I’ve borrowed its style to explain some items of Browser Cache settings of W3TC.
I explain the settings and the cache stuff below in easy-to-understand and easy-to-use ways. If you want more and deeper technical information on browser/HTTP caching, you can have a look at the article at mozilla.org and the article by Ilya Grigorik.
6.1.1. Set Last-Modified header
This is one of the options that help your visitor’s browser identify whether it needs to reload resources from your server
If this option is selected, a browser compares the modification dates of resources it has in its cache and the resources located on your website. If the resources in your visitor’s browser cache are outdated, they are reloaded from your website.
The “conversation” between your visitor’s browser and your server goes like this when the visitor open your website’s page:
Browser: Hi, server. I need to display image.jpg. I already have it in my cache. I need to know, what is the modification date of that image you have?
Server: Hi there. Image.jpg was last modified on June 2, 2017, 5:00 PM.
Browser: It’s the same date as here. So, I’ve got the freshest copy. I don’t need to spend time and download it from you. I’ll show it to the user right away. Thanks!
Last-Modified header is a default choice for determining whether the resources in the browser cache are outdated. In most cases you are fine to go with it.

W3 Total Cache: Browser Cache / General / Set Last-Modified header
Default value: Selected
Recommended value: Selected
Explanation: It’s the basic method to determine if the resources on the server have changed compared to what is cached in a browser. In a general case it’s fine to use it.
However, if you have a very busy site with high return rate of your visitors or with high number of pages per session, consider using a header control method that does not require to requesting your server at all (see below “Set expires header” option and “Set cache control header”).
6.1.2. Set expires header
‘Expires header’ in W3TC’s Browser Cache settings specifies a lifetime of a cached resource (CSS, JS, image file etc). And until that time comes there’s no need to request the server at all.
A common life analogy is an expiry date of a food product after it was open, say, a bottle of milk. For example, you can store an opened bottle of milk for 24 hours. When it expires one can’t use the milk (read: a cached file) any longer. And a person (read: a browser) needs to go to the store (read: the server) and get a new bottle of milk (read: re-load the file from the server).
So, the browser knows exactly when it needs to request your website’s server regarding each cached resource. Until that time the browser does not bother your server at all.
The “conversation” goes like this when the visitor open your website’s page:
Browser: Hi, image.jpg. I need to display you. I see that I already have you in my cache. But are you still fresh?
Image: I should expire in 24 hours after you downloaded me.
Browser: Let me see. Great, I see you are still fresh. I don’t need to spend time and ask the website’s server to give me your updated copy. I’m displaying you to the user now.
So, requests to the server are eliminated during a cache lifetime. And if a user opens a website after those 24 hours end, the browser will need to download the image again to put it in its cache.
By default expires header is not enabled because last-modified header is enabled by default which is enough.

W3 Total Cache: Browser Cache / General / Set expires header
Default value: Not selected
Recommended value: Not selected
Explanation: If you already use the default option (Last-modified), then you can ignore ‘expires header’ setting.
If you enable Expires header option, then in the subsections you will need to specify the lifetime of the resources (in CSS & JS, HTML & XML and Media & Other Files subsections). The lifetime value specifies how long a cached resource stays fresh (in seconds). After that time called lifetime the resource should be re-loaded from the server. The default lifetimes values for different types of files specified are fine.
6.1.3. Set cache control header
‘Cache control header’ allows more versatile options how, and for how long, the browser and other intermediate caches can cache the individual resources (CSS, JS, media files and HTML). Mostly, this is a developers’ thing.

W3 Total Cache: Browser Cache / General / Set cache control header
Default value: Not selected
Recommended value: Not selected
Explanation: Not needed if you already selected ‘last-modified header’ or ‘expires header’. But can be used if you need more versatile tuning.
But if you enable it, then in the subsections you will need to specify an option in each of the Cache Control policy subsections below (in CSS & JS, HTML & XML and Media & Other Files subsections).
Depending on your needs, there is a number of combinations of the following options of Cache Control policy that are used in the subsection below:
- Public cache. This is a kind of cache that stores responses which can be used by more than one user. For example, this can be a proxy cache.
- Private cache. This is a kind of cache that stores responses which can be used by only one user. For example, this can be a cache in a user’s web browser.
- Must-revalidate. This is the directive that prompts cached resources to verify their status. And the expired ones should not be used.
- Proxy-revalidate. This is the directive similar to the must-revalidate directive, except that it does not apply to private caches.
- Max-age. This header specifies how long a cached resource stays fresh (in seconds). After that time called lifetime the resource should be re-loaded from the server.
- No-cache. This directive prompts the cache to send request to the server to validate a resource status. Before it releases the cached resource. Last-modifed or eTag are supposed to be used with it.
- No-store. This directive forbids caching responses. Each time the request should be sent to the server. And unlike no-cache directive, no-store directive forbids caching the resource.
6.1.4. Set entity tag (ETag)
Entity tag (ETag) header in W3TC’s Browser Cache settings specifies a unique fingerprint (a hash) of a cached resource (CSS, JS, image file etc). This finger print allows to identify if a resource has changed.
The “conversation” goes like this when the visitor open your website’s page:
Browser: Hi, server. I need to display image.jpg. I already have it in my cache. I need to know, if it’s the same image as you have?
Server: Hi there. My Image.jpg has the following fingerprint: asdf123.
Browser: It’s the same fingerprint as here. So, I’ve got the actual copy. I don’t need to spend time and download it from you. I’ll show it to the user right away. Thanks!
So, the server is requested in most cases only for validation, which is more efficient compared to downloading the image all the time. The image (a resource) is downloaded to the browser cache only when the original resource on the server changes.
ETag header is a good alternative to the last-modified header in case some date discrepancies are possible on your server. By the way, last-modified header and ETag can be used together.
By default ETag header is not enabled because last-modified header is enabled by default which is enough.

W3 Total Cache: Browser Cache / General / Set entity tag (ETag)
Default value: Not selected
Recommended value: Not selected
Explanation: Not necessary to use it if you already selected ‘last-modified header’. But can be used additionally, e.g. it’s useful if there were some date manipulations on the server.
6.1.5. Set W3 Total Cache header
W3 Total Cache header adds information to the resources that they have been optimized by W3TC plugin. This can e useful for debugging, troubleshooting and performance fine-tuning by developers and advanced users. Anyway, this header does not affect performance.

W3 Total Cache: Browser Cache / General / Set W3 Total Cache header
Default value: Not selected
Recommended value: Not selected
Explanation: This header contains additional information that is not useful for a typical user. It does not affect your website performance. But it can be useful ifyou want to troubleshoot or fine-tune the cache performance.
You can enable or disable this setting individually in each of the corresponding subsections below (in CSS & JS, HTML & XML and Media & Other Files subsections).
6.1.6. Enable HTTP (gzip) compression
GZIP compression helps greatly to reduce the size of transferred data between the server and the browser cache (the user). It’s highly recommended to leave it enabled on any websites.
Theoretically, GZIP compression gives some additional load to the server CPU, but compared to the benefits the compression brings, it can be neglected.
GZIP compression is supported on all modern web browsers including the ones on the mobile devices.

W3 Total Cache: Browser Cache / General / Enable HTTP (gzip) compression
Default value: Selected
Recommended value: Selected
Explanation: It allows to decrease significantly the transferred data between the server and the browsers. It increases the performance pretty well.
You can enable or disable GZIP compression individually in each of the corresponding subsections below (in CSS & JS, HTML & XML and Media & Other Files subsections).
And it’s recommended to disable GZIP compressions for media and other files since very often these files are already compressed.
By the way, since GZIP compression is a must-use technique in most cases, webhosts may enable it by default on their side.
6.1.7. Prevent caching of objects after settings change
This setting prompts the caches of browsers to re-load the resources from the server each time when W3TC settings are changed. New query strings are generated and added to the resource names for that if this option is enabled.
This is not enabled by default as it may be needed not that often.

W3 Total Cache: Browser Cache / General / Prevent caching of objects after settings change
Default value: Not selected
Recommended value: Not selected
Explanation: This option is not set by default since what it does is not always needed. It prompts browsers to re-load the resources from the server each time you change the settings regardless of expire header or last-modified header. However, if this is what you need, you can enable this option.
You can also enable or disable this setting individually in each of the corresponding subsections below (in CSS & JS, HTML & XML and Media & Other Files subsections).
By the way, you can see examples of how this setting affects a query string of a static resource below.
6.1.8. Remove query strings from static resources
This setting removes query strings (which include “?” sign) from static resources such as JavaScripts, images, CSS files etc. it can be useful if you use a proxy cache that does not cache resources with query string.
In most cases you don’t need to bother about this setting.
Prevent caching exception list
This field contains the URIs (i.e. URLs of the pages without protocol’s names such as http, https) that you don’t want to be applied to the “Remove query strings from static resources” option. Regular expressions are supported.
The recommended (and the default) settings of this subsection:

W3 Total Cache: Browser Cache / General / Remove query strings from static resources
Default value: Not selected
Recommended value: Not selected
Explanation: This option is not set by default since it may be needed only in specific cases such as using proxy cache.
Default value: Empty
Recommended value: Empty
Explanation: This can be used if you want to retain query strings for some static resources. This field is an additional setting to the previous setting (Remove query strings from static resources). In most cases you can ignore it.
By the way, here are the examples to demonstrate how a static resource’s query string changes when “Prevent caching of objects after settings change” and “Remove query strings from static resources” are enabled and disabled.
| Prevent caching of objects after settings change: | Not selected |
| Remove query strings from static resources: | Not selected |
| Static resource example: | style.css?ver=4.7.5 |
| Prevent caching of objects after settings change: | Selected |
| Remove query strings from static resources: | Not selected |
| Static resource example: | style.css?x72328&ver=4.7.5 |
| Prevent caching of objects after settings change: | Not selected |
| Remove query strings from static resources: | Selected |
| Static resource example: | style.css |
| Prevent caching of objects after settings change: | Selected |
| Remove query strings from static resources: | Selected |
| Static resource example: | style.css?x72328 |
6.1.9. Don’t set cookies for static files
The point of this optimization technique is to decrease the traffic which contains cookies for static files. This is a part of upload traffic. An upload traffic is often not zipped and an upload bandwidth is usually about 10 times less than a download bandwidth. So, the optimization effect of this setting can be quite considerable, even if size of cookies may seem no significant.
A further development of this optimization technique is using a cookie-less domain or subdomain for static resources. Or even utilize a CDN (Sucuri WAF/CDN is recommended for a low budget). But a free quick and quite efficient solution that W3TC offers is “Don’t set cookies for static files” option.
The recommended settings:

W3 Total Cache: Browser Cache / General / Don’t set cookies for static files
Default value: Not selected
Recommended value: Selected
Explanation: Getting rid of cookies for static files does not affect your site functionality, but has a positive effect on performance. Cookies are relatively small, but they are often not compressed and steal a deficit upload bandwidth.
You can also enable or disable this setting individually in each of the corresponding subsections below (in CSS & JS, HTML & XML and Media & Other Files subsections).
6.1.10. Do not process 404 errors for static objects with WordPress
If you have a lot of images or other static objects then enabling this option may reduce server load to some extent. But at the same time you will need to handle isolated cases when static objects which are generated (e.g. by some plugins) will return 404 (not found) errors.
So, in a general case, to avoid hassle and troubleshooting I’d recommend to keep this option unchecked.
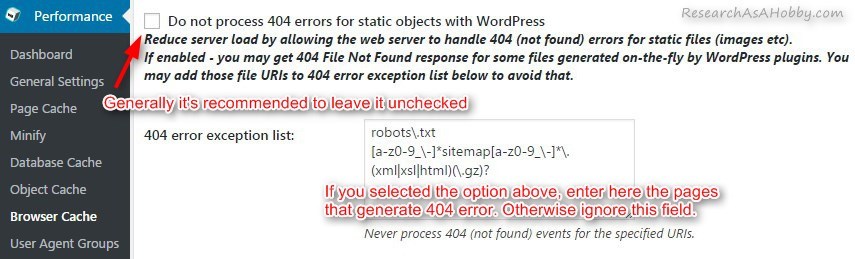
W3 Total Cache: Browser Cache / General / Do not process 404 errors for static objects with WordPress
Default value: Not selected
Recommended value: Not selected
Explanation: Keeping it unchecked will let you avoid 404 errors on generated static objects. That’s why it’s recommended to leave it not selected. However, enabling it may help you decrease a bit your server load if you have a lot of static objects.
Default value: As provided in W3TC by default
Recommended value: The default values
Explanation: You can ignore this filed if you left the previosu setting unchecked. But if you enabled it, in this field you need to input the static objects which provoke 404 errors.
6.1.11. Rewrite URL structure of objects
Usually the similar setting in the Minification section already optimizes the performance by requiring URL structure of CSS and JS files. With this setting in Browser cache section it regards other files as well.
I’d recommend to leave it unchecked by default unless you have a clear reason to use it.

W3 Total Cache: Browser Cache / General / Rewrite URL structure of objects
Default value: Not selected
Recommended value: Not selected
Explanation: Leave it unchecked unless you want to enable it for the reason.
6.1.12. Apply HTTP Strict Transport Security policy
HTTP Strict Transport Security (HSTS) helps improve your website security if your website uses SSL. This feature lets your website tell browsers that they should only communicate with your site using HTTPS, instead of HTTP.
By the way, for more security see this article about WordPress security solutions comparison and this article about basic but very useful WordPress security tactics.

W3 Total Cache: Browser Cache / General / Apply HTTP Strict Transport Security policy
Default value: Not selected
Recommended value: It depends
Explanation: If your website uses SSL (https) then it’s recommended to enable this option for more security. If you website does not use SSL, then leave this option unchecked.
6.2. CSS & JS
The recommended settings that suit well for typical WordPress websites inherit the General settings of Browser Cache. And you don’t really need to change anything in this section of W3TC settings in most cases.
6.3. HTML & XML
The recommended settings that suit well for typical WordPress websites also inherit the General settings of Browser Cache. You don’t really need to change anything in this section of W3TC settings in most cases.
6.4. Media & Other Files
The recommended settings that suit well for typical WordPress websites also inherit the General settings of Browser Cache in W3TC apart from one setting.
You just need to uncheck “Enable HTTP (gzip) compression”:

W3 Total Cache: Browser Cache / Media & Other Files / Media & Other Files
Default value: Not selected
Recommended value: Not selected
Explanation: If you followed the recommended settings and enabled GZIP compression in the General section, then in this section (“Media & Other Files”) GZIP compressions became also enabled. And it’s recommended to uncheck it here. The reason is that media and other files which are considered are also compressed. No need to spend server resources to GZIP them.
7. User Agents Groups
This is actually not about caching directly. This is a traffic management feature in W3TC. Depending on a visitor’s user agent (particular mobile device user or a browser) you can specify this visitor to go to a particular landing page or a theme.
You can ignore this section entirely.
8. Referrer Groups
It’s also a part of a traffic management feature of W3TC. Depending on where a visitor comes from you can direct them to a specific landing page or a theme.
You can ignore this section entirely.
9. CDN
Since this article includes tutorial on how to set up W3 Total Cache the easy way for most websites, CDN is a bit different topic. I’ve already mentioned CDN above.
If you use CDN, then recommended W3TC settings can be different from what you see in this article. You may want to contact your CDN provider for details.
10. Monitoring
You need this section if you use New Relic monitoring service. I’ve mentioned it above.
If you don’t use New Relic, you can ignore this section.
11. Fragment Cache
I’ve mentioned Fragment Cache in the W3TC settings above. You can start from there if you need it.
If you don’t use Fragment Cache in W3TC, then you can ignore this section.
12. Extensions
In this section of W3TC settings you can find extensions that help to intensify performance of some themes, plugins or services (often premium ones).
This is optional and can be used on per-case basis.
Generally, you can ignore this section.
Download W3TC settings for import
W3TC has options to export and import its settings.
You can download and import the W3TC settings that I recommend in this article. These settings are fine and safe for most websites on shared hosting.
Here’s the file with settings that you can import (download the file and import it in W3TC).
And here you can see the settings in the spreadsheet and compare with the default settings.
The differences between the default settings and the settings in this downloadable file are the following (recommended values are given in the brackets):
- Enable Page Cache:
Setting: General Settings / Page Cache / Page Cache (enabled) - Enable Cache Preload in Page Cache:
Page Cache / Cache Preload / Preload the post cache upon publish events (enabled) - Don’t set cookies for static files in Browser Cache:
Setting: Browser Cache / General / Don’t set cookies for static files (enabled) - Disable HTTP (gzip) compression for Media & Other Files in Browser Cache:
Setting: Browser Cache / Media & Other Files / Enable HTTP (gzip) compression (disabled)
Conclusion
W3 Total Cache is one of the best free caching plugins for WordPress.
Even without fine-tuning of its settings it gives 75% speed improvement on a typical blog.
The most powerful performance boosters of W3 Total Cache are Page Cache and Browser Cache. If you simply enable them (one click action) it will increase the speed of your site tremendously in most cases. In minor cases (if you have a specific server environment) you may need to set your preferences.
I’ve written this article to explain W3TC settings to mainly non-technical WordPress website owners. With this information W3 Total Cache becomes closer and more clear to users.
The settings I recommended in this article are applicable to shared hosting and non-technical people.
Although W3TC is efficient software, some hosts offers customized versions of this plugin. Also, some hosts develop their own caching solutions which are specifically tuned for their specific server environment. These plugins have less settings and designed to be hassle-free to use. If you are interested, I suggest looking at this host: A2 Hosting (my review).
If you don’t want to deal with caching plugins at all, then this is possible with fully managed hosting WP Engine (my review).
The next step in performance optimization of your website can be using CDN. It’s not free though. You can read more thoughts on CDN above.
P.S.: For this website I use free version of W3 Total Cache in conjunction with Sucuri Cloud Proxy.
Also, I have a couple of other articles about how to optimize website performance that a not technical user can do easily and for free (and I do this too).

BTW, I respect your privacy, and of course I don't send spam, affiliate offers or trade your emails. What I send is information that I consider useful.
Absolutely Amazing Content/ Tutorial.
Have you ever done an explanation for a buddypress or buddyboss site?
Thanks again
Thanks)
No, I have not. I almost never post content on other websites.
Thanks sir. This article must usefull for me Beginner person.
If I may. Please make a tutorial for setting cdn on cloudfare. Because I still find many difficulties. Greetings from Indonesia 🙂 . thanks
The easiest way is to contact your hosting support and ask them to assist you. A proper hosting should help you.
Great tutorial. W3 Total Cache is my favorite plugin for optimization. Recently, I am facing slow speed issue on one of my blogs. I will follow your guidance to optimize and improve the page speed.
Thank you,
Hi Manoj,
In most cases even default settings of a caching plugin does improve speed dramatically. In minor cases tweaking may be required.
So, make sure the speed issues are not caused by your hosting.
Feel free to let me know if you have any questions.
“By the way, Cache URI’s with query string option is disabled if you use Disk: Enhanced page caching method. So, if you are on a shared hosting and need caching URIs with caching strings, select Disk: Basic page caching method.”
OK that answers a lot! I use UTM codes very often for tracking traffic. What can I do to remedy this and still use enhanced?
Why is it disabled?
Hi James,
Thanks for your questions.
> Why is it disabled?
This feature is not included. I think this could be connected with a potential white screen error danger in some cases if you use some regex in “Accepted Query Strings” field.
> What can I do to remedy this and still use enhanced?
You can try a community driven build of W3 Total Cache where this feature is partly done. You can get to know more details here and here.