


Image optimization is one of the simplest and efficient things you can do to make your website faster. And I want to show how you can optimize images. And I’ll demonstrate how useful image optimization is in numbers.
Also, I’ll share with you several practical and very useful tips how you can optimize your new and existing images for free.
This is easy and cool 🙂
Intro and what you’ll learn here
While fast and reliable hosting is the first factor of any website performance, there are some others. One of them is image optimization.
To explore this, I’ve run 52 tests measuring the performance before and after image optimization.
I wanted to make the experiment as close to a blogger’s or website owner’s (i.e. your) realms as possible. It means that in my tests I use typical web images which are originally about a couple of hundreds of kilobytes each.
Besides, this post goes as far as it’s necessary to cover the topic of free image optimization for you from a practical point of view.
In this post you will learn:
- What is image optimization which makes your site faster.
- How faster a website becomes when using image optimization (52 tests on a typical blog post).
- Using or not using image optimization plugins.
- How to deal with the existing non-optimized images on your website.
- My own approach to image optimization on researchasahobby.com
- You’ll be able to optimize your images from now on.
How you can optimize images for free
Optimizing images for web allows to make a page size significantly smaller. It speeds up the page by reducing network bandwidth and processor time to process the images displaying in your browser.
Here’s below how you can optimize your images to make your website faster. You can apply all or any of these options.
Reduce image resolution (size in pixels)
Although it may seem obvious, for some reason (likely because of being lazy or unaware), some website owners neglect it.
The smaller resolution of an image, the less its size.
The point is that it does not make sense to add image which has a bigger resolution than it’s going to be displayed on your site. In other words, if your maximum blog post width is 720 pixels, then it’s not worth adding an image to your posts wider than that.
Image width should not be bigger than a text area width
The exception to this advice is if you want to let your readers open the image in full resolution (e.g. in a single browser tab or window). But even in this case it may make sense to add an image with reduced size to the post, and link to a full-size image which is on a separate page.
Choose image file format wisely
To put it very simply, don’t use heavy image formats such as .bmp, .tiff and others. Best image formats for web are .jpg, .png, .gif and .svg:
- SVG is a great and powerful vector (scalable) format. It can be also used for graphic animation and interactivity.
- JPG is often the choice for color-rich images such as landscapes, portraits, screenshots etc.
- PNG is often preferred for crisp images and images with transparent background or simple graphics. PNG can be also used as a heavier alternative to JPG in case you need higher quality of your image.
- GIF is often used for simple image animations, small images with limited color palette (e.g. in web design). GIF is also used for images with transparent background (lighter alternative to PNG.
A trickier part is to choose whether using the most two popular image formats: .png or .jpg. A wrong choice may turn out that your images will be tens percent heavier than they should.
Sometimes you will want to simply convert your image to different formats. And then compare the size and quality of the images to choose one.
As a rule of thumb, JPG images have the smallest size in most cases. So in general, it should be the preferable format for your images. Simple graphics can have smaller size with PNG though.
If you need images with transparency, then choose either PNG or GIF.
PNG give you the better (lossless) quality though. However, the different in quality of PNG is often not distinguishable compared to other image formats.
So, test and see yourself.
By the way, if your original image is in JPG format, then you can not improve its quality by converting to PNG.
But if your original image is in PNG format, then you can decrease the image’s size greatly by converting it to JPG (or to GIF if you want to keep transparency).
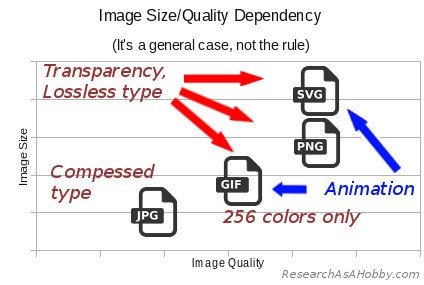
Comparing image formats
By the way, when converting PNG into JPG (or re-saving JPG) a graphical editor allows specifying a quality level. The less quality level the less image size. There are good chances that decreasing quality level quite a bit will not affect how the image look like, but its size will be much smaller. Just experiment saving your image with different quality level trying to decrease the size as much as possible.
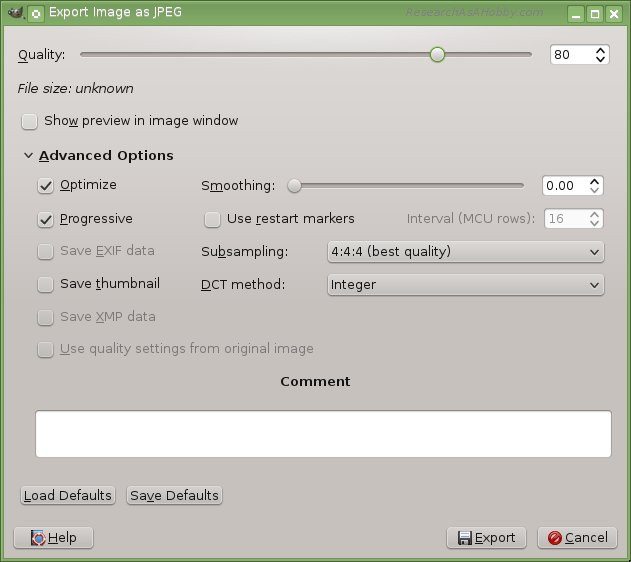
Specifying quality level when saving JPG file in a graphic editor (e.g. GIMP)
Optimize images (compress them) with plugin or service
This step I consider extremely useful. Not only it allows reducing the image size, but it also improves GTMetrix, PageSpeed Insight by Google Developers and other metrics regarding image optimization.
There are two major types of image optimization: lossless and lossy. Also it may be some options with flexible and advanced settings.
Lossless image optimization does not affect your image quality at all. It does not alter a single pixel of your image. But it reduces image size by removing metadata such as creation date, author, descriptions and other non-pixel data from image file. This metadata is added by graphical editors when your images is created. When adding an image to your website you don’t need this meta information.
You are likely to use lossless image optimization quite rarely. Only in case you need a perfect quality of your image.
Lossy image optimization is your best friend. In absolutely most cases you will want to use this method to optimize you images before adding them to your website. It allows to compress your image so that its quality does not visibly suffer in most cases, but its size reduces significantly.
There are plugins and online services which allow optimizing (compressing) images.
When adding new images to my website I prefer optimizing the images using a web interface of online service kraken.io. It’s free for optimizing images less than 1 MB. This option is absolutely fine and as good as its paid option. You just upload your image(s) there, click a button, and get your optimized images.
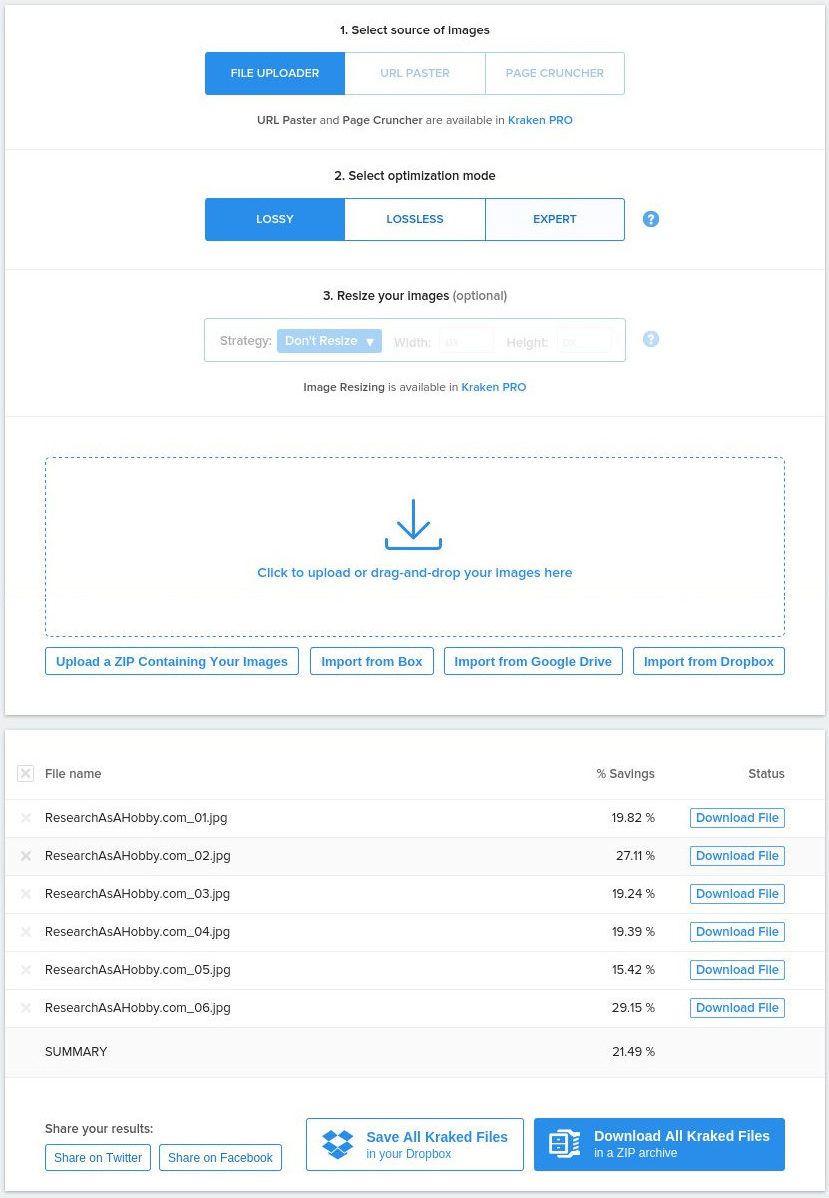
Web interface of kraken.io online tool to optimize images
The paid options offer bigger than 1 MB images optimization, cloud storage, advanced API access etc which most website owners do not really need.
Another option is compressor.io. I like it for visual comparison of original and result images. It does not have much settings and works only for single images though.

Web interface of compressor.io online tool to optimize images
As regards using a plugin to optimize your images, I’m not really a fan of it in most cases.
The reason is the following. Getting one more plugin is not a good idea if you can get without it. Since each new plugin makes your site heavier (and slower). It also adds risks of integrity and incompatibility issues.
However, using a plugin can be justified if you deal with lots of images. In this case processing (compressing) images can be more convenient inside WordPress rather than in a separate web interface. Another reason of using a image optimization plugin can be if you need to optimize a lot images that are already added in your WordPress website.
There are also other image optimization services out there. For example, here you can compress an image of upto 50 MB in size for free.
By the way, if you start using a plugin to optimize your images, make sure you have a backup solution that can save you in case anything goes wrong.
Don’t resize images in your HTML code or CSS
It’s advised to add images to your website without resizing them in HTML or CSS. If you need to change the dimensions of your image, resize the image in a graphical editor. There are also free online tools available (just Google “resize image online”).
Resizing in HTMLor CSS requires additional CPU usage for page rendering. And as a result, this slows down a website a bit.
CDN (not free)
Using a CDN (Content Delivery Network) is not a free option. But it’s worth mentioning in this section because it regards images to a great extent. It allows to outsource image storing to a “cloud”. In very short, images will be requested not from your server, but from the location-optimized CDN server. And this is faster compared to a typical hosting.
Thanks to CDN, the images will be closer to your visitors and the requests to your website elements will be paralleled. It means better speed.
One of the best ones in terms of price-quality is MaxCDN. As regards another very well-known option, CloudFlare, I’m not a fan of its free plan. Although I haven’t tried it myself, after analyzing reviews the free plan seems not very reliable to me. And its paid option is comparatively expensive as a starting option.
Using a CDN can be justified when you have enough budget. The more images your have on a page, the more speed improvement is supposed to be. With few images on a page you are not likely to see a considerable speed improvement, provided you have a good hosting like these ones.
However, if you can afford a CDN (usually when you already have quite successful website), using it is preferable. Not only images, but also CSS files, JavaScript files and other files (e.g. downloadable freebies) can be put on a CDN to improve your website speed. Anyway, it goes a bit out of scope of this article, so I cut it off now 🙂
And although it’s not a true CDN, it has a caching layer on its servers that improves a website speed (here’s my research on it).
This combination of superb security and speed improvement is a great option for me while I don’t have budget for MaxCDN or CloudFlare paid option.
Methodology of image optimization for my tests
Preparing my test website:
- Used a fresh-installed WordPress site with several plugins on one of the well-known hosting where I have testing accounts. There’s one of the security plugins and a dozen of others to make the site more heavy than a fresh installed website.
- Used a free caching plugin W3 Total Cache (by the way, it showed a good performance boost compared to the other free famous caching plugin in my another research). I set it up typically.
- I’ve got one post containing 2,000 words, 20 images and a dozen of comments. The images are ordinary JPG files (not large) and they are not optimized. This way I wanted to imitate a typical blog post. The images take 4.3 MB.
- I’ve duplicated the first post (with lite not optimized images). But I replaced the compressed copies of the images. I’ve received them by optimizing the images with a lossy optimization method using a free online tool kraken.io. The images take 3.4 MB (optimized by 20%, which is not much since JPG format is already a compressed type).
The image optimization was done in seconds using the tool. No other image optimization techniques mentioned in this article were applied to the images. I did it on purpose since this is what anyone can do extremely easy and fast.
Running the performance comparison tests:
For website performance testing I used a free online tool webpagetest.org. This tool is known for reporting very realistic browser loading time of a page, start render time and visual complete time that I focused on in this research.
The process of testing:
– Running performance tests for the two posts consequently one after another.
– Repeating the above step 20 times.
As you see, I run the tests multiple (52) times on each of the tested website pages. I did it so to eliminate the factors of the shared hosting server load fluctuations, network latency fluctuations, the latency fluctuations of the testing tool etc. By running multiple tests and calculating the average values I’ve got more precise and reliable results.
Understanding Start Render, Visually Complete and Load Time
I’ve already written this section in my previous article. But for the integrity purpose I’m including it here too.
These metrics can be found in such website performance testing tools as webpagetest.org. It’s important to be aware of these time metrics which are connected with your website speed and user experience. You need them to understand not only the effectiveness of using optimized images, but also to evaluate any other website optimization options.
So, let’s look at what Start Render Time, Visually Complete Time and Load Time mean (it’s very easy).
Start Render Time is the time which it takes a browser to start displaying anything on the page after you enter the page URL. From a visitor’s perspective this is the time which it takes a website to start loading. If Start Render Time is too long (and the page stays blank), a visitor may assume that there’s something wrong with the website and will leave the website (bounce off).
Visually Complete Time is the time that it takes for a browser to display everything on a user’s screen. From a visitor’s perspective it’s perceived that a page is ready to start consuming (reading, scrolling down etc).
Load Time is the time that it takes for a browser to completely load all elements and data (text, images, layout, design, forms, tables etc) on the page. No network transfer is included further. Visually it’s like that: a page looks ready, and also a loading icon on a browser tab stops indicating the loading process (e.g. stops spinning).

Spinning browser tab icon indicates the page is still loading
Besides, Load Time can be used as the time when the page becomes totally consumable. User can fully interact with the page, e.g. manipulate with the interactive elements on the page, input data on the page etc.
Here’s a filmstrip of a page loading process to clarify the explanations of the above terms.
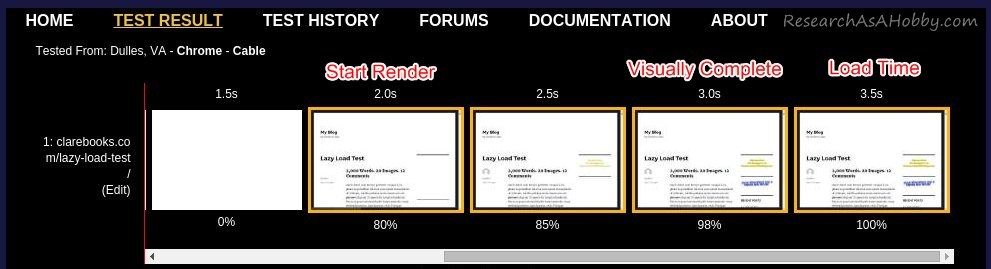
Typical stages of page loading in a browser
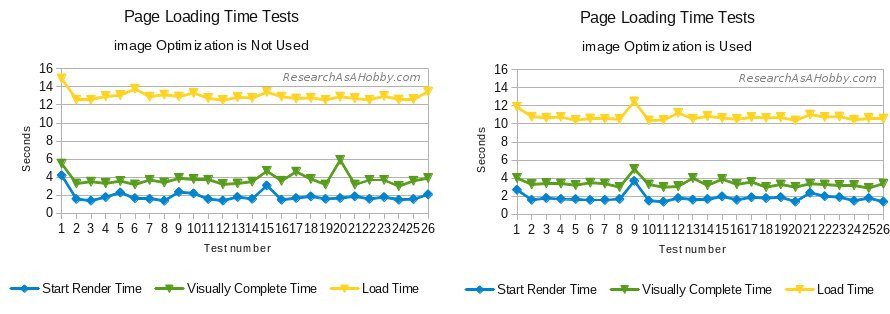
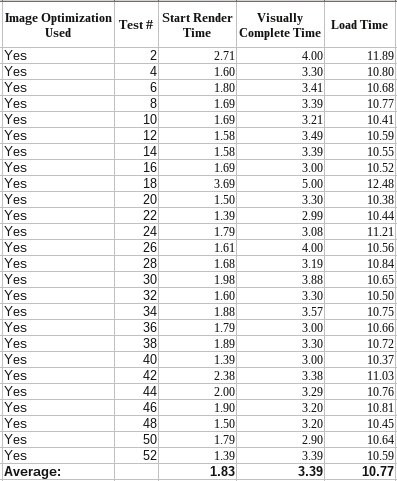
The results of 52 speed tests with optimized and not optimized images
As I’ve noted above, I’ve run 26 test with NOT optimized images used on the website and 26 tests with the same but optimized images to compare the speed performance of the website.
Result charts
Here are the test results in charts:
Result tables
And here are the same lazy load test results, but in table views:
Images are not optimized:
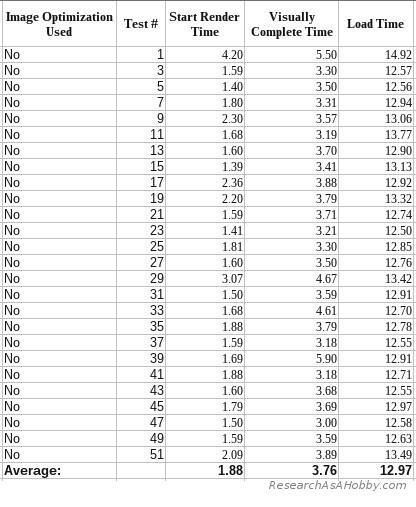
Speed performance with not optimized images
Images are optimized:
Speed performance with optimized images
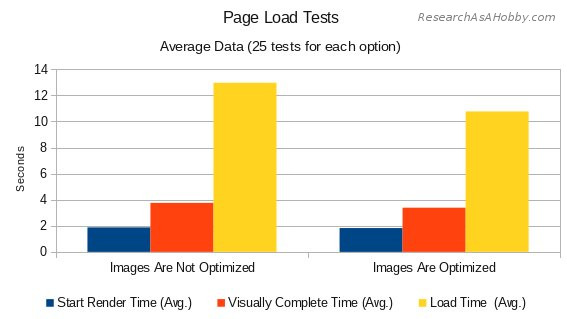
Comparison (average values):
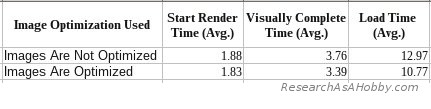
Speed performance with optimized and not optimized images (average values)
Webpagetest.org test samples
Here’s a sample of a webpagetest.org test run for the web page with not optimized images (the image is clickable):

webpagetest.org test: Images are not optimized
And this is a sample of a webpagetest.org test run for the web page with optimized images (the image is clickable):

webpagetest.org test: Images are optimized
Here you can download all 52 tests that I’ve run using webpagetest.org (39 MB).
Understanding the image optimization tests results
I’ve already written a very similar section about reading the the performance test results in my previous article. In this post I repeat the section but with the data which is specific to image optimization tests.
When it regards website performance, especially when tested on shared hosting, it’s important to run multiple tests. Otherwise, there’s a high risk that the results will be incorrect, too inaccurate or unreliable.
I’ve seen too many bloggers use just a single test to draw their conclusions. This way they analyze hosting performance, website speed optimization tools etc. This is a wrong way.
As you can see from the above test data, average values are very close in both groups (optimized and not optimized images). But single measurements fluctuate quite a lot. For example, Start Render Time differed from 1.4 seconds to 4.2 seconds in single tests. And Visually Complete Time differed from 2.9 seconds to 5.9 seconds. And this is no way because of image optimization influence.
The reason for the website speed fluctuations in tests is mainly the nature of a shared hosting server, as well as the network.
Server load (and therefore website performance) differs greatly, even in many times withing a short period of time. Multiple users and processes on a shared hosting run simultaneously. And it causes my test website’s performance differ for no inner reason.
Network and server latency fluctuations are also great. Although I’ve not presented Time To First Byte (TTFB) in this article, it also differed very much from 0.2 seconds to 2.2 seconds in my tests. (Most values are within 0.2-0.6 seconds interval). Again, this is obviously not because of image optimization. By the way, you can read this article to learn more about Time To First Byte and how it’s connected with website performance.
That’s why running multiple tests and calculating average values is essential if you want to get reliable results. By the way, for scientifically precise results there should be some statistical operations applied additionally (such as calculating statistical error). But it would be an overkill for this article. 52 tests that I’ve done and calculating averages is enough for evaluating image optimization effectiveness.
From a visitor’s perspective visualization of a page is not very much different in both cases (with optimized and not optimized images). Start Render Time is almost the same in both cases (1.8-1.9 sec). And the difference in Visually Complete Time is less than a half of a second: 3.39 sec with optimized images and 3.76 sec with optimized images.
A pretty noticeable difference is that Full Page Load Time in my tests is about 20% more when images are not optimized (10.8 vs 13 sec). From a visualization and user experience point of view it means that a loading icon on a browser tab continues spinning for longer if images are not optimized.
By the way, the size of the images that I reduced has changed by about the same amount (20%). It makes sense as in my case the images cause the most load since I didn’t use heavy scripts, tens of plugins or a lot of css files on my test website. (Optimizing scripts and css is another story.)
To put it simply, you can improve your website speed proportionally to how you reduce the size of your images (if you use a lot of images).
Also, less load time and visually complete time mean that a visitor feels more comfortable to start interacting with your website.
Besides, smaller load time is more beneficial from a SEO point of view as Google wants sites to load faster.
Conclusion
To resume, image optimization helps to make your site look faster and be faster. The more images you have, the more beneficial it is to optimize images. Also it makes your website better in Google’s eyes.
The gist of image optimization is to make your page less in size without noticeable image quality decreasing.
To put it very roughly, you can improve your website speed to a bit less extent as you reduce your page size. And since images are often the biggest part of your website, optimizing images plays a big role in making your site faster.
Even a simple steps like using a plugin or a free service that optimizes your images can make a big difference.
You need to know quite simple (and some obvious) principles and tricks to optimize your images efficiently. I’ve described them in this article, and here are just a very short summary:
- Keep your image resolution (size in pixels) reasonable. In most cases there’s no sense in uploading an image with resolution wider than a work text area of your website or a blog. Or place a smaller images which a visitor can click and open and full-size image in a separate browser tab or window.
- Choose image file format wisely. In most cases JPG is what you will want. PNG can be used for a higher image quality, for images with transparency or simple graphics. GIF is for animated images and less quality transparent images. SVG is for rich image animation and interactivity.
- Optimize images with a plugin or a service. Free options are fine in most cases. I prefer using a free online tool like this to avoid adding one more plugin to my WordPress installation.
- Don’t resize images in your HTML code or CSS since it adds additional processing loads and slows down your websites. Resize images instead.
The advantages of using image optimization is making your website faster:
- Even an simple image optimization truly improves website speed.
According to my 52 tests on a page with 2,000 words, 20 images (JPG) and 12 comments, image optimization with just a free online tool could cut the load time by 17%. Visually complete time improved by 10% (from 3.8 s to 3.4 s). However, according to my tests, image optimization did not affect much start render time. - Faster load time is good for SEO.
- Also, image optimization allows a visitor to start interacting with the page sooner since it reduces load time of your site.
- One more advantage is that with optimized images you can save your bandwidth.
As regards the disadvantages of optimizing images, they are minor. But still you need to be aware of them.
- It requires additional efforts to optimize images and look after the quality of result images.
- If you use a image optimization plugin, then like any additional WordPress plugin, it has a risk to your WordPress integrity and security.
Anyway, if your images are not optimized you add the odds that your visitor will want to quit your page because of a website slowness. It makes as much sense as many images you have on your website.
After all, whether you optimize your images or not, you better use a fast and reliable hosting. Hosting is the foundation of your website performance and it can’t be underestimated.
Using a CDN (paid option) also makes sense especially if you use a lot of images. I can recommend this one as not expensive with great support.
At the time of writing (April 2017) I don’t use a CDN, but I use a caching layer of CloudProxy website application firewall (another name for Sucuri WAF). In the first place it’s a security product from Sucuri. By the way you can find my performance tests of Sucuri WAF in this post.
P.S.: You’re welcome to check out more articles on WordPress performance optimization here.

BTW, I respect your privacy, and of course I don't send spam, affiliate offers or trade your emails. What I send is information that I consider useful.
Have you done any research with WebP images? I’m particularly interested in whether this situation is unique enough to justify two plugins? Don’t we need two plugins: To optimize JPEG files for the Safari users and create optimized WebP images for everyone else.
To test my theory, I have been experimenting with the plugin Convert WebP & Optimize Images.
Ignoring, for a minute, the task of picking the best plugin for each image type, can you address the issue of adding support for WebP images to a website that has JPEG images. [In my case, I have used resumsh.it and used a quality setting of 92.]
Would it be correct to conclude that the JPEG images optimized for JPEG would use a quality setting of 100% by the second plugin to avoid further lowering image quality?
Or is it your opinion that adopting a WebP plugin requires one to commit to only WebP images and abandon Safari users?
In testing the Convert WebP & Optimize Images plugin, I found that a number of the images processed could not better the compression already in use. I’m ok with that. If, however, the situation is as I described, there should be no harm (and a potential benefit) in using both plugins.
Do you agree? Or am I missing something?
Thank you for your question. Unfortunately, I have not researched WebP images yet. So I can’t suggest you anything specific, sorry. If you already tested it, I think you know more than me 🙂
In general, using two image optimization plugins makes sense if they complement each other and do not conflict. Why not.
I assume that different plugins may use different image optimization techniques. And some plugins may work better than others in your particular case (type and size of your image and your personal quality preferences). So trying and comparing the plugins makes sense (as you already did as I understand).
Hello friends, there is a new way to reduce weight and easily optimize the image without compromising quality. That is a good optimizer. Please try at https://optimizejpeg.com/.
Hi James.
What are the advantages of the tool you suggest compared to the ones mentioned in the article?
i have got more idea from this post. thanks a lot for giving this best idea
Thanks, Shayla, for your comment.
Feel free to share your ideas with us 🙂