


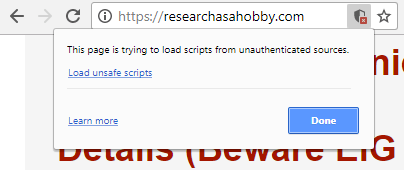
You are a website owner and it’s likely that you did not care much about getting SSL and moving your website to HTTPS. But starting from October 2017 Google Chrome indicates
non-HTTPS web pages as not secure the following way:
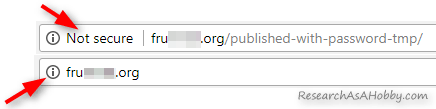
My tutorial (including video) will help you to get rid of this warning by moving your WordPress site to HTTPS easily and avoiding pitfalls. With this article even a person with little technical knowledge can switch to HTTPS correctly, easily and in a safe way.
And this is how your website URL may look like after migration to HTTPS:
![]()
And this is quite a long article because I included practical tips and tricks which will let you move your website to HTTPS on your own and for free. I also mention paid options which can make the process even easier.
I’ve written this tutorial first of all for shared hosting users with WordPress websites. However, other users may find this article useful too as it contains universal practical advice.
In this tutorial I focus on the most technical part of moving your site to HTTPS:
- getting HTTPS in from of your website URL;
- fixing HTTPS issues on your website to get rid of the ‘non-secure’ warnings (so-called ‘mixed content’ issues).
Also I cover other business concerns and options that you need to be aware of when migrating your site to HTTPS:
- choosing right SSL certificate;
- SEO concerns like duplicate content, your site positions in Google search, existing backlinks to the HTTP version of your site;
- losing your site social shares and likes;
- affiliate tracking issues (if your affiliate target URL is HTTP);
- your site speed concerns when using HTTPS;
- enhanced website security when using HTTPS.
I’ll show you that you can move your site to HTTPS the safe and right way easily even if you are far from being a programmer 🙂
Tutorial intro
The non-secure warning I’ve shown above appears in your visitor’s browser if your HTTP web page has an entry field (like a contact form, comments section, password field etc).
This warning sucks as it may negatively impact your website visits and conversions. Non-technical visitors may simply be frightened off and leave your website as soon as they see it.
So, it makes a good sense to move your site to HTTPS, even if earlier it had been not that necessary.
I’ve written this tutorial to help you solve this issue and let your website look legitimate and safe in your visitors’ eyes again. I will show you how to move your site to HTTPS easily and correctly.
When moving your site to HTTPS, there’s a risk of making your site slower or lose SEO value. As well as there are some other pitfalls I mentioned above. But doing everything correctly will let you avoid it all.
When done right, HTTPS even can be beneficial for your website SEO. At least Google mentioned it so. I would not count on it much though, but anyway HTTPS is one of the positive ranking signals. More about HTTPS and SEO you can read below.
The process of moving your website to HTTPS the easiest and the cheapest (free) way consists of the following aspects:
- You need to use a hosting which supports a free SSL (more on it in the next chapter).
- You make some simple adjustments in your WordPress dashboard or/and in some service files in your WordPress installation.
- You make sure that you use elements on your website in a safe way.
- You adjust settings in your Google Webmaster console and Google Analytics.
I’ll show you below how to do it all for free.
By the way, free SSL has some restrictions (e.g. multiple domains, subdomains, not all hosts support free SSL). In some cases you will need to use a paid SSL certificate. More on it below in the next section.
By the way, if you prefer using a paid SSL certificate, the procedure of moving your website to HTTPS will look similar:
- You buy a SSL certificate from your hosting or the 3d party (more on it in this chapter).
- You install the SSL certificate in your hosting account (a non-technical can do it; see more details in this chapter).
And then go the same steps as in the case with a free SSL certificate: - You make some simple adjustments in your WordPress dashboard or/and in some service files in your WordPress installation.
- You make sure that you use elements on your website in a safe way.
- You adjust settings in your Google Webmaster console and Google Analytics.
So, let’s get down to the step-by-step tutorial now.
1. Choose the SSL certificate that will fit you the best
To put it super simply, SSL certificate is a security technology that let your site use HTTPS. Sometimes in the Internet you may notice the term “TLS“. It’s basically a synonym to “SSL” as far as it concerns moving your site to HTTPS. So just don’t be scared off if you see SSL/TLS instead of just SSL.
Special entities called Certificate Authorities issue SSL certificate for your website and your hosting installs it on your account. Some hosts make the SSL issuing and installation hassle-free (or even automatic and bu default) for their clients.
There are different options and limitations that you can get with different types of SSL certificates. To put it simply, you can get:
- The simplest SSL certificate that allows your domain name have HTTPS and a padlock icon in its URL.
- If you don’t want anything special (like the options below), and just HTTPS is enough for you, then a free certificate (e.g. Let’s Encrypt) will do fine for you. This type of SSL is called Domain Validation.

This is how a domain with Domain Validation SSL certificate looks like in Google Chrome
- Note: a free SSL from a well-established Certificate Authority does not normally support subdomains (at least until 2018).
- Multiple domains are also not supported by free SSLs at the moment on shared hosting. You need either a VPS or a reseller plan or a paid SSL that supports multiple domains.
- If you don’t want anything special (like the options below), and just HTTPS is enough for you, then a free certificate (e.g. Let’s Encrypt) will do fine for you. This type of SSL is called Domain Validation.
- SSL that provides HTTPS not just for your single domain, but also for your subdomains or/and multiple domains. This type of SSL is called Wildcard Certificate. For your website visitors it looks like the Domain Validation certificate displayed above.
- SSL that is issued by a recognized authority which verifies your organization. Your authenticated organization details will be available in your visitor’s browser’s security settings. This type of SSL is called Organization Validation.
- In the browser URL your visitors will see the same as in case with Domain Validation SSL. But in the certificate information (available through browser settings) it will be noted that this is organization validation, not just domain validation.
- SSL that displays your business name beside your website URL in a green bar or font (referred to as “secure green browser bar” sometimes). This type of SSL is called Extended Validation.

This is how a domain with Extended Validation SSL certificate looks like in Google Chrome
To get a feeling of prices and to compare different types of SSL certificates, have a look at this Namecheap’s page. Namecheap is a reputable domain registrar which offers a really nice wide range of SSL certificates for very affordable prices. There you can add to comparison multiple SSL certificates to see stronger sides of each option.
By the way, it’s a good idea to use a free SSL certificate installed by your hosting. And if you need a paid SSL certificate, you can buy it from your hosting or by one of the SSL resellers. Namecheap is a good and affordable place to make purchase.
After all, if you don’t want to pay for a SSL certificate, you don’t have much choice. You then just need your hosting to support any free SSL certificate. Most likely it will be Let’s Encrypt certificate (probably managed with AutoSSL tool provided by cPanel).
Have a look at a short overview of Let’s Encrypt limitations. Still, Let’s Encrypt SSL certificate is often a good choice for simple blogs and non-commercial websites.
However, some hosts do not want to support any free SSL certificates, but offer only paid SSL certificates instead. So, if you use such shared hosting, the only way for you to move your website to HTTPS is either to pay for the cheapest SSL provided by your hosting or switch to the host which supports a free SSL. By the way, you can find my recommended hosts here.
2. Make a backup of your site or/and test on a clone site
The process of moving your site to HTTPS includes modification of your website installation. And it’s very likely you will need to edit internal links in your website. This means you will modify your database or/and website files during the process.
So, if you have not made a fresh backup of both your database and files, it’s time to do it.
By the way, I have an article devoted to WordPress backup solutions here.
It’s also a good idea to make a full backup of your site (including all your hosting settings). A full backup contains not only your website data, but also other your hosting account data including SSL settings.
Besides, if you don’t want to risk and would like to test how you can migrate your site to HTTPS before making any changes on your actual website, I can suggest making a clone of your site and test switching to HTTPS on it first. To do that, you need to do the following:
- Sign up with some affordable hosting which supports free SSL (e.g. Let’s Encrypt). Paying for just one month is enough. Note that you can’t have two domains with Let’s Encrypt SSL certificates under one hosting account. That’s why you need another hosting account even if your current hosting plan supports add-on domains or subdomains.
- Register a new domain (the domain for your tests on the new hosting). By the way, my favorite domain registrars including cheap ones are here.
- Clone your website to a new domain (here’s my tutorial how to do it).
- And test your migration to HTTPS on your clone site.
Alright, finished with the preparation. Let’s get to the tutorial now!
3. Decide where from you will take the SSL certificate and install it
If you want a free SSL certificate
As I’ve mentioned above, the easiest and often the free way is to get SSL certificate provided by your hosting. In this case it’s very likely that you don’t need to do anything since SSL certificate is already installed on your hosting account. And you are ready to move you site to HTTPS.
Here are the screenshots below on which you can see how to make sure a SSL certificate is installed on your hosting account.
In you cPanel, select SSL/TLS:
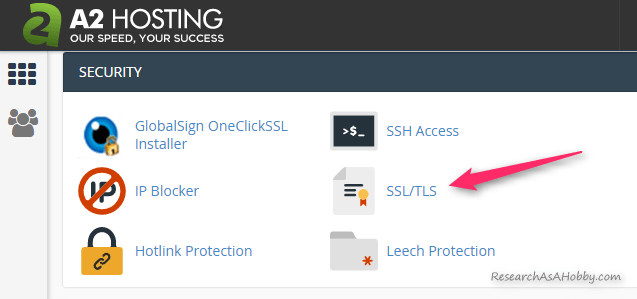
Then click “Manage SSL sites” under “Install and Manage SSL for your site (HTTPS)”:

And then you will see your domains and subdomains on which SSL is installed. Make sure your domain names (e.g. yoursite.com and www.yoursite.com) are in the list:
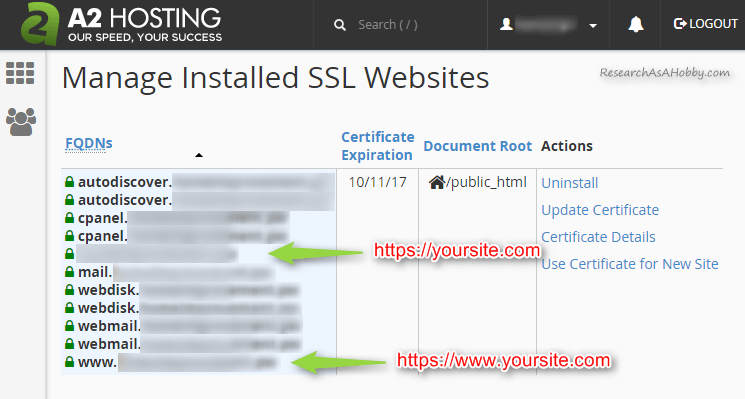
That’s it for this step! You have just made sure that SSL is installed for your website. So, hosting has already done its part of the work. As you see, you don’t need to do anything on server side if you want to use a free SSL certificate that is provided by your hosting.
Also, you may see this small article and this short comparison table in which a free Let’s Encrypt certificate is compared with paid SSL certificate types which are often used by website owners. The table shows briefly the most important limitations of a free SSL certificate.
If you want a paid SSL certificate
You may want to use a paid SSL certificate on your website for one or more reasons I’ve mentioned above.
Before all, you need to know that SSL certificates are issued by Certificate Authorities. But the usual way you get a SSL certificate is buying it from a reseller. The reseller can be your hosting, domain registrar or some other 3d party.
The advantages of paid SSL certificates are the following:
- More functionality is available for some SSL types (works for multiple domains/subdomains).
- May have warranty (insurance for your visitor against loss of money when making a purchase on your site; read a short note here).
- Giving your site more trust in the eyes of your visitors (I’ve illustrated it in this section above).
Buying a SSL certificate from your hosting is a good idea as your hosting technical support will be more happy to help you in case you have questions.
If you are using A2Hosting (many of my readers use these large and well-established hosts), just go to the corresponding page and choose the SSL certificate you need:
You can also contact the hosting support if you have any questions.
Buying a SSL certificate from a third party sounds reasonable if your host does not offer paid SSLs. Also, you may be looking for a particular kind of SSL certificate or just looking for a more affordable one than what your hosting can offer.
For example, I use Namecheap domain registrar which has a wide variety of affordable SSL certificates. You can check out the offers here. By the way, you don’t need to have your domain registered with a 3d party SSL provider to by a SSL certificate from it.
By the way, before buying SSL certificate from a 3d party make sure that your hosting allows it. Some hosts allow only SSL certificates if you buy them from those hosts only. Also get to know how you can install a third party SSL on your hosting. Contact your host if you hesitate.
By the way, if you use a CDN/Firewal/Proxy, then you may want to contact the provider and make sure you don’t need to upgrade. The matter is that it’s quite common that the cheapest CDN/Firewall/Proxy plans include only free SSL certificate. And if you want to take advantage of your paid SSL certificate, you may need a more advanced CDN/Firewall/proxy plan.
Installing SSL certificate which you bought from the 3d party is not difficult. Here are the instructions:
- from A2Hosting,
- and this one from Namecheap if you use some other host with SSL/TLS Manager (also, SSL/TLS Wizard) available in your cPanel.
In case you don’t have an option to setup SSL in your shared hosting account, contact your host’s technical support.
Check your SSL certificate
Once a SSL certificate is installed on your hosting account, you can check it.
A quick check is simply trying to open your website with HTTPS. Make sure your site loads. Perhaps, the layout may be broken, but anyway, in your browser you should see HTTPS (e.g. https://yourwebsite.com).
If your website redirects from HTTPS to HTTP, then you may want to temporarily disable this redirection (if you know how to do it) and test it again. It’s likely that you will need to edit your .htaccess file. Contact your hosting support in case of doubts.
A deep SSL checking using SSL testing tool from SSLLabs let you see the technical details of your SSL certificate. Just go to that tool and enter your domain name. You will see a summary and also a lot of technical details. What you want is simply seeing A or A+ result in the summary. It’s enough to say that your SSL is fine and you are ready to move on.
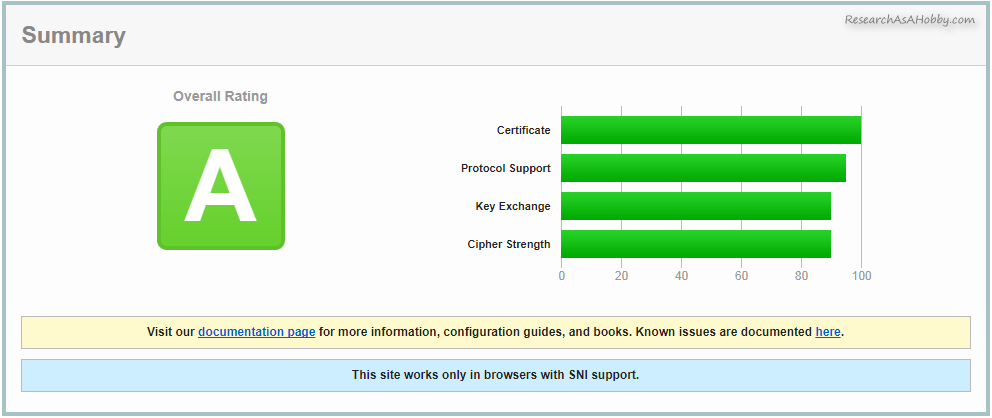
SSL test results summary (Let’s Encrypt was tested)
However, if the test fails and you see an error or the summary shows something different from A or A+, then something is not good. You may want to contact your hosting for support in this case.
By the way, if you use a CDN, a cloud firewall or a proxy, see below.
I hope your SSL certificate test has been successful. Now let’s move on!
4. Update URLs (change HTTP to HTTPS)
4.1. General information
This is the technically most difficult part. However, in many cases it can be done in a few clicks.
Updating URLs from HTTP to HTTPS in a WordPress website basically consists of the following parts:
- Updating WordPress settings.
- Updating inner links in user content (i.e. links in your posts, pages to other posts, pages, inserted images,embedded third party content). Technically, these links are stored in the WP database.
- Updating links to your website resources (such as CSS and Javascript files, image files etc used in your theme and plugins). Technically, these links are stored in your website’s files on your hosting.
You don’t need to update external links to make them HTTPS that go to other websites.
By the way, updating links from HTTP to HTTPS to the resources (images, files etc) on your HTTPS pages is called fixing ‘mixed content’ issues.
For example, if you have a HTTPS page and inserted image which is linked as HTTP, this will be determined by Google as a mixed content. And you can see it the way I explain below. This needs to be fixed. The embedded content also should be linked as HTTPS.
Otherwise, the page is not considered safe. It means no green padlock in the URL bar of your visitor’s browser, and non-secure note there instead.
The whole process of updating links from HTTP to HTTPS in both your content and website system resources requires several steps. And in some cases it may seem a bit technical.
However, there are simple ways which can work in many cases.
- If you think you can’t handle the technical part of moving your site to HTTPS, there’s another way that may help you. There’s Really Simple SSL plugin. It’s a free plugin which can make the work done. And its paid version is even better. I will explain the difference between free and paid version below.
Note that this plugins can work in many ways, but not always. In some cases you will need to fix mixed content manually (see below how) which have not been fixed automatically by the plugin.
4.2. Options you have
Here are the options that I suggest you can do to update your inner URLs to HTTPS. You need to choose one:
If you want to try avoiding technical things as much as possible:
- A. Try a plugin offered by your host to simplify the process (if your hosts offers it). Your hosting can assist you to some extent. In some cases you may need to fix ‘mixed content’ issues yourself (see this section).
- B. Use Really Simple SSL pro plugin, paid version. The paid version gives you a human technical support and the tool that simplifies finding mixed content issues (see more on this plugin feature here). In some cases you may need to fix ‘mixed content’ issues yourself (see this section). Really Simple SSL pro plugin just makes it easier by automatically crawling your site and finding the pages with mixed content which have not been fixed automatically. Also, it has some other nice features.
- C. Try using Really Simple SSL plugin, free version. This may work well on websites with HTTPS-ready WordPress themes, plugins and content. If the plugins does not work out of the box for all mixed content issues, you will need to either use option B, D or E.
If you want to have everything under control and do manually the job that the plugins in the above options do, then consider option D:
- D. Do all the work migrating your site to HTTPS manually without using any plugin. This approach of moving your site to HTTPS is the most professional. And although it’s the most technically complicated compared to other options, it’s a ‘cleaner’ way to go. And it’s free. And if you are not afraid of doing some technical stuff such as running SQL update queries in your MySQL database on your WordPress website. And you may still be required to fix mixed content issues. I’d recommend going this way.
If the above options do not make you happy or do not work out for you, then you can hire a technical person who can do the work for you:
- E. Find a freelancer who will move your website to HTTPS. However, don’t forget, that you also need to make changes in Google Webmaster console and Google Analytics if you use it (read more below).
Besides, there’s another option actually left:
- F. Create your website from scratch installing it on HTTPS. I include this option just in case so that you know about it. I guess this option makes sense if only you were going to re-do your website anyway. Obviously, in general it’s much easier to migrate you website to HTTPS rather than re-do a website. Just be aware that if you re-do your site from scratch you still need to use properly coded theme and plugins which will not cause ‘mixed content’ issues.
After all, the whole matter of moving your website to HTTPS may sound to you quite technically complicated. But in fact from a practical point of view, it’s not that difficult. You just need to understand what you are doing and in most cases it’s pretty simple.
In fact, easy option A, B or C work in many cases perfectly. And you need just a couple of minutes to make it work. These are the most favorite options for most non-technical users.
However, there are disadvantages of the three methods (A, B, C). They are the following:
- These options do not solve ‘mixed content’ issues if your website or the plugins you use are not HTTPS-ready. In this case you need to do manual actions. It means that you need to change some insecure HTTP links to HTTPS manually in the code. I explain it in more details in option D. Really Simple SSL pro plugin simplifies identification of such issues.
- These three options require installing and constant using a plugin which is a little but still a drawback. Although it does not make your site slower, it is additional piece of code. And your HTTPS website functioning depends on it.
So, if you are a perfectionist or technically pedantic, then you will want to avoid using one more plugin which you are able to do without. This will require more technical efforts of replacing HTTP with HTTPS inside your website. But it’s not really difficult. See how to do it (the option D) in the next chapter.
4.3. Set HTTPS in the WordPress settings (Site URL and Home URL)
Go to your WordPress dashboard / Settings / General. And in in the fields “WordPress Address (URL)” and “Site Address (URL)” set HTTPS instead of HTTP for your website URL. See an example on the image below:
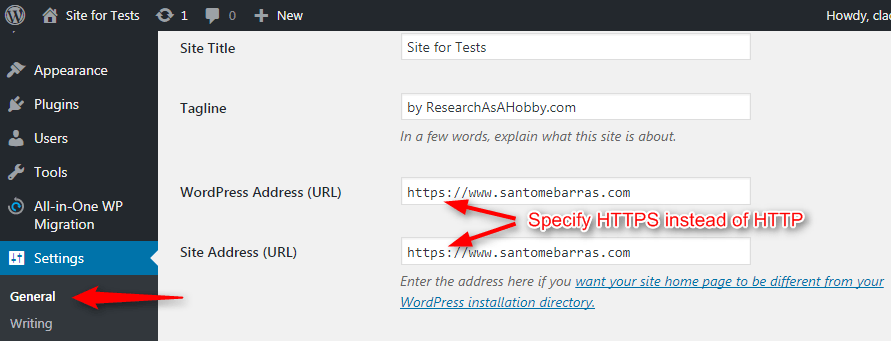
Set HTTPS instead of HTTP in your website URL
The same effect takes place if you change siteurl and home values in the wp_options table. (No need to do it, the image below is just for informational purposes):
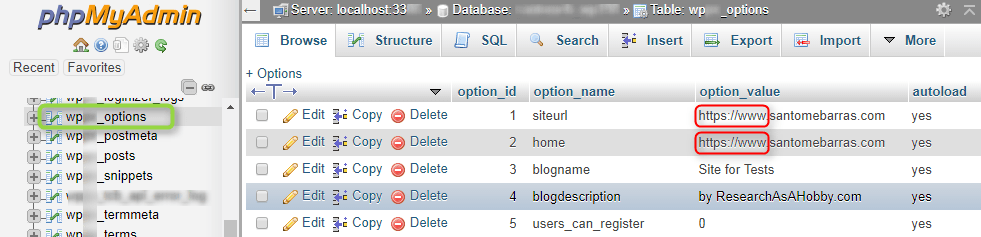
Website URL settings in the WordPress Options table
That’s it with this step. Very easy!
4.4. Updating inner links to HTTPS in your website content
Here’s what it basically means. There are links from your pages and posts to other posts and pages on your website. You inserted these links when you wrote your articles, pages etc on your website. And these links are HTTP.
And you need to turn these links into HTTPS. You can go to each page and edit the HTML text of your articles and other places manually to do that.
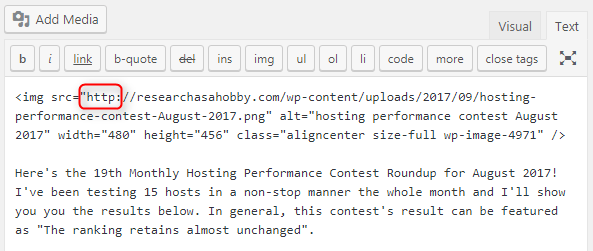
HTTP links in user content needs to be changed to HTTPS
Manually changing http://yourwebsite.com to https://yourwebsite.com can probably makes sense if you have just a small number of pages. But in case of tens and hundreds of pages or more you may want to have an automatic way to do it.
Moreover, if you use a page building plugin, forexample: (e.g. ThriveArchitect, Elementor, BeaverBuidler etc) manual editing of HTML code can be not very convenient. And automatic changing HTTP to HTTPS in links saves your time and efforts.
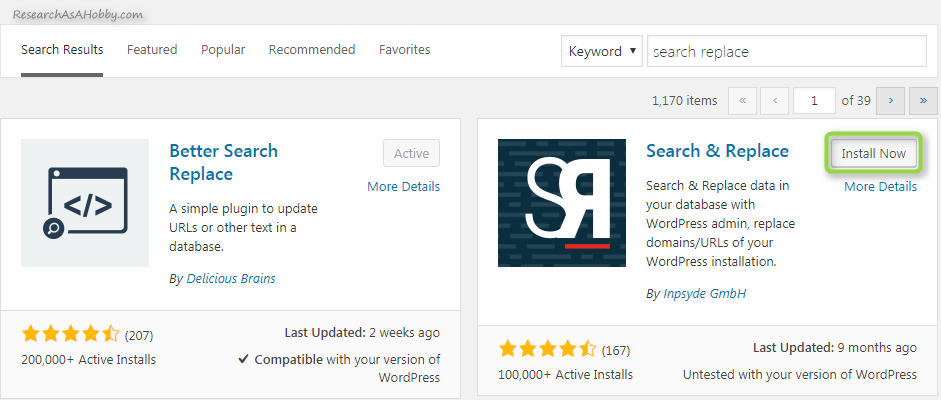
So, here comes a free Better Search and Replace plugin for WordPress. By the way, there are also other similar plugins. But I will use this one for my tutorial as it works fast and does what we need.
After you replace HTTP with HTTPS for your website’s URLs which are mentioned in your website content’s HTML code, you can remove the plugin.
So, let’s start.
Install and activate the plugin. Nothing special:
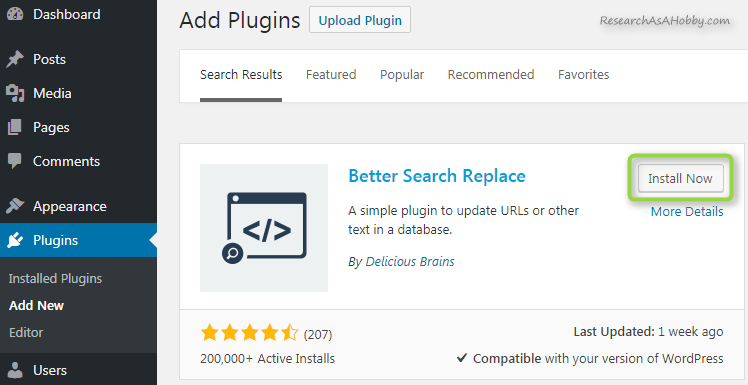
Installing the plugin to replace HTTP with HTTPS in your website content
Then go to the plugin settings. They are located at your WordPress dashboard / Tools / Better Search Replace:
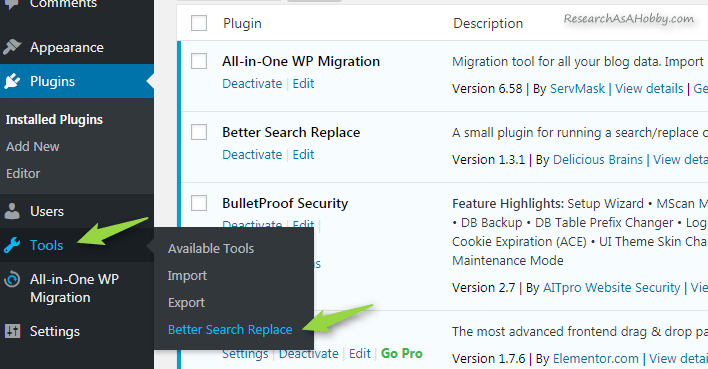
Better Search Replace settings location
Now setup the plugin and run replacing the HTTP version of your website URLs with the HTTPS version as shown on the image below:
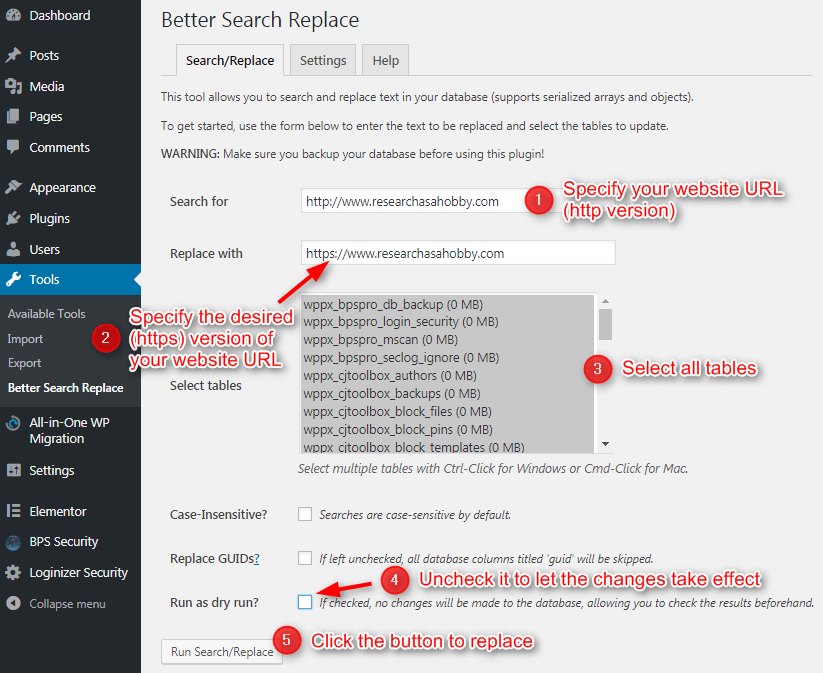
Better Search Replace settings to replace HTTP with HTTPS URLs in your website content
By the way, the settings on the “Settings” tab can be left by default.
Note: if you get a error during the execution, then it’s probably too much data to process. Try executing the update in several steps, e.g. process bigger tables separately or/and process tables in batches. Decreasing page size setting (on the “Settings” tab) also helps.
In many cases using this neat plugin is enough for replacing links in your website database. However this plugin (Better Search Replace) does not affect serialized data in the database. It means that some HTTP links still may stay unchanged. If this happens in your case, you will encounter it in the further checking and you can fix it as I show below using Search&Replace plugin.
That’s it for this step. You have replaced your HTTP version of your website URLs with the HTTPS version in your website content.
4.5. Make sure your website pages do not have ‘mixed content’ issue
On the previous step you have changed the URLs to HTTPS which were technically stored in the database. But some URLs of your website which are stored in the files may still be HTTP.
Also, there can be some other HTTP links which are stored in the serialized form (sort of compressed) in the database. You need to change these links to HTTPS too by editing your website content.
Insecure (HTTP) links to resources which are used on your site cause so-called ‘mixed content’ issue. Mixed content issue takes place if a HTTPS (i.e. secure) page of your website contains HTTP (non-secure) elements. Such elements can be:
- Web fonts
- JavaScript includes
- CSS style sheets
- Image embeds
- Video embeds
- Audio embeds
- Iframe content
You need to find such places and fix them to make secure (i.e. using HTTPS links instead of HTTP links).
How you can fix mixed content?
Once you find the page with mixed content, you need to find out what file or link is causing the issue. And then you decide how to fix it:
-
Sometimes it’s just enough to change the HTTP link to HTTPS (e.g. replace http://expternalsite.com/some_file.css with https://expternalsite.com/some_file.css if this file is available via HTTPS). Some of them you can fix manually by editing your content. Some of them you can fix using database editing plugins which search and replace text in the database. I explain how to do it below.
- Sometimes you may realize that you just need to delete the outdated plugin that you don’t really need. Moreover if he plugin contains potentially insecure content.
- In some cases it makes sense to contact a developer of that plugin and request the update.
- In some cases you may want to download an external resource (e.g. a file with fonts) which is available only via HTTP to your website. Thus you will be able to link to the resource locally using HTTPS.
- In some cases you can find an alternative to the insecure content (e.g. find a plugin with similar functionality but which does not cause mixed content issues).
So, whatever you decide to do, you need to replace the external links to insecure (HTTP) resources with secure (HTTPS) links.
How you can find the pages on your site with mixed content?
There’s a number of ways how you can check that each and every page of your website is secure (i.e. with no insecure elements in it).
One of the most efficient ways is to use Really Simple SSL pro plugin functionality. Here’s the article about it.
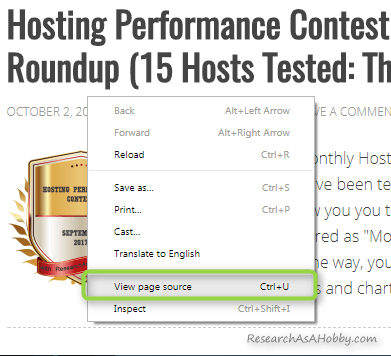
And as as a totally free alternative, I’ll show you right now how to check each of your page manually. All you need is just a Google Chrome browser.
You need to know the URLs of all your website pages that you want to be secure (HTTPS with no mixed content) in the Google’s eyes. It means such pages should have a green padlock and no non-secure mark in the URL field of your visitor’s Google Chrome browser.
One of the easiest ways to get the list of these URLs is looking at your sitemap. The sitemap contains the list of all your website posts, pages, categories, tags, attachment pages etc.
Very often the sitemap is located at yourwebsite.com/sitemap.xml address. If you don’t know where your sitemap is, just open this address in your browser. If it works, you are good. If it does not, make sure you have sitemap specified for your website.
For example, here’s the screenshot of my sitemap (I use Yoast SEO plugin that generates the sitemap for my website):
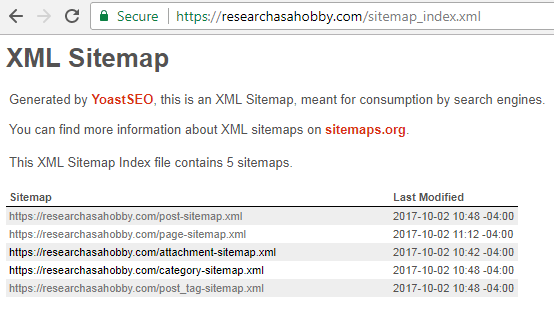
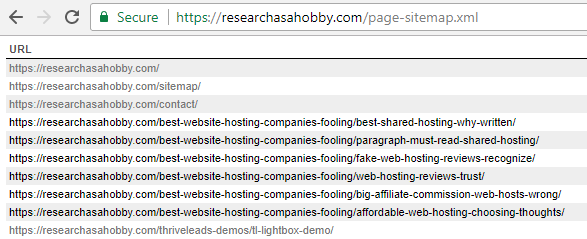
It contains the links to other sub-sitemaps which contain the pages, the posts and so on. For example, this is a fragment of the sitemap of my pages:
Note that the URLs are HTTPS, not HTTP. This is so because the sitemap automatically regenerates and includes your HTTPS pages as soon as you do previous steps.
Now, you can put together the list with your website posts, pages etc (let’s call them pages in short).
And you can check each page if there’s a mixed content issue on them. To do that just open each page via HTTPS one by one in Google Chrome and look at the browser URL bar. If it displays a green padlock, then there’s no issues on that page:
![]()
And if there’s no green padlock on the HTTPS page, and there’s a non-secure notice or attention information icon like on the images below, then the page is not considered safe by Google. It means that there’s a mixed content issue on that page:
![]()
![]()
By the way, on some HTTPS pages with mixed content you may notice a broken layout, wrong fonts, missing elements, broken functionality etc.
So, on this step you have found a problematic HTTPS page with mixed content.
Now you need to locate the mixed content on that page. Read the next section to know how to do it.
4.6. Fixing ‘mixed content’ issues on your HTTPS pages
4.6.1. General overview of the process and video walk-through
Here’s a short overview of the process that I explain below in this pretty long section. Come back here once you are lost eventually during the process of fixing the mixed content issues.
- You identify the HTTP link that causes mixed content issue on your website page(s).
- In some cases you can easily find out where this HTTP link is located and what you need to edit in your WordPress website to fix it. If it’s your case, fix it (replace it with the new HTTPS link) and you are done. Otherwise, make further steps.
- This problematic HTTP link can technically be located only in two places: either in the website files OR in the database.
- You download your website files and scan them searching for the HTTP link. If you find the HTTP link, you replace it with the new HTTPS link. Done. Otherwise make further steps.
- You use Better Search Replace plugin to replace HTTP link with the HTTPS link in the database. (Note: the content of your website is stored in the database). If mixed content issue is resolved, you are done. If not, make further steps.
- You use Search & Replace plugin to find in what database table or tables the problematic HTTP link is located. And then you use the plugin to update the database table(s) to replace the HTTP link with the HTTPS link (do it with caution, see below). Or better, use phpMyAdmin to update the table values. Now, if you have done everything correctly, the mixed content should be fixed.
You can repeat the process as many times as required to fix all mixed content issues.
After all, the point of the process is to replace the resources (images, external files) which are used insecurely (i.e. via HTTP) with the resources which are used securely (via HTTPS). Sometimes instead of doing the technically complicated procedure, you can simply re-load your resources (e.g. images) to your website to get rid of the mixed content issues which are caused by these resources (e.g. images).
Another point to keep in mind, if you use external resources (CSS files, images etc), you need to make sure that these resources are available via HTTPS. Otherwise they will be causing mixed content on your website. If you have no control over the external website, then find alternative external resources which are available via HTTPS, or move the resources to your website.
Also, mind your minification or/and caching plugin or solutions. if you use any. When making changes to your website, be aware that your caching solution may cache your old version of site. That’s why you may need to clear the cache in the caching solution after you change anything on your website. Or you can simply deactivate your caching plugin (and minification plugin) while you change your site.
I explain this process with more details and examples right below.
And here is the video tutorial how I fix mixed content issues using different techniques when migrating website to HTTPS. You can find this video very useful in conjunction with reading the below chapters.
4.6.2. Using Google Developer Tools to find mixed content
Google Developer Tools / Console tab in Google Chrome is to help identify mixed content issues.
So, you have found a page on your website which contains mixed content.
To locate the issues right-click with your mouse on the page and select “Inspect”:
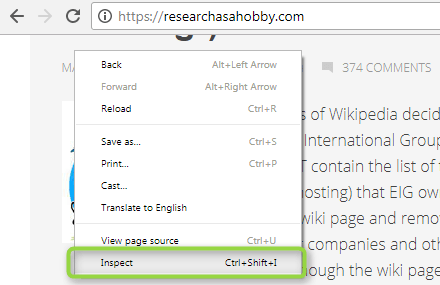
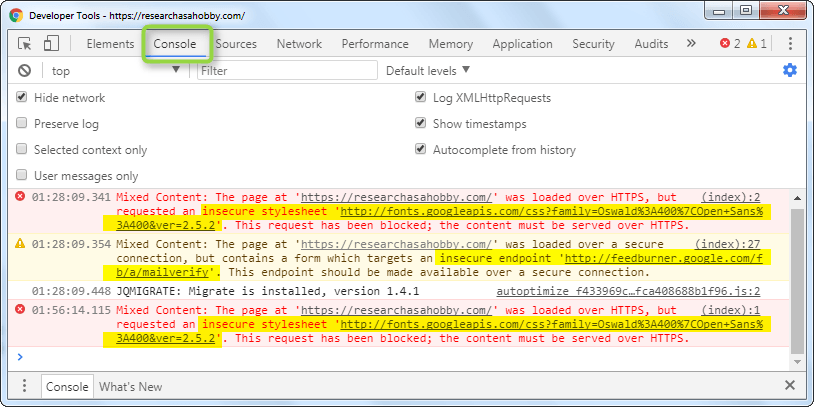
Google Developer Tools panel/window will open. Go to “Console” tab. And you will see the list of your mixed content errors (I highlighted them in yellow on the image below):
Now you need to analyze the messages and try finding out what plugin or which element on your website cause each of the issues. Sometimes it’s easy to do as you can clearly see what is causing the mixed content issue and what you need to fix. But sometimes you don’t have a clue where to look at further anyway.
We have come to the point in this tutorial where exact steps are not enough because each website is an individual combination of theme, plugins, custom code and user content. And the mixed content errors can be quite specific in each case. That’s why it’s hard to say where exactly you need to look on your website to fix the mixed content issues.
However, I can give you a recommendation that will help you fix mixed content errors and make your HTTPS pages secure in most cases. Here it is right below.
The whole matter is that some links in your website code and your website content are HTTP where as they should be HTTPS. And you just need to replace these HTTP links with HTTPS. Sounds simple.
Also, keep in mind that your website is a combination of database and files. And you have already replaced HTTP links with HTTPS in your database.
So, there are big chances that the HTTP links which cause mixed content issues are still somewhere in the files. Fixing these links in the files is likely to resolve all or most of the mixed content errors.
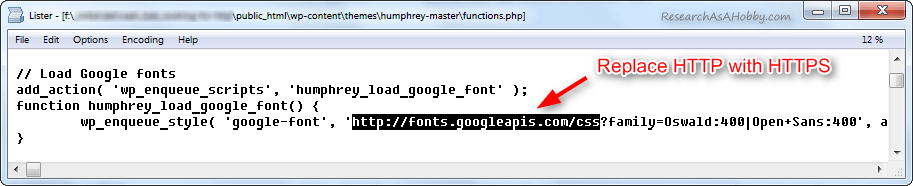
4.6.3. Replacing insecure links in the files
To replace HTTP links with HTTPS ones in the files, I suggest downloading your website files to your local drive. And then using your file management tools find the places in your website files where unsafe HTTP links are used.
For example, you want to fix the issue connected with an insecure style sheet file (see my example on the screenshot above). You know the name (or its part) of the style sheet file (in my case this is “http://fonts.googleapis.com/css”).
Before all, check that HTTPS version of the resource is available. In my example, I try opening “https://fonts.googleapis.com/css?family=Oswald%3A400%7COpen+Sans%3A400&ver=2.5.2” in my browser. If it opens fine, you can continue. If it does not exist, then you need to find an alternative to that resource or download it to your website to access locally via HTTPS.
So, we continue now. In my example I want to find out in what file or files the insecure resource (“http://fonts.googleapis.com/css?family=Oswald%3A400%7COpen+Sans%3A400&ver=2.5.2”) is used. Download to your computer your website files which are located in public_html folder (via FTP or using partial backup).
And then simply run your favorite file search tool that will find files by text. I use Total Commander’s file search functionality. Here’s my search result:
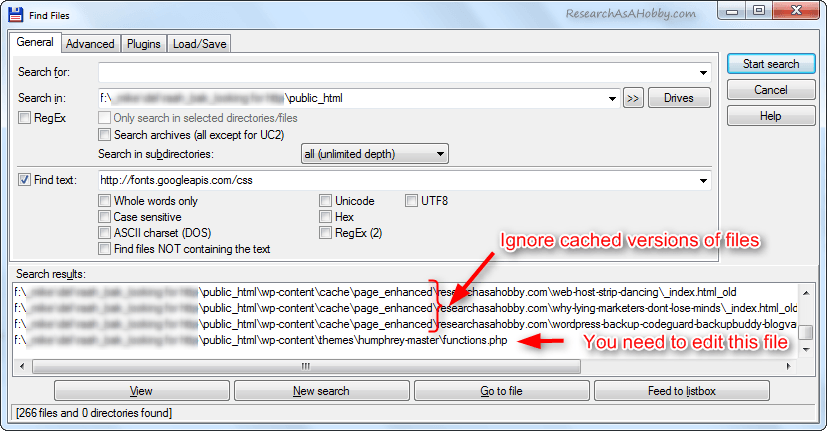
After you find the files, you can replace insecure HTTP resource with the secure HTTPS version of the resource. You need to use your common sense to determine which files should be edited and which should be not.
For example, it does not make sense to edit cached versions of files. Also, if you get updates of your theme (or other software like plugins), do not edit the files which belong to your theme/plugins. Otherwise with the next update of your theme/plugin your edits will be overwritten. Contact your theme/plugin developer instead to make the theme/plugin HTTPS-ready.
In my example, the file belongs to the theme that I support myself, so I can edit it.
After you edited the file, upload it back to your hosting.
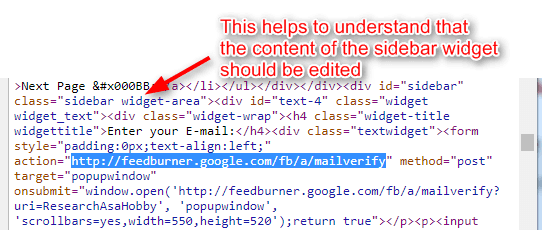
4.6.4. Viewing page source code to locate mixed content
Another trick that will help you locate a particular mixed content issue is looking at your page source code.
By looking at the surroundings of the mixed content code string in the page source code you can identify where the mixed content element is located.
To see the HTML source code of your website page, right click on the page and select “View page source”:
And in the opened window with the HTML code, find (Ctrl-F) the resource which causes mixed content.
For example, the other mixed issue that I found on my page is caused by this resource: “http://feedburner.google.com/fb/a/mailverify”. So, I open the source code of the page and find the problematic resource in the code. The code beside it tell me that I need to go to my sidebar widget in my WordPress dashboard to edit the resource link from HTTP to HTTPS:
4.6.5. Replacing insecure links in the content (advanced)
Sometimes the HTTP link which causes mixed content issue is located not in your website files, but somewhere in the content. And you can’t find this place in your website content easily.
And even using Better Search Replace plugin like I described above does not help to replace the link. This happens if the link is technically stored in the serialized data in the database. Better Search Replace plugin does not “see” such content.
In this case Search & Replace plugin can do a great job. It’s free.
Here’s how the plugin generally works. it can scan your database tables for some text (e.g. URL) and tell you in which tables and in what table fields this URL is found.. Also, the plugin can generate a SQL script and run it to replace text in the database tables.
However, here’s a word of warning. Please note that this plugin may seem to work very long on shared hosting (or even sort of endlessly) if you use it for importing the whole database or large tables (more details on it below). That’s why you better to use it only for updating not all, but only selected database tables which are not large (less than a pair of megabytes is fine on a shared hosting).
And that’s why I recommended trying to use first Better Search Replace plugin instead which works fast and may fix all your mixed content issues located in the database.
Before showing you how to use Search & Replace plugin, let me tell you a bit technical note to explain you a good trick. As I’ve mentioned, this plugin can scan your database for a specific text (HTTP link in your case). And then it can create a script for the new database that you can import to replace your existing database. This way this plugin helps you replace an old link with a new link. But this approach (replacing a whole database table) is too heavy in case of large database tables.
That’s why I recommend using this plugin not for importing large database tables, but for scanning your database (even a large one) for the HTTP link you need to replace. This way you can find which database tables you need to replace. Then you can tell the plugin to create a script not for the whole database, but just for the selected tables. Although the tables should not be very large (a script of tens of megabytes is likely to fail on a shared hosting).
By the way, instead of running SQL script in Search & Replace plugin, use phpMyAdmin to edit the database table values instead. I show how to do it in my video.
This trick helps you to use the power of Search & Replace plugin without risks to fail database import execution.
Also, sometimes after just scanning the tables with Search & Replace plugin, it gets clear where you should go in your WordPress and change the content the usual way.
Also sometimes, especially if there are not many changes to do, it’s even much safer and easier to change the values in the database table(s) using phpMyAdmin, than using import functionality in Search & Replace plugin.
One more warning is avoid replacing values in GUID fields. One reason is that it has nothing to to with mixed content issues. Another reason is that it can make your script too large. Besides, it can affect your RSS feed.
And of course, don’t forget to make database backups, especially before running the scripts generated by Search & Replace plugin. If anything goes wrong, you can restore the database backup easily. It will let you start over again right from the failure point.
When editing or updating database values, it’s most likely that you will need to update just Content fields.
After all, Search & Replace plugin allows you to see what you are going to change in your database. And you need to review the changes before you run the script if you decide to do so.
Alright, the theoretical part about Search & Replace plugin is over. Now let’s get to the practice.
4.6.6. Using Search & Replace plugin
After you read the previous section, you can go on.
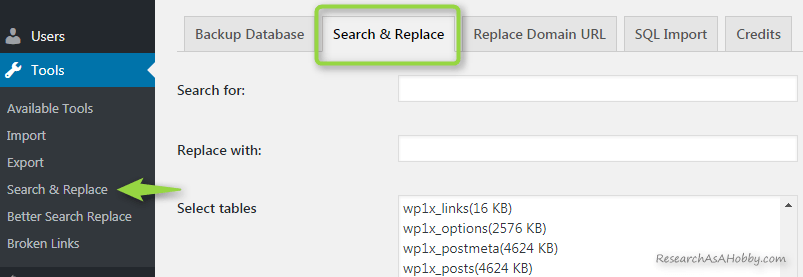
Install and activate Search & Replace plugin:
Go to the plugin settings in your WordPress dashboard / Tools / Search & Replace:

On the plugin setting’s page go to “Search & Replace” tab:
So, you have a problematic HTTP link that causes mixed content issue. You need it to be replaced with the secure HTTPS link.
In my example, here’s the HTTP link that I want to replace with the HTTPS link: “http://feedburner.google.com/fb/a/mailverify” (see the screenshot with mixed content report above). This HTTP link is connected with my email subscription form that is hidden somewhere in the content on my website (probably in my ThriveLeads opt-in forms). I could not quickly find all the places where this URL is used on my website, so using Search & Replace plugin will help me in fixing it.
Now find out in which database tables your problematic HTTP link is stored.
To do that do the following:
- Input your problematic HTTP link in the field “Search for”.
- In the field “Replace with” you can actually enter whatever you want (it does not affect anything on this step). But you can input the HTTPS link there.
- Click “Select all tables” (you want to search in all database tables).
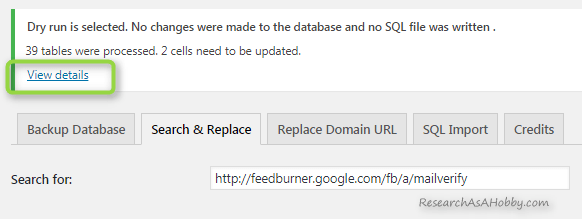
- Leave “Dry Run” option checked (it’s a safe option which helps to see the required database changes in a safe mode which works fast).
- And click “Do Search & Replace” button (it’s safe to click it now, nothing will be changed in your database actually).
Here’s the screenshot of these settings:

Search & Replace plugin settings to find out where the insecure URL is found
When the plugins finishes working, click the “View details” link:
A window will appear with the database tables entries where the problematic URL was found. What you need is the database tables where the URL was found:
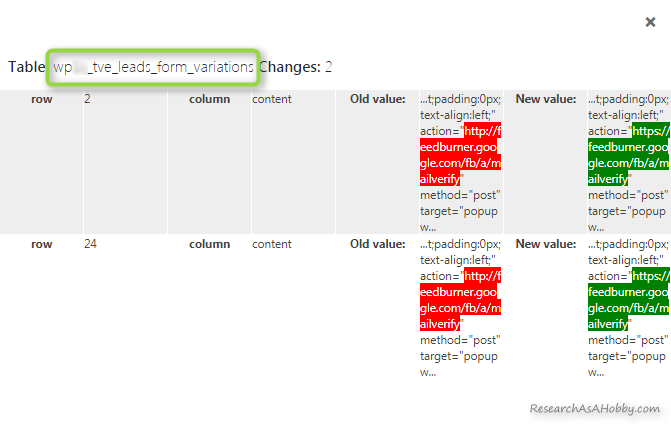
Note the database tables where the insecure URL was found
Remember (or put down somewhere) the found table names. On the next step you will re-create these tables where the insecure HTTP link was found. The new tables will contain the new HTTPS link.
So, in my case I need to re-create just one table.
Now get back to the plugin settings:
- Select only the tables which you have just found (the tables which contain the insecure HTTP link).
- Unselect “Dry Run” option (because you need to generate a script now).
- Set option “Export SQL file with changes” (with this option the plugin will generate the script).

Search & Replace plugin settings to generate SQL script
“Use GZ compression” option helps if you get a large script.
Then click “Search & Replace” button. And the plugin will generate SQL script that will replace database tables with the new ones containing the new HTTPS link.
Download the SQL script by clicking the button:
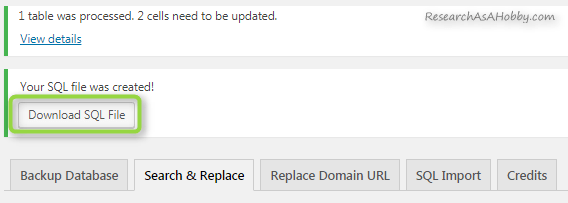
Then go to the SQL Import tab, select the SQL script and run the import:
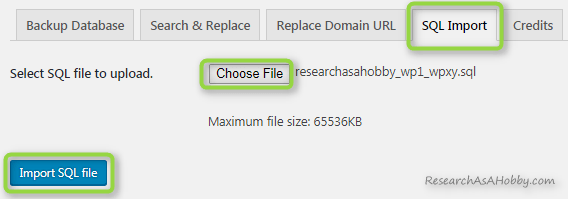
The script will be imported and thus the database tables will be re-created. The new tables will have the secure HTTPS links you specified.
Now you may need to clear the cache in a caching solution (if you use it and have not deactivated it). Then re-open your website page and make sure that that the mixed content issue has been resolved.
This way, you fix mixed content issues in your website files one by one until you fix them all. By the way, fixing a mixed content issue on one web page may result in fixing mixed content issues on other pages. And finally the secure green padlock will display on your website pages:
![]()
Technically fixing mixed content is quite easy to do. However, it takes a bit time to get an understanding of what you are doing.
5. Managing redirects from HTTP to HTTPS version of your website
Since you migrate your website from HTTP to HTTPS, you need to force HTTPS. It means that all visitors of your website including search engine bots should consider that your new version of your website is available from now on via HTTPS, not HTTP. So, anyone trying to access the HTTP version of your website will be redirected to the secure HTTPS version.
This also helps to avoid duplicate content issues and is very good for your SEO.
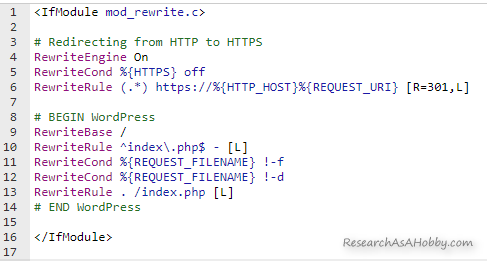
You can easily do it by adding the following lines of code to your .htaccess file:
# Redirecting from HTTP to HTTPS
RewriteEngine On
RewriteCond %{HTTPS} off
RewriteRule (.*) https://%{HTTP_HOST}%{REQUEST_URI} [R=301,L]
Technical note. By the way, other examples of the code blocks you can find here. And if case of redirect issues, this might help (e.g. redirect to HTTPS should go before rules for WordPress).
You can place this code in the beginning of your .htaccess file (above the rules for WordPress). By the way, it’s advised to put the code inside the block “
Also, it’s advised to have just one line “RewriteEngine On” which goes above the rewrite rules.
The .htaccess file is located in the root directory in the files on your hosting.
A technical side-note: the code above works for Apache web server only. If you don’t know what it means, then just ignore this side-note. Anyway, it’s very likely to work for you if you use a shared hosting.
You can edit your .htaccess file via File Manager in your hosting cPanel. Alternatively, if you use a security plugin Bulletproof Security or Bulletproof Security Pro you can edit your .htaccess file right from your WordPress dashboard.
Here’s the screenshot below to show you where my .htaccess file is located in File Manager through cPanel (your .htaccess file is located in a very similar place, e.g. in your public_html folder). If you don’t see your .htaccess file there, make sure that “show hidden files” setting is selected:
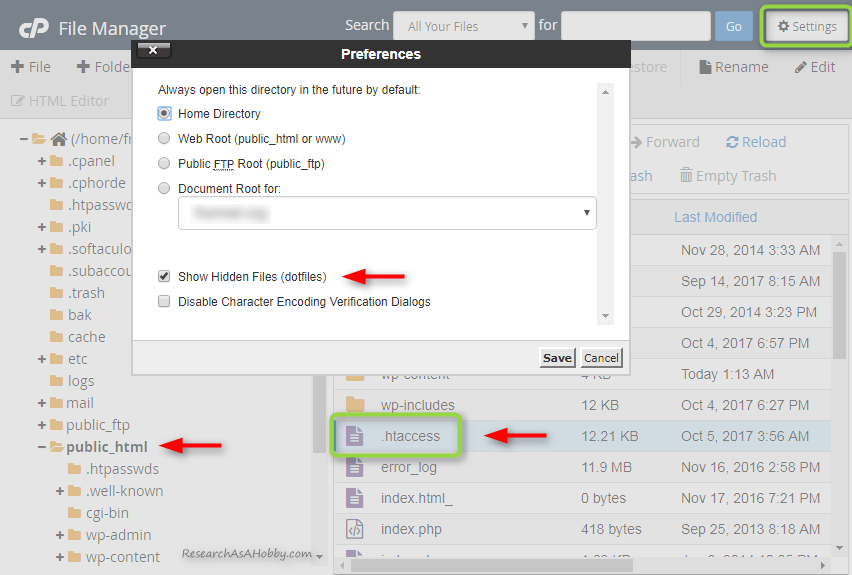
And here’s an example of a standard WordPress .htaccess file with the HTTP-to-HTTPS redirect block:
If you have done everything correctly, the redirect from HTTP to HTTPS should work fine. To check it, open some page on your website using HTTP (e.g. http://yourwebsite.com/somepage/ or http://www.yourwebsite.com/somepage/) in your browser. And it should redirect you to the HTTPS page (e.g. https://yourwebsite.com/somepage/ or https://www.yourwebsite.com/somepage/).
6. Check out robots.txt – whether HTTPS pages are blocked
It’s likely that you will not need to do anything regarding robots.txt file. But I’m including this section just in case.
The file robots.txt may contain rules for search engine crawlers. The file is located in the root directory (usually this is public_html folder, see the screenshot above).
You just need to make sure that HTTPS pages of your site are not blocked. Open this file and see its code if there’s anything suspicious (e.g. you see HTTPS or SSL there).
If robots.txt does not exist, just skip this section and move on. You are fine.
Usually, if you or your website developers did not block the HTTPS version of your website using robots.txt on purpose, then you should be fine. Otherwise you need to allow search engines crawl your HTTPS website. You may need to contact a technical person to edit your robots.txt. This goes out of scope of this tutorial.
7. Make sure your site map now contains HTTPS pages
The sitemap is the file that contains a list of all your posts, pages etc of your website.
I’ve already mentioned where you can find your sitemap (see above).
You just need to make sure that all the entries in your sitemap are HTTPS, not HTTP.
If it’s so, move on to the next section of this tutorial.
If it’s not so, something is wrong with one of the previous steps you made. Check out again this (and particularly this) section.
8. Let Webmaster Tools and Google Analytics know about your migration to HTTPS
There’s nothing special in this section. A few simple steps and you are done. I just refer you to the short tutorial here.
Also, a couple of practical short key notes about Webmaster Tools:
- Add your both HTTPS versions of your website (https://yoursite.com and https://www.youriste.com).
- Don’t forget to submit sitemap (“Crawl / Sitemaps”) for the main HTTPS version of your site for faster re-indexing of your site.
- It’s advised to initiate “Crawl / Fetch as Google” for your home page of HTTPS version of your site just to make sure Google can see it.
- After everything is done, monitor the indexing statistics (“Google Index / Index Status”) of your new site. It may take several days or so (depends on your site size) for your new HTTPS version of your site to get fully re-indexed by Google. Meanwhile, some of your pages continue stay indexed as HTTP. Google re-indexes your site page by page, not your website altogether.
- Your website ranking in Google may fluctuate a little during this re-indexing period. But Google promises to give you more SEO love after the migration of your site to HTTPS is complete. (More on SEO concerns see below).
- Monitor Crawl errors “Crawl / Crawl Errors” for all your versions (http://, https//, http://www, https://www). By the way, it’s a good idea to monitor the errors regularly, not just after the migration to HTTPS. This is so especially for your main HTTPS version of the site.
9. Setting up your CDN and/or cloud firewall for HTTPS
If you use a CDN (or a cloud proxy/firewall), make sure if you need to do anything to let your website be serviced via HTTPS. Simply contact your CDN/Firewall provider for details if you are not sure.
For example, I use Sucuri WAF (which I reviewed here, by the way) and when I migrated my website to HTTPS everything worked fine without doing anything from my side. Sucuri Firewall’s Basic plan allows encrypting the connection via Let’s Encrypt certificate.
10. SEO concerns connected with migrating to HTTPS
Perhaps you doubt whether your website SEO suffers after migrating to HTTPS. My short answer is that the influence is not significant.
If you have a 301 redirect from HTTP to HTTPS version of your site, then there’s nothing much to be concerned about.
However, it’s believed that backlinks going to your exact website location (HTTPS) are a bit more precious than links going to a former location (HTTP) which is redirected. So, it may seem that migrating to HTTPS is not good for SEO.
On the other hand, Google promises to favor websites on HTTPS.
Thus, I think the general SEO effect of migrating to HTTPS is somewhat neutral in short term and positive in a long term.
After all, the sooner you migrate to HTTPS the better since from now on new backlinks will go to the HTTPS version of your site.
By the way, if you can, update the external links to your site to make them HTTPS.
This is not critically, but if you can why not doing it?
Of course, you can’t replace most of the links. But at least you can do so with the links which you can control (e.g. links from your social media accounts, email templates, ads etc.)
The most important thing regarding SEO is to monitor your crawling errors and indexing status in Google Webmaster Tools as I mentioned above. As Google re-crawls and re-indexes your HTTPS version of your site, it may find errors that you need to fix (e.g. broken URLs).
11. Loosing social media shares after migrating to HTTPS
As migrating to HTTPS is technically considered as migrating to another domain, your social media shares like Facebook, G+, Twitter, Pinterest, LinkedIn etc likes/shares will be lost. To be precise, the social media counts will stay on your previous pages (i.e. HTTP). And you will need to start getting social shares for new HTTPS website afresh.
Probably the most pleasant approach to this issue used to be using a premium plugin that allowed sort of recovery of your social media counts. But due to API changes of some social media networks this functionality has become not guaranteed, unfortunately.
12. Speed concerns after migrating to HTTPS
If you have migrated your site to HTTPS correctly, there should not be any significant speed issues on your site. The negotiation with HTTPS is quite fast (about 150 ms) so the slowdown should not be noticeable.
However, the real life can be more complicated sometimes. And some website owners experience significant slowdowns. In this case the issues causing it should be located and eliminated.
Fixing speed issues goes out of scope of this tutorial. However I can give you some tips regarding it.
In short, some possible reasons why the HTTPS version of your website may slow down:
- redirect issues (you may want to check you this section again);
- loading external resources which are slow via HTTPS (in this case it may make sense to find an alternative external resources or download the resources to your server);
- caching issues (in this case disable temporarily your caching/minification plugins to locate the issue; contact your CDN provider if you use it);
- misconfigured SSL on your server (in this case check out your SSL here or/and contact your hosting);
- SSL certificate with too heavy encryption (this is the case if you chose SSL certificate with higher security metrics. You don’t need RSA keys stronger than 2,048 bits and ECDSA keys stronger than 256 bits).
By the way, there’s a strategic solution to make your HTTPS site faster even compared to your HTTP version. This is taking advantage of using another protocol (HTTP/2 (SPDY)) which is available only via a secure (HTTPS) connection.
For example, A2Hosting offers HTTP/2 on Turbo plan.
Another way to improve your HTTPS website performance is to use HSTS. This is a mechanism that allows connecting to your site using only secure connections. This is a good performance improvement for any HTTPS site. Also, it helps to protect your website better. And it’s good for faster re-crawling of your site. Contact you host to make sure HSTS is enabled on your account. And ask them what you need to do to enable HSTS on your website. Usually adding this line of code to your .htaccess file is enough:
# Enabling HTTP Strict Transport Security (HSTS)
Header set Strict-Transport-Security "max-age=31536000" env=HTTPS
Some hosts allow HSTS. For example, A2Hosting enables HSTS for HTTPS websites.
I highly recommend enabling HSTS after you make sure that you don’t have mixed content issues on your site and set up redirect from HTTP to HTTPS.
One more efficient way to make your site faster over HTTPS is using OCSP stapling. This is an optimization technique that makes HTTPS requests much faster. However, most shared hosts do not support it, at least for now.
13. Additional steps and other information
In this section I include notes that complete this tutorial.
Just in case: if you disabled caching/minification plugin before migrating your website to HTTPS, don’t forget to enable it again. You can do it now.
If you have affiliate links on your website, it’s a good idea to make your affiliate links secure (i.e. HTTPS) if it’s possible. The point is that referrer information is lost if a visitor goes from a secure (HTTPS) web page to an insecure (HTTP) web page. This might be a reason that your affiliate sales may be not registered.
Here is some more additional information:
- Useful information from Google for webmasters and FAQ about HTTP to HTTPS moving from Google’s guy John Muller.
- Watch this video for more general information from Google guys about encryption and particularly about moving your site from HTTP to HTTPS (from 19m30s).
- Partly a bit technical but useful overview of best practices implementing HTTPS is here.
Conclusion
Migrating your site to HTTPS it’s not really difficult whether you want to use a free or paid SSL certificate. You just need you understand the matter of what it means to migrate your website to HTTPS. This article helps you to do it.
However, this tutorial may look big and partly technically complicated. This is so because I wanted to make this tutorial comprehensive. And I wanted to focus on a real life process and issues connected with migrating your site to HTTPS.
Basically, you have several options how to migrate your website to HTTPS. If some cases migrating to HTTPS is just few clicks away.
In many cases using a plugin helps to migrate your site to HTTPS with minimum efforts. Really Simple SSL pro plugin is the best option in this respect.
If you want to do everything manually without having to use a plugin or in case you will need to fix mixed content issues on your site you will need to do some easy actions, but do them carefully.
The last but not least. It’s advantageous to have a professional hosting which will not be a cause of your possible issues on a server side.
That’s it. Good job! You’ve done it!
You can download a PDF version of this article (1.41 MB):


BTW, I respect your privacy, and of course I don't send spam, affiliate offers or trade your emails. What I send is information that I consider useful.
Wow excellent post, I wish I had discovered this before. Very detailed and easy to follow. Migrating websites Its always been a nightmare for me.
Thanks, Michael, I’m definitely bookmarking this site
Glad it is helpful!
Hello, I went into settings and changes http to https and now I am locked out of wordpress completely. Do you have a solution to this as it is a clients website and I am concerned I have lost everything completely. Nick
Andy,
If you are not sure what you are doing, ask your hosting tech support to fix it, explaining them what you did.
I don’t know which settings you broke. Probably you need to go to phpMyAdmin and as shown in section 4.3 fix the http/https thing.
Anyway, I’d recommend bringing everything back (restore a backup as one of the options if your hosting support or you do not fix it) and find a technician to move http to https.
Hi Michael,
Your tutorial that’s mainly devoted to turning insecure HTTP resources into secure HTTPS resources without using any plugins (i.e. above tutorial)… do you have a PDF download for this please… could not seem to find the link on the page?
sincerely
Bruce
Hi Bruce,
I wrote this article before I started creating PDFs out of the articles. I’ve created a PDF for this one, here’s the download link.
thanks so much Michael,
already downloaded.
sincerely
Bruce
Thanks a lot for being my long-time reader, Bruce!
Thanks MICHAEL, been looking for this to find out a way for wordpress move. You saved my time.
Hey Smith, Glad to help!
Thanks for sharing useful information!! I am really impressed to see that you have provided such an interesting information about WordPress.
I was struggling with the same issue since last 3 days and finally solved it. Anyways can you suggest me some better option to get cheap linux hosting other than redserverhost.com?
Thank you once again!!
Hey Raley,
My recommended hosts are on this page.
There are several cheap options which are still very good hosting options.
You can also take this quiz which will give you suggestions on the hosts by your criteria.
Good content, on point, and it helped me move my site.
Glad that it helped you, Mori.
Feel free to share the article!
Effective guidelines, great sharing.
You are welcome, Vishal!
I’m glad you found it useful.
Thanks for this in depth step by step guide.
From my experience, you don’t need to use Search & Replace plugin if you run Really Easy SSL (this was confirmed by this plugin’s authors).
Besides that, some cPanel dashboards have 4 different menus related to SSL and that’s quite confusing (see screenshot here: https://cloudup.com/cvS16p6yc3Q):
1. SSL/TLS Manager:
The SSL/TLS Manager will allow you to generate SSL certificates, certificate signing requests, and private keys – anything to be done here?
2. SSL/TLS Wizard: In most cases certs are already listed here, stating that “a DV certificate already secures this domain”.
3. SSL/TLS Status: Apparently, here are listed all domains with certs and with “AutoSSL Domain Validated” – whatever that could mean…
4. Let’s Encrypt™ SSL: This page provides a facility to issue certificates via the Let’s Encrypt™ service.
It seems that cPanel issues their own cert called AutoSSL and it would be very helpful to explain what all those sub-menus are for and the differences between AutoSSL and Let’s Encrypt.
Hi John,
Thanks for your question.
From my experience Really Simple SSL plugin works in many cases. But if it were the ultimate solution, I would not write this tutorial 🙂 You may need to manually fix mixed content issues for example when you use page builders and alike software (e.g. an opt-in plugin).
After all, using Really Simple SSL plugin helps to avoid manual actions in many cases and it’s great!
As regards your question about different SSL options in cPanel, here’s a short answer:
1,2, and 3 allows to deal with manually installing SSL certificates and checking their status (expiration, validation, the domains the certificate covers). This can be used if you, for example, buy a certificate from a third party.
4 – it’s a cPanel add-on that hosts make available if they support Let’s Encrypt certificate. This makes it easy for users to install this certificate.
Besides, AutoSSL is a cPanel addon that allows to manage automatic renewal of the SSL certificates (in you case this is Let’s Encrypt certificate).
After all, if you use a free Let’s Encrypt certificate, then you might need need to use just “Let’s Encrypt™ SSL” to install the certificate. And then, you can check its status (SSL/TLS Status) to keep an eye on its automatic renewal when the expiration (renewal) time comes.
However, in many cases for users who want to use a free SSL certificate, the users even don’t need to do anything because SSL certificate is already installed by your host for you (if the hosting does its work well). And you can just check SSL/TLS Status to make sure the certificate is installed. By the way, exactly this case I use in my tutorial.
In you case, as far as I can see (“a DV certificate already secures this domain”), you don’t need to do anything, as you already have the certificate installed. You may just check that the certificate covers the domains and subdomains you need and that the certificate is installed correctly (I show how to do it in the section above here and here)
Hope it helps.
Great, many thanks for the clarifications!
You are welcome!
G’day Michael,
thanks again… For the sake of your readers I wanted to respond regarding “mixed content” issues after changing to HTTPS. – Your response on my image map issue has confirmed for me that it appears that any images on a site PRIOR to changing over to HTTPS that cause problems may very well be because of where they are sourced from… hard drive, other sites, etc… for me I had to reload or upload the same images that I may have already used in a website builder ( eg Artisteer) and make the sucure WP site the main source, which seems to make sense… now!!!!!
I had a another read of your blog setting up image maps and followed your directions that enabled me to make a fresh install of the Image map ( AND without having to rebuild the partitions). Your blog link here – https://researchasahobby.com/responsive-image-clickable-areas-free/
So all good – another step forward, another Coffee secured (pun!)
cheers Michael
sincerely
Bruce
It’s great, Bruce, that you have managed to sort it out!
And thanks for sharing your experience.
By the way, fixing insecure images that were previously uploaded to your website (e.g. by a site builder) is possible both by re-uploading the images (like you did) or by using Search And Replace plugin & phpMyAdmin (I described it in the section above).
However, Re-uploading images can be easier if the number of such images is not great.
Thanks to your comment, I’ve added the instructions to the tutorial which will make the life easier for other readers.
OK Michael… plenty to think on, thanks for all this
Much appreciated,
You have helped me to understand quite a bit.
sincerely
Bruce
You are welcome, Bruce.
Michael… PS – I am using Chrome browser – but the green lock stays ‘up’ in Firefox…
Bruce
Bruce,
Probably you need to clear browser(s) cache.
I have checked it on my PC and the same here. Probably the browsers process security issues differently, and Google Chrome is more strict.
PPS. Just a thought Michael (spelt your name right this time … !)
Would you consider adding your blog “items” available with your emailed followers in a PDF format to read up at a latter stage and/or print off as a reference?
respectfully
Bruce
Thanks, Bruce, for the idea about PDF format.
I’ll think about how to deliver the information this way.
G’day Michael,
Thought you might like an update regarding the changing of my own site to HTTPS…
which may give insight to your readers. I used Cloudflare for free to register, added my Domain then used the WP Easy SSL plugin (by Mark Hess & MICHAEL Thomas – must be something special in that name!) to complete the procedure.
I’m wadding through the anomalies that are “interfering” with the page ‘holding’ its security… a few internal links but mostly images.
Interestingly the images that are causing the trouble appear to be the ones that were in the site when it was uploaded originally, so… I am having to simply re-upload them to my WP media folder, reinstall them and refresh the page to success, thankfully.
BUT I have a dilemma that I hope you can help with – its an image map (a design that you recommended actually) that I have on my front page – link here – https://menshealthaustralia.info/
My page holds its security until I scroll down and reach this image… I use this process to hone in on my ‘problem images’!
I cannot simply replace the image because it was installed using the coding (as designed), how do ‘reinstall’ it, I’ve already gone through the coding to check it for HTTP links?
appreciate your feedback.
sincerely
Bruce
Hi Bruce,
Here are my comments:
> how do ‘reinstall’ it, I’ve already gone through the coding to check it for HTTP links?
Replacing HTTP:// with HTTPS:// (or simply with //) should work in general. But you should not forget that the domain which is used with HTTPS should have valid SSL certificate.
Thus, I’ve looked at your page code and seen that there’s an image (https://menselectivenetwork.info/wp-content/uploads/2017/03/Map-of-Australia-.png) that you probably use as an image map is actually located NOT on your website (menshealthaustralia.info), but on some other domain (menselectivenetwork.info). And this domain does not have a valid SSL certificate.
Thus, you need to install a valid SSL certificate on the website menselectivenetwork.info (if it is your website), or move the image to your original website (menshealthaustralia.info).
Another thought, Bruce.
If you use caching plugin(s) including Autoptimize, Lazy load, you need to clear/delete the caches of theses plugins. Probably the problematic image (menselectivenetwork.info/wp-content/uploads/2017/03/Map-of-Australia-.png) is cached somehow.
G’day Micheal,
Thanks for this very timely article… as in the past you seem to have made an impression, which as I emailed you once before, I am not surprised – your incite is always valuable.
I am building a network of sites with a main theme as content, all resource sites, my concern (!?) is, if I understanding the points correctly, regarding having to manually “sort” all website links as part of setting up HTTPS… on each of the 8 state pages of my Australian site I have over 100 links! see here http://menshealthaustralia.info/mens-health-australia/aust-capital-territory/
Are my fears justified or hopefully have I misunderstood?
yours very sincerely
Bruce Bennett
Coordinator – Men’s Elective Network.
Hi Bruce,
I’ve looked at the page. Looks like all those links are external, i.e. they are going NOT to your domain (menshealthaustralia.info), but they go to some other websites. Thus, you don’t need to turn these links to HTTPS.
In case all those links go to YOUR other websites which you also switch to HTTPS (you mentioned you’re building a network of sites), even then you don’t have to turn the links into HTTPS. But if you can, this is a positive thing to do from a SEO perspective.
Feel free to let me know if this answers your question.
Appreciate your reply Micheal.
It appears my “fears” are relieved, I did jump the gun a little though ( I was only half way through reading your article!!! oh dear.) BUT… thankfully you did bring up a related point that was in the back of my mind but forgot to elaborate as part of my question regarding LINKS to other NETWORKED websites – as such, I will be switching these (external) links to HTTPS for SEO.
For me personally your article could not have come at a better time, having just completed my first country site (as soon as HTTPS is sorted…) before I move on to refurbishing the Hub site and start on the 2nd country site.
I owe you a coffee Mike (or should that be… 3)?
Sincerely,
Bruce
Hi Bruce,
Glad my article got to you at the right time.
Thanks for the coffee, by the way 🙂
Wow, ok, now it makes sense. I was trying to understand some of this thing and I was finding it very hard untill I got here 🙂 Thank you very much!!
No problem. Glad you found it useful.
Hi Michael,
SSL Certificate is essential to encrypt and authenticate the data that we send on the web. It is a Google ranking factor as well. We too have a blog post for the SSL installation for WordPress but your article is amazing with in-depth details. Thanks for the guide, I’ll share the post on my network.
Thanks Sakthi,
My aim was to make a practically useful and comprehensive post on this topic.
Wow is a really long tut, congrats……
And what your think about some Force plugins?? https://wordpress.org/plugins/force-https-littlebizzy/
Hi Hamad,
Thanks for your comment.
I have not tried Force HTTPS plugin. It looks like a simpler alternative to Really Simple SSL plugin, but designed specifically for NGINX web server.
Also I’ve noticed in the description that it skips external links. So, in case you link to external resource (e.g. a font) you will need to fix this mixed content issue manually anyway.
Besides, plugins can’t fix all the possible mixed content issues on any website. One of the examples is that some resources may be simply missing when accessed by HTTPS, and you need to find an alternative resource or download the resource to the server to use locally. I cover this in my tutorial.
Also I have doubts about a seemingly simple job of redirecting website pages from HTTP to HTTPS (regards all plugins). It can appear to be not a straightforward task if you have some conflicting code in your .htaccess file (considering using “RewriteEngine On” command just once and putting redirection before other redirection rules). HTTPS forcing plugins may fail in some cases (and even causing redirect loops), and manual intervention may be required. In my tutorial I emphasize this too.
After all, HTTPS forcing plugins like these ones are a sort of a patch to make a HTTP site pretend to be HTTPS (by redirecting HTTP resources and links to HTTPS). The plugins are good if they work. But if the don’t, a human intervention is required. That’s why Really simple SSL Pro support is an advantageous option.
However, my tutorial is mainly devoted to the idea to make the website truly HTTPS by turning insecure HTTP resources into secure HTTPS resources without using any plugins. This way the website works more reliably, especially in the long run.