
My tutorial with creating interactive SVG image and adding it to a WordPress website has been getting popularity over time. And my readers contact me from time to time with issues they meet when they try to create the SVG file in Inkscape. One of the most frequent issues regards dealing with creating and editing links for a SVG area or shape. Most often the issues are connected with clumsy user interface of Inkscape software.
I decided to write this article as a go-to resource to help resolving such issues connected with creating or editing links in SVG.
Alright, each chapter below represents a problem with links in SVG and a solution.
My image has no link, it’s displayed like a normal image with no reaction
This is probably the most common problem.
Try this:
- Check the box “Force Inline SVG”
- Don’t check the box “Sanitize SVG while uploading”
And also this may be needed:
I don’t have “Force Inline SVG” enabled on my website. But on your theme it may be required.
For possible issues with this option enabled see this comment.
I added a link, but it’s not visible, is lost or takes all the place round
In short:
- The main cause of the issue is the wrong order of objects or shapes.
- The solution is to change the order of the objects either in the Inkscape, editing the SVG code or re-create the objects or the whole SVG.
SVG with properly working link
Before all, this is how an SVG with properly working link looks like (and yeah, I created this SVG to promote the page with my list of the recommended host, so please feel free to visit it if you are interested):
(Move the mouse over the image of photo frame to see the working SVG)
And this is the animated GIF which shows that there are no issues with links in the SVG image (if you are confused with the SVG above for any reason to try yourself):

SVG with a totally missing link
Here’s how this issue with totally missing link in SVG looks like:
(If you move your mouse over the image of photo frame, you will not be able to click the link)
Here’s the animated GIF demonstrating the issue:

Fixing the SVG issue with link by moving objects in Inkscape
The most typical cause of this issue is the wrong order of the objects.
You can try to fix the order using Inkscape user interface.
Here’s how the correct order of the link and shape objects should look like in SVG inside Inkscape editor:
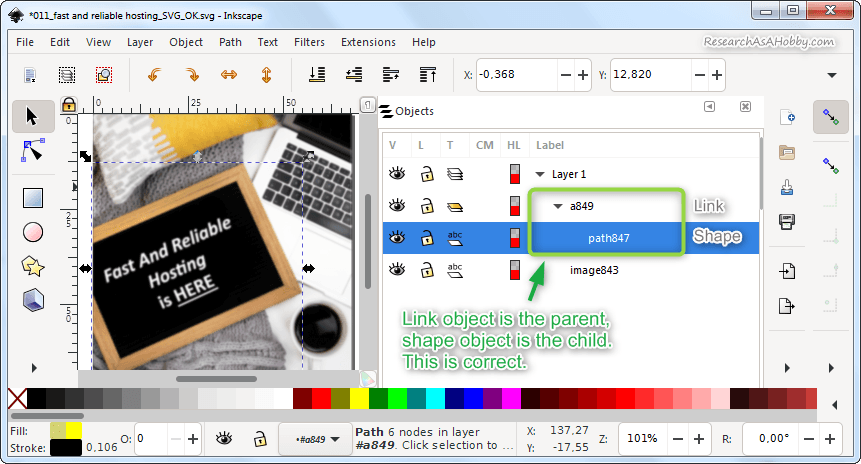
Correct order/relationship of the objects
And this is how incorrect order of link and shape objects in SVG looks like:
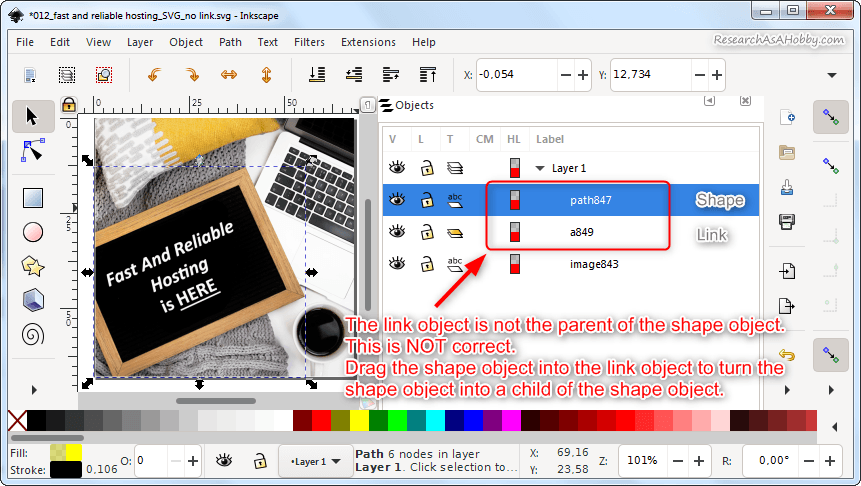
Not correct order/relationship of the link and shape objects
In many cases you can fix the issue by just dragging the shape object into the link object. Open the “Objects” panel in Inkscape, locate your objects and drag one into another. It will make the shape object the child to the link object. The link object should be the parent.
Fixing the SVG issue with link by modifying SVG code
Sometimes dragging the objects does not help to fix the missing link issue in SVG. It may be connected with some glitches in the SVG code. In this case you can try solving the problem by editing the SVG code.
SVG image is actually a XML file which code. You can edit the code using any plain text editor. I prefer using Notepad++ (it’s free).
Okay, open the SVG file in your code (text) editor. Then locate the objects in question (the link object and the shape object). The link object has <a> tag. The shape (path) object has <path> tag.
Here’s how the code of the SVG with working links looks like:
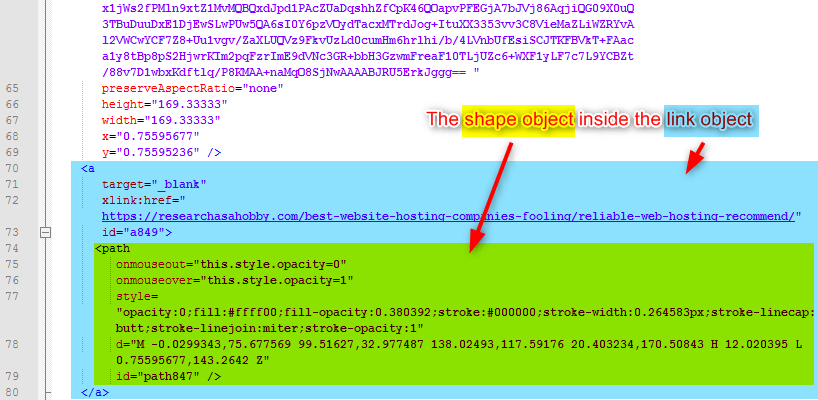
SVG code of the working shape and link objects
Notice how the code represents the parent-child relationship. The code of the shape object (the child) is inside the code of the link object (the parent).
And this is the code of the broken SVG (with the link which does not work):
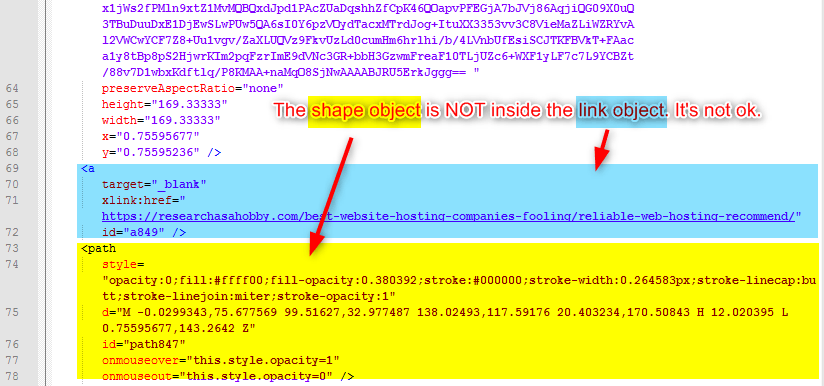
SVG code with a broken “link-object” relationship
Note that the code of the shape (path) object is NOT inside the code of the link. This is not OK.
Try to fix the code by cutting the code of the shape (path) and pasting it into the <a> tag. You should get the code like I presented above here.
Re-creating SVG or SVG objects
Sometimes you can’t fix the link in SVG using the methods above. It can be connected with a complexity of the code and it’s easy to make mistakes if you are not a coder. In this case you can re-create the SVG elements or the whole SVG file entirely using Inkscape or even manually by writing the code.
Here are some practical tips if simple re-creating the objects in Inkscape does not work again:
- You can see how the SVG’s code changes. In other words, what sections of the code appear when you add the object (a path or a link). To compare the changes before and after adding the object you can use a tool like Diffchecker. It will let you know which aprticlular code is responsible for your shape and link.
- When you know the code for your shape (path) and link, you can put the path’s code inside the link’s code (i.e. inside the
<a>tag) manually if you fail to do that via Inkscape. - Open your SVG file in a single browser window/tab to check how ti works (i.e. you don’t need to add the SVG image onto your website to check how it works).
The last tip in this section: perhaps the problem is not about the lost link. Maybe you messed up with fill property (the thin border of the link object should be clickable in this case). See the next section for the details.
Besides, if after all you get confused, you can try recreating the SVG entirely. Sometimes it’s faster and easier way (especially if your SVG is not complicated). When re-creating your SVG start from the problematic part (i.e. where your link was not added properly) just to see if it works this time.
SVG with the link outside of the planned area
Here’s how this issue with the link appearing outside of the planned area in SVG looks like:
(Move the mouse over the image of photo frame to see the working SVG)
(The planned area is not clickable, but the outside area is clickable)
Here’s the animated GIF demonstrating the issue:

Fixing the SVG issue with link by moving objects in Inkscape
The most typical cause of this issue is the wrong order of the objects.
You can try to fix the order using Inkscape user interface.
Here’s how the correct order of the link and shape objects should look like in SVG inside Inkscape editor:

Correct order/relationship of the objects
And this is how incorrect order of link and shape objects in SVG looks like:
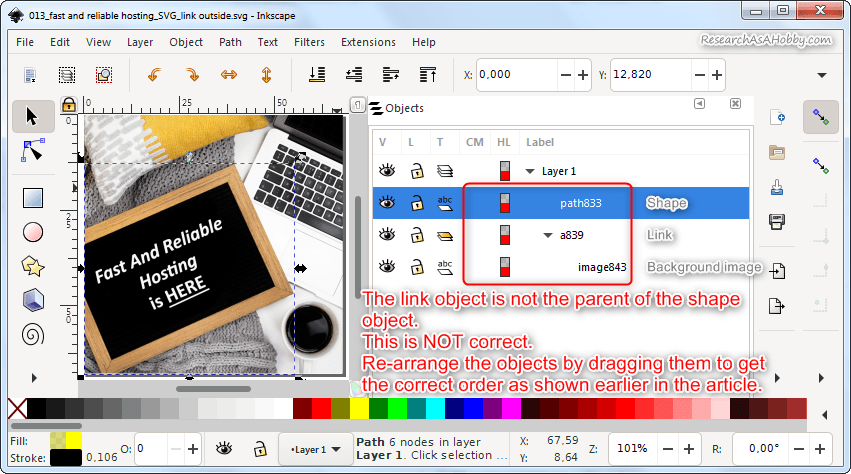
Not correct relationship between the link, shape and other objects
It’s likely that you can fix the issue with the link showing outside of the planned area by just dragging the objects within the “Object” panel inside Inkscape.
Fixing the SVG issue with link by modifying SVG code
If you could not solve the problem within Inscape for some reason, try fixing the code by editing it in a text / code editor like Notepad++.
Open the SVG file in your code editor. Then locate the objects in question (the link object and the shape object). The link object has <a> tag. The shape (path) object has <path> tag.
Here’s how the code of the SVG with working links looks like:
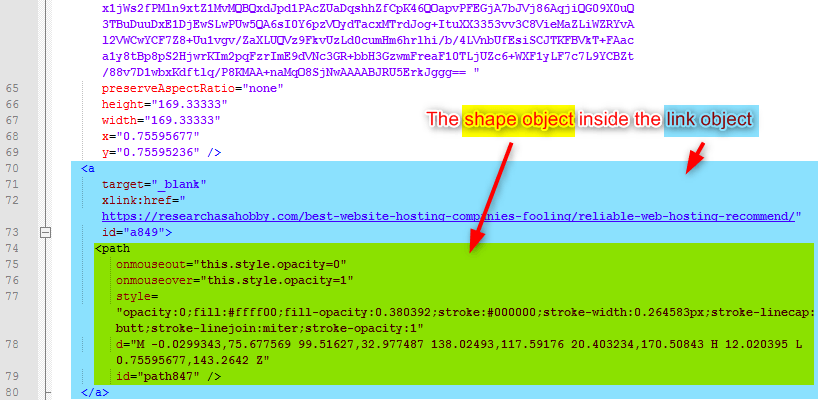
SVG code of the working shape and link objects
Notice how the code represents the parent-child relationship. The code of the shape object (the child) is inside the code of the link object (the parent).
And this is the code of the broken SVG (with the link which does not appear on the planned area, but appears outside of the planned area):
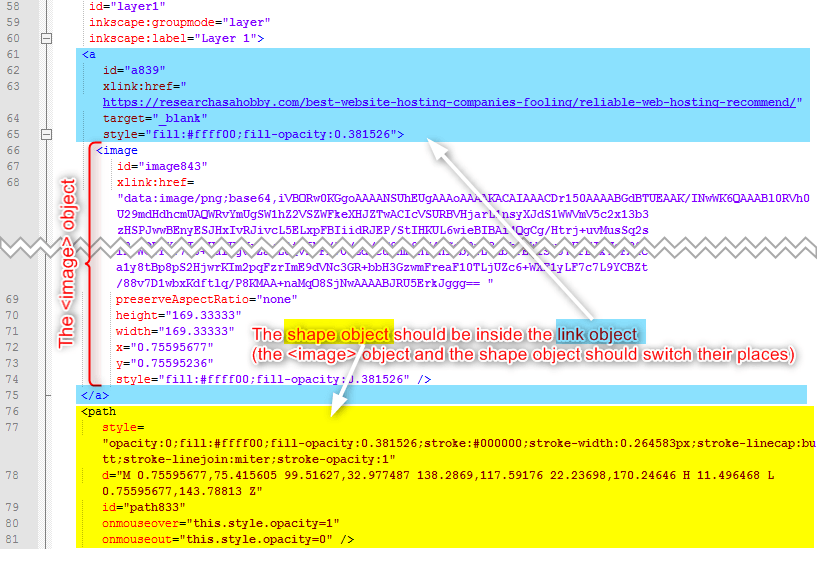
SVG code with a broken “link-object” relationship
Note that the code of the shape (path) object is NOT inside the code of the link. This is not OK.
By the way, don’t worry that the embedded image’s code is not readable. It is an imported bitmap. Anyway, you can see the structure of the code and edit (cut-paste) the code that you need.
Try to fix the code by cutting the code of the shape (path) and pasting it into the <a> tag so that it replaces the <image> code. And the <image> should go where the <path> code was. You should get the code like I presented above here.
Re-creating SVG or SVG objects
If editing inside the Inkscape or manual editing of the SVG code does not help to fix the link issue, you can delete the objects in Inkscape and re-create them. Or you can re-create the entire SVG, if you are lost. You can also follow the tips in this section if you want to dig deeper (for example, if just recreating SVG does not help and you want to trace where the issue with the link appears).
I added a link, but it’s not clickable or only a border of the link object is clickable
In short:
- The main cause of the issue is that the shape (path) area does not have a fill property specified .
- The solution is to specify the fill property of the shape (path) object. It will make the link object working correctly as expected.
Example of SVG with the link working only on a thin border
This is how an SVG with properly working link looks like:
(Move the mouse over the very border of the image of photo frame)
The animated GIF below demonstrates the issue with the link in the SVG image:

The border is clickable actually only because the stroke paint is specified. If a stroke paint is not specified, the border will not be clickable too.
Fixing the SVG issue with link working only on a thin border
Fixing the issue in Inkscape
If you have this issue when only a border is clickable, then you need to specify the “fill” property of the shape area:
- Make sure you selected the shape object (not the link object) that you want to be clickable:
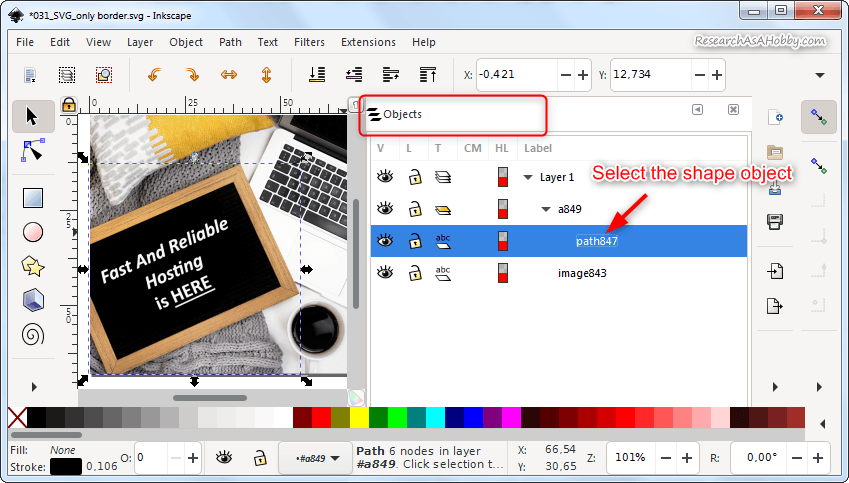
“Objects” panel / Select the shape object in Inkscape
- Go to “Fill and Stroke” panel and specify the “Fill” property:
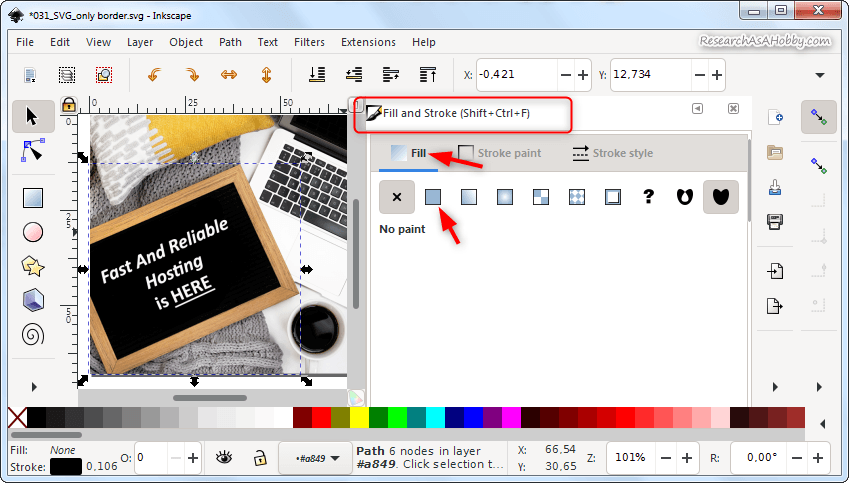
“Fill and Stroke” panel in Inkscape
- Set any color in the Fill property, save the SVG and open in your browser to check if the whole shape area became clickable:
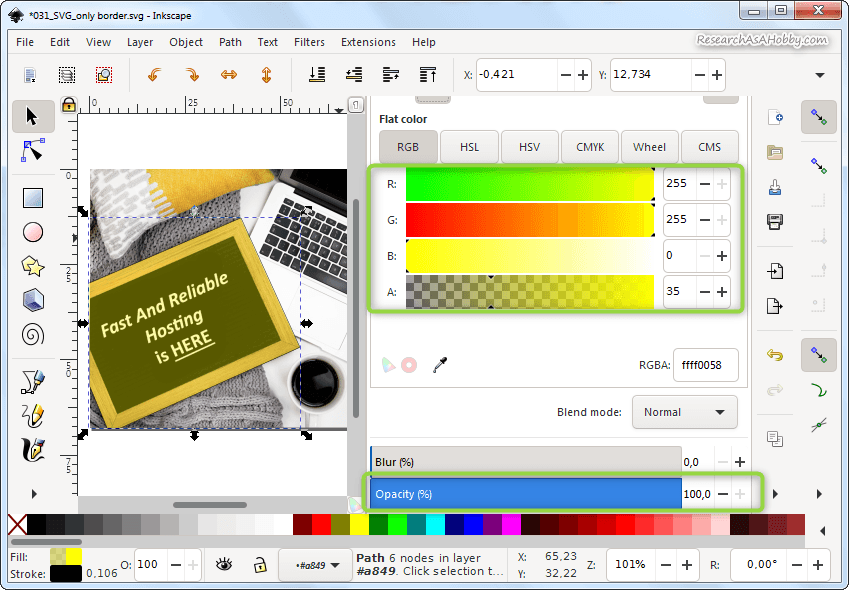
Setting the “Fill” property in Inkscape
- After you check that the shape area becomes clickable as expected (problem solved!), you can get back to continue working on your SVG and tune the transparency and the interactivity of the shape object as I show in my tutorial here.
Fixing the issue by editing the SVG code
Instead of editing the SVG in the Inkscape, you can edit directly the code instead. I think editing in Inskcape is easier, but anyway, here is how it looks like when editing the code:
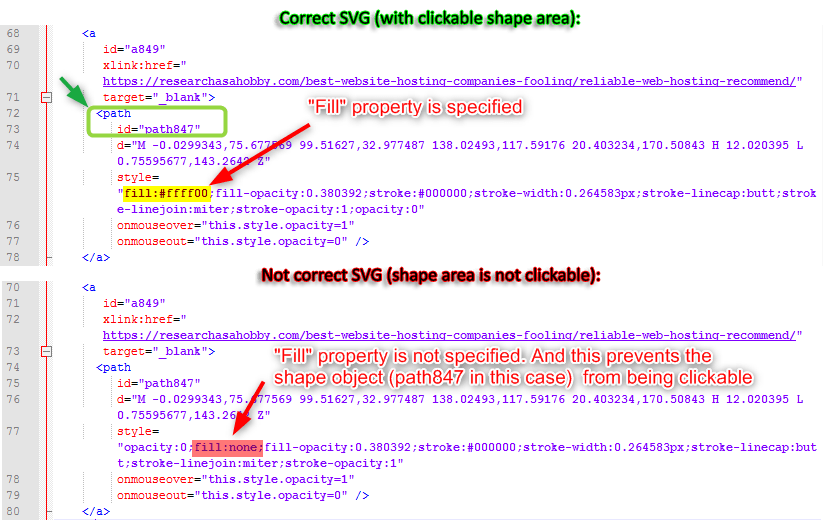
Comparison of the code with clickable shape area (above) and only the border clickable (below)
Can’t edit object attributes (no such panel in Inkscape, cant’ add target=“_blank” etc)
In short:
- The main cause of the issue Is that the “Object attributes” panel is lost .
- I could not find the way to open this panel rather than creating a new link object.
- Another option is to edit attributes in the XML Editor panel.
- One more option is to edit the SVG code directly
Inkscape has a not very friendly user interface. And sometimes it causes annoying issues.
For example, you added a link. And then you want to change “target” property (e.g. target=”_blank” ). But you can’t find the “Object attributes” panel. There is “object properties panel”, but there is no “Object attributes” panel. It’s very annoying.
Here are the Inkscape panels in question:
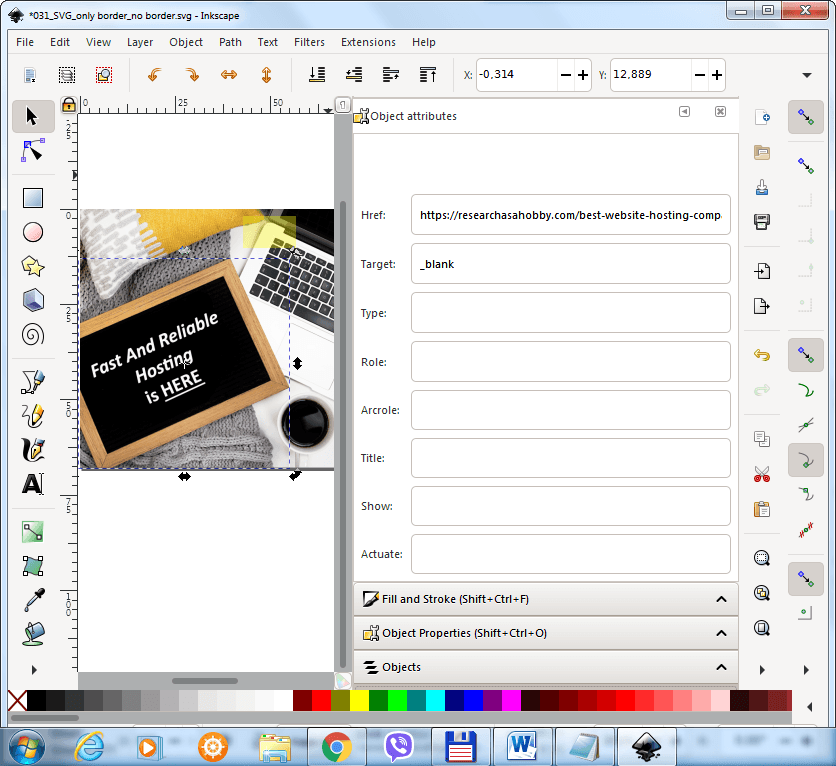
“Object attributes” panel in Inkscape (this panel often disappears)
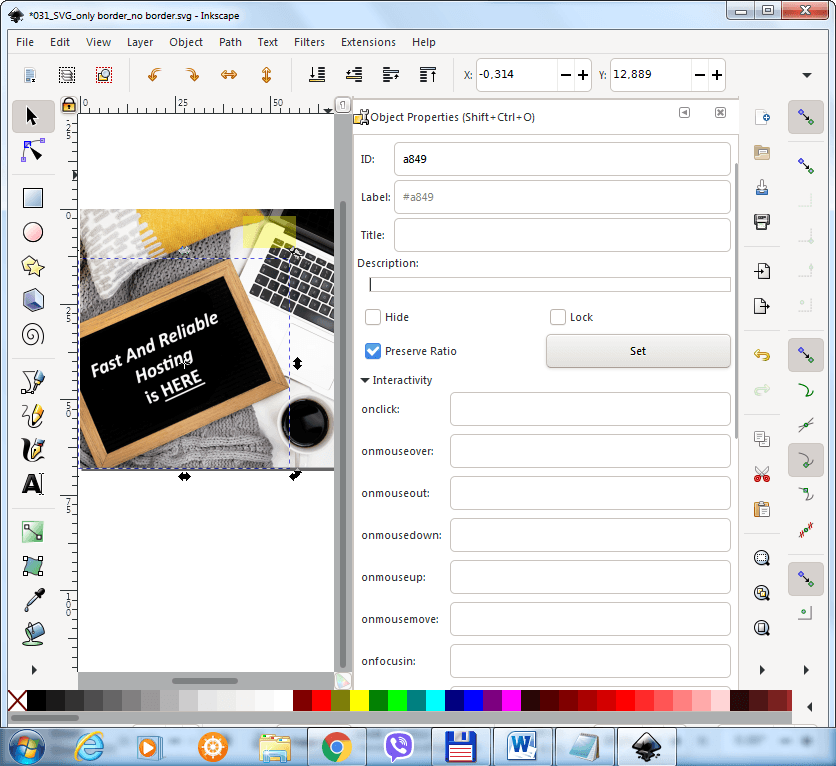
“Object properties” panel in Inkscape
Getting “Object attributes” panel by adding a dummy link object
The trick is simple:
- You add a new link object (you can add a dummy shape for that too, e.g. a rectangle, then right-click on the active shape and select “Create a link”).
- This opens “object attributes” panel.
- Then you select the link object you need to edit (via the “object panel” in Inkscape) and here you go – the “object attributes” panel is now accessible for your link object!
- You can remove the dummy link object (and the dummy shape object).
The point is that “object attributes” panel opens only when you create a link. But then, after you close the panel or Inkscape the panel disappears. And you can’t open it again. Crating a dummy link object allows to get access to the panel again which displays the attributes of the link object which is currently selected.
Editing object attributes in the XML Editor panel in Inkscape
SVG image is a text XML file. And Inkscape has an embedded XML editor. You can open it by navigating through the panels in Inkscape or simply press Shift + Ctrl + O.
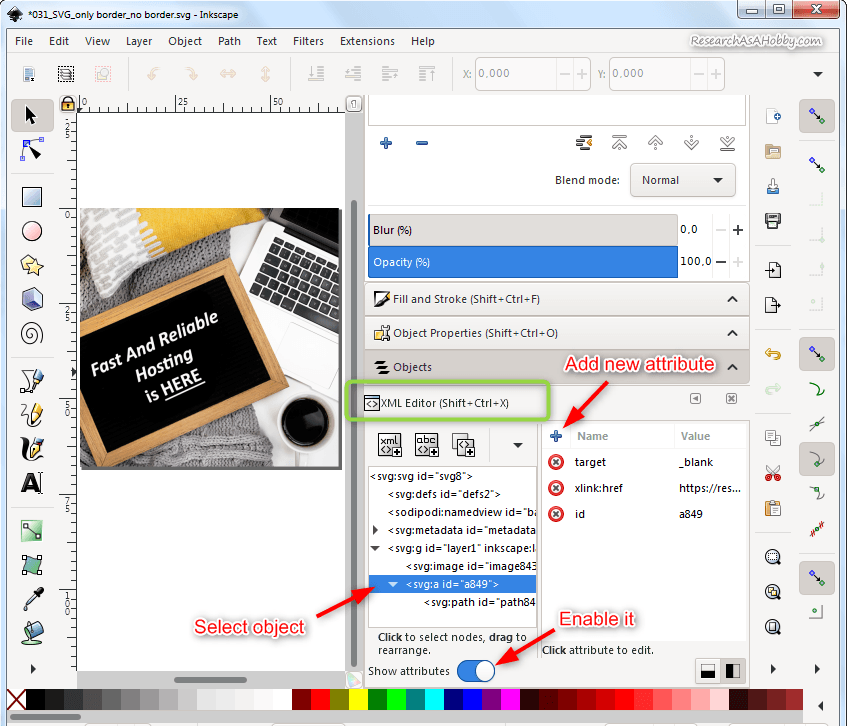
XML Editor in Inkscape
A little bit tricky thing is that you need to know the ID of the link object that you want to edit. Select it in the XML Editor (see the screenshot above). And you need to know the name of the attribute you want to add or edit. It’s not complicated.
Editing object attributes in the code of SVG file
Even if you are not very comfortable editing code, it can be the easiest and the quickest way to do what you want. Just open your SVG image in a plain text editor or a code editor (e.g. Notepad++), locate you link object (you need the ID of the object) and add a line specifying the link attribute you need or edit one that you want.
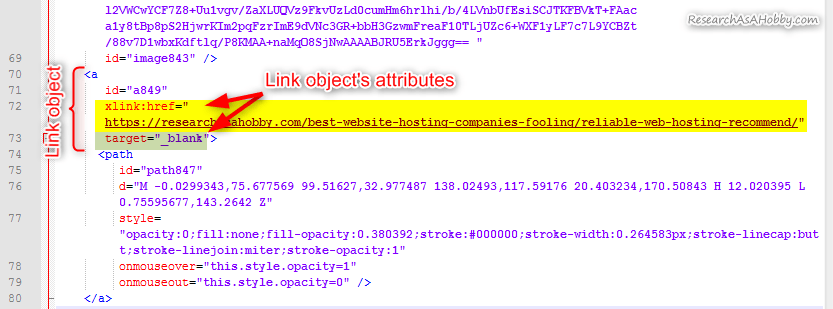
Editing link attributes in SVG code
Different link behavior in different browsers working with SVG
This is a case that I and my reader solved. And I’d like to share the result s of our findings.
The problem was that on different devices (e.g. iPhone) the link caused different actions. On some devices a opened a new tab or window opened, on other devices it just followed the link on the same page. My reader decided to use javascript to open a new window. But it did not solve the issue and just complicated the things.
The solution was simple. Just playing with “target” attribute of a link solved the problem. target="_top" was the winning value which elegantly solved all the issues.
If you experience similar issues, try playing with different values of “target” attribute too.
Issues with SVG links using Elementor plugin
I’ve got several requests in the comments to this article and via private messages about the issues with the links in SVG image when using Elementor plugin (both free and paid versions).
Here are the issues and the solutions:
- The most common issue is that the links in SVG simply do not work. SVG is treated as an ordinary image. Solution: Upload the SVG file via WordPress media library, not via Elementor. And use HTML widget, not WP Custom HTML widget.
- Another common issue is that the link does not open a new page (e.g. it shows a broken image icon). Solution: disable the Image Light Box in Elementor’s Setting > Style Tab > Image Light Box (at the very bottom) and uncheck the box.
- The following issue regards caching. Like with ordinary images, if you first delete the SVG file from the WP library and then you upload the new version of the SVG with the same name, the old version of the SVG image may be cached. Solution: use a new name for your SVG file each time when you upload a new version.
Besides, if you have problems with SVG working in Elementor, I suggest going to this page, search (Ctrl+F) for “Elementor” in the comments and study the corresponding threads. There are chances that you will resolve the issues after reading those comments.
I did everything as instructed but I still have a problem with SVG (e.g. links do not work)
Sometimes you feel lost when you did everything right and still SVG does not work as expected. Although SVG is quite a solid and modern technology, in combination with different WordPress software (especially page builders) you may encounter some issues trying to make SVG work on your site.
There may be different isolated cases that I can’t cover in this tutorial and I can’t imagine what may be going wrong. A standard approach to such situation is the following:
- You make sure that your SVG is done right. Open you SVG image separately in a browser. If it does not work, then you did something wrong when crating SVG. I suggest reading my tutorial again. If SVG does work in a separate browser window/tab, then the problem is not in SVG, but there is some conflict between SVG and WordPress or WordPress software (plugins, themes etc).
- Then you can try de-activating all your plugins (except SVG Support plugin) and activating them again to see if the problem disappears. Sometimes it helps.
- Then I suggest trying to find out what is causing your issue. It can be a plugin or a theme. When you know the cause, you will understand what decision to make about it (e.g. contact a plugin/theme developer regarding the conflict with SVG or SVG Support plugin). A standard approach is to deactivate your plugins except SVG Support plugin and then activate the plugins one by one to narrow down the conflicting plugin(s). Also read this comment.
Another reason why SVG links (as well as some other SVG functionlity) may not work is Web server settings.
If your SVG works perfectly locally (on your computer), but it does not work after downloading to a web server and WHEN opening in a browser (pure HTML or simply opening the file, i.e. no WordPress or other software), then contact your host. Something on the server is blocking SVG or some of its functionality. I suggest contacting your host then.
Conclusion
I want this article to become a helping hand to assist you solve the issues with the links in your SVG file. I’ve already covered here the most frequent problems that a number of my reader came across working on links in SVG. If you have any other issues to add – feel free to let me know in the comments below, by private email or in our Facebook group.


Hi Michael!
Great work, thank you very much! Though I use a new version of Inkscape, it!s very easy to adapt your tutorial to it. Everything abot creaating an interactive SVG works perfect.
The only problem with first using a SVG image in my WordPress was that it was showed like normal image without any reaction, although by testing the SVG it in any browser everything was OK.
So I started experimenting with settings of the “SVG Support” plugin and last I have found a solution wchich works for me:
1. Check the box “Force Inline SVG”
2. Don’t check the box “Sanitize SVG while uploading”
Awesome, Ludvik!
I added your case to the article. Other people also reported this.
Thanks!
I don’t create my own svg’s The problem I am having is the svg is in a zip file and on my iphone the file zips just fine. When I try to unzip the same file on my Microsoft laptop, the svg file doesn;t work. the svg file has a Cricut Design Space tag and when selected, it opens Cricut Design Space.
I hope you can help. This is driving me crazy.
Thanks
Sorry, I don’t think I can. Perhaps you could edit your svg file in a code or text editor to remove the functionality you don’t need.
Hi Michael!
First, thank you sooo much for your tutorials – I am a very new SVG creator and have learned a lot from you thus far! I’m creating an online exhibit as an intern for a museum and have been tasked with designing webpages and content for the exhibit, though I do not have full administrative rights to site.
Thanks to you, I’ve managed to create a map divided up into twelve regions, each highlight when moused over and are linked to twelve separate webpages. It looks awesome and works perfectly when opening it on its own!
When adding it to a WP site though, the hyperlinks open in-frame – and I mean a tiny frame where the map was. The website administrator suggested make the links open in a new window, but I was really hoping that I wouldn’t have to do that. I want site visitors to be taken directly to the webpage clicked. It does this function perfectly when opening the file in the browser, just not the WP page. Do you have any suggestions?
Thank you! Megan
Hi Megan,
Thanks for your feedback 🙂
Try to use
target="_parent"ortarget="_top"property in your links. It will likely do what you want.G’day Michael,
Thanks for this – excellent reading.
I have downloaded it for reference.
I trust your well.
cheers
Bruce
Hello Bruce,
You are welcome and as always feel free to ask any questions 🙂