
This is a simple but very useful tutorial. I’ll show you how you can avoid the situations when installing new plugins or updating your plugins or updating WordPress version breaks your site. This method works perfectly for huge websites too. It’s easy and free.
It’s the best free way I know so far if your hosting does not offer staging environment for you.
Intro
Although it’s generally recommended to update your plugins, themes and WordPress version as soon as possible to avoid security issues, it’s not that safe to do so. Updating your website software may result into breaking your entire site or parts of it because of new conflicts between plugins, themes and your WordPress version.
There’s a simple way how to make sure nothing will break if you update your plugins, themes or WordPress. Its essence is in testing updates on a functional clone of your website which is available only for administrators of your website. However, if you want to create a complete clone of your not large website which would be available for anyone (on a separate domain or subsomain), this article may help you.
And if you need to create a complete clone of your website which is large, then you’ll enjoy this tutorial (featuring All-in-One WP Migration plugin). The copy of your website created this way also can be available for anyone (on a separate domain or subsomain).
Now back to our method. It allows creating a sort of staging environment for your WordPress site. I will explain below and you’ll see that it does not require any technical skills, new domain, subdomain or money. You don’t even need to have a lot of disk storage on your hosting for doing that. And the sweet part is that it’s easy as pie (actually, as easy as clicking a couple of times).
And if your host does not offer such staging option, this tutorial is for you. And the secret weapon I’ll be talking about below is a free and sweet WP Staging – DB & File Duplicator plugin for WordPress.
A very nice feature of this tool is the option to easily exclude not important database tables, files and folders when cloning your website into a staging area. This makes it possible to create clones to test if installing new plugins, updating plugins, updating themes and WordPress version are safe for your website even if it has a huge size.
Making WP updates and plugins installs and updates safe: peek under the hood
There are two things you need to know about what this plugin does when it creates a clone of your website:
- It simply creates a copy of your databases (you can exclude tables if you want).
- It creates a subfolder in your WordPress installation folder and copies there files and folders of your WordPress and other custom folders. (You can also exclude folders and files if you want from being copied.)
This is enough to let you test if installation of new plugins or update of plugins, themes and WP core are harmless for your website.
However, please note, that first you need to make sure on your staging (cloned) website that you can install new plugins or update plugins or WordPress version without issues. And then you need to repeat installing or updating the software on your live (production) website. In other words, you can’t push the changes back to you live website from the staging site.
What’s the process of testing if plugins installs or updates and WordPress updates don’t break your website?
Below I’ll demonstrate the process in details.
Here’s the whole process from A to Z how you create a staging site easily and test there plugins, themes, WordPress updates etc:
- Install WP Staging plugin.
- Click “Create new staging site”.
- Specify if you want to exclude database tables, files or folders (useful to deal with huge websites to make the process faster).
- Click “Start cloning” button to create a staging site.
- Go to a new staging site’s WordPress administrator dashboard (1-click action). And do your tests on the staging site: install new plugins, update plugins, update theme, update WordPress version and do other changes if you need.
- After you make sure the updates/installing did not break anything on your staging site, you can make necessary changes on your live website with no worries. These changes will not break anything now (install plugins, update plugins, theme, WordPress version etc).
- You can remove the staging site. Or you can leave it till next time when you want to test installation or update of plugins, themes or WordPress version on this staging site.
Every step above is super simple. However, no.3 (Optional excluding database tables, files for folders) may cause issues if you are not sure what you do. Read below for more details how to deal with it.
1. Install WP Staging plugin
Nothing special. Just install and activate the plugin as you usually do with any WordPress plugin:
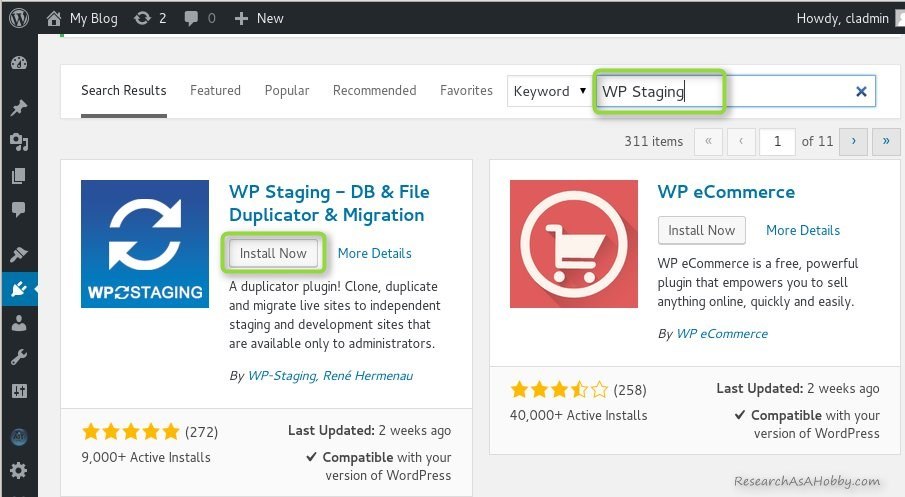
No further settings are needed. However, there are settings page for the plugin in case you need to tune the plugin’s performance or change some default settings.
2. Click “Create new staging site”
Simply go to WP Staging section in your WordPress dashboard and click “Create new staging site” button:

3. Specify what database tables, files or folders you want to exclude in your staging site
If your website is small (up to a hundred megabytes), then you can just skip this section.
Anyway, the maximum size of your website that WP Staging plugin can handle is not explicitly limited (starting from version 2.0.2).
Usually similar plugins start having problems with websites which more than 500 MB in size and hosted on a shared hosting.
Also, in general, the bigger website, the longer the process of creating a staging site.
In a restricted shared hosting environment the process of creating staging site may fail because of too heavy or long process. This is a typical problem that website backup and clone plugins face on a shared hosting. The major issue is a big size of your website.
And so, there are more risks that your hosting may automatically stop the process of creating your large staging site halfway. It can unlikely break your original site, but it can leave data garbage in your website.
WP Staging plugin handles processes especially. And it allows to deal with heavy processes and avoid timeouts (starting from version 2.0.2).
To make a process of creating a staging site faster and more realiable, on a typical shared hosting it’s recommended to keep a staging site as small as possible to let WP Staging plugin run fast and flawlessly.
In other words, it makes sense to optimize the process of creating a staging site by excluding some parts from inlucding into your staging website. It will allow you make the whole process much faster and less risky.
That’s why in case of large websites I’d recommend excluding some parts from your staging site to make your staging site much smaller. WP Staging plugin allows doing it on a simple level and now I’ll show you how.
3.1. Excluding database tables from being included in a staging site
If you know what you’re doing, you can exclude database tables which you don’t need in your staging site. Otherwise, just leave database tables as is (e.g. all included):

The database is usually not the biggest part of your website. So, including all database tables is fine.
By the way, on the image above you can see that you can specify the name for your new staging site. I’ll leave it blank to see what name it generates by default.
3.2. Excluding files and images from a staging site
The biggest part of your website is usually the uploads folder where all your images are located. If you exclude this folder from your staging site, it will not affect the functionality of your stagin site. And you will be able to test new plugins, update plugins, themes or WordPress version as well.
Also, it’s a good idea to exclude other folders that you don’t need in your staging site, especially if they take a lot of disk space. In my case it’s a folder (bps-backup) with database backups that are automatically created with BPS security plugin.
For example, here’s an example of what file folders I exclude when creating a new staging site:
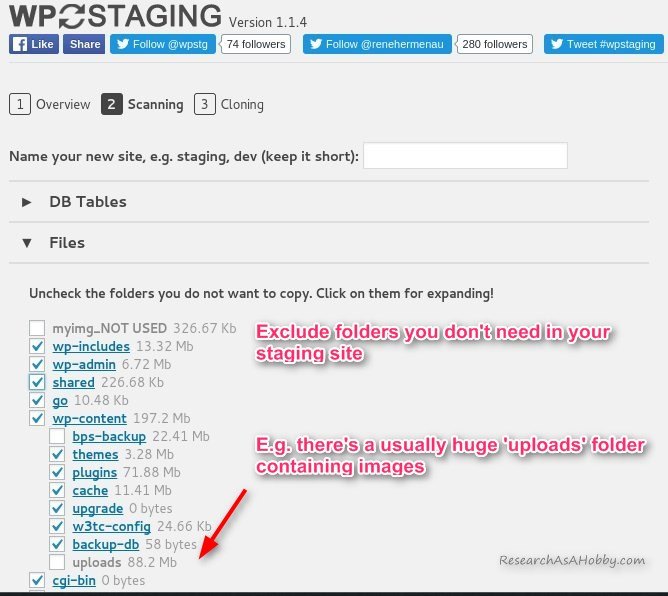
Of course, if you exclude upload folder, you will not see images on your staging site. There will be empty areas instead of the images on your staging site. But in most cases you don’t need images to test new plugins or updating plugins and other software on your WordPress site.
3.3. Including some images into a staging site
However, there may be cases when you really need images to be included in your staging site. For example, you want to test design-related things such as a gallery plugin or a new WordPress theme. In this case you may include just some selected images or subfolders with images instead of including all the images.
Here’s an example of including to a staging site only the latest images which I’ve uploaded to my website just recently. In this case I will see images in my latest posts on a staging site (I assume the images uploaded only during year 2017 can be enough for what I may want to test):
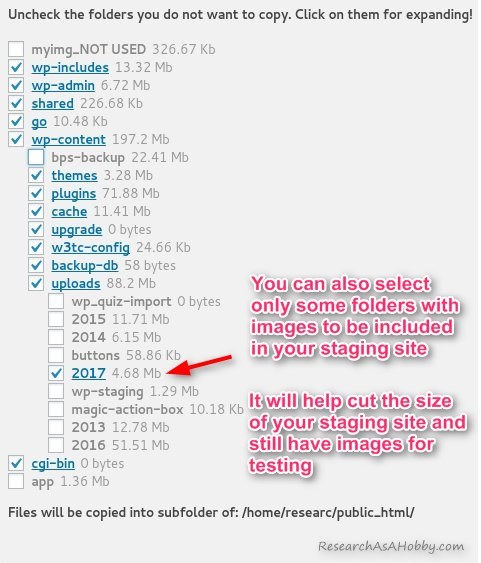
These tactics will let you create a staging site fast and flawlessly even on restricted shared hosting. And you’ll be able to test plugins, themes and WordPress versions efficiently.
4. Click “Start cloning” button
As simple as it says – just click the “Start cloning“ button to create a staging site:
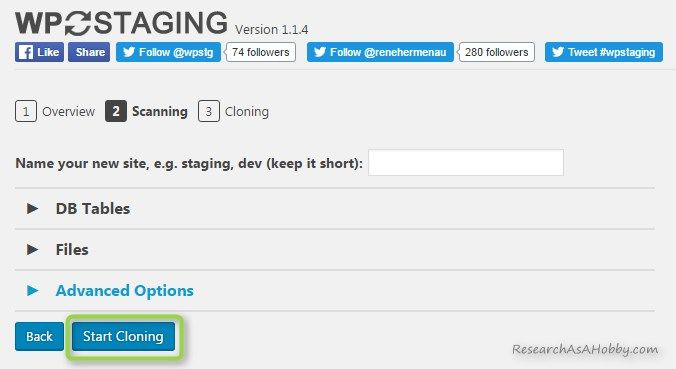
A new staging site will be created:

Note that no database has been created, but new database tables have been added. And files for the new staging site have been added to a subfolder in my WordPress installation folder. In this case the subfolder’s name was generated as 1488583707022 (it could be specified to a more friendly one before creating staging site – see image here).
5. Test on the staging site: install new plugins, update plugins, update theme, update WordPress etc
This is the summit of the whole tutorial. You’ve got a functional copy of your website (staging site). And now you can test anything you want on it. You can install new plugins or themes, update plugins or themes, update WordPress version to see if it does not break anything on your staging site.
To do that just click a link created by WP Staging plugin on a previous step and you will get into the staging site.
Administrator dashboard of the staging site has a bright orange top panel:
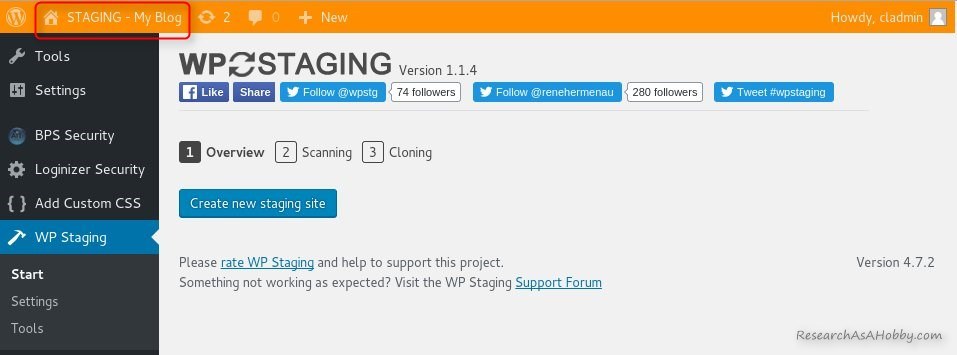
The panel helps you easily determine whether you work in your original website or the staging site
6. Make changes on your live site with no fear of breaking anythng
So, on a previous step you tested everything you wanted: updated plugins, installed new plugins, updates WordPress version etc. And you made sure it’s safe and does not break your website. Now you can do the same changes on your original website.
7. Remove staging site or leave it till the next tests
After I do all the tests I delete a staging site. Next time I want to test new plugins or updates of my WordPress software I create a new staging site. But your testing strategy may be different and you can have several staging sites.
There’s no limit on how many staging sites you may have. The only practical limit is only your disk storage.
Conclusion
Installing new plugins, updating existing plugins, updating themes or updating WordPress version can break your website. That’s why it’s recommended not only to have a reliable and efficient backup solution, but also test the changes of your website on a staging site.
Staging site is a functional copy of your website available only for administrators. The easiest way to create a staging site is using a special functionality which can be provided by an advanced hosting (see more details above).
But if your hosting does not offer staging environment, then you need to take care of it yourself.
One way is creating a totally independent clone of your website for running install and updating tests on a separate domain or subdomain. It can be easy and free if your website is small.
But it turns into a very challenging or daunting task, if your website is medium or large. Here’s where WP Staging plugin comes into play.
The plugin can create staging sites not only for small websites, but it also makes it possible to create staging sites even If your website is large. And in this article I’ve described how you can do it very easily.
Now you can avoid new plugins breaking your website. And you’ll be safe when updating plugins, themes and WordPress version. And the sweetest part is that this method is free 🙂
P.S.: When dealing with outdated plugins or WordPress version, a strong security solution will help you avoid being hacked.

BTW, I respect your privacy, and of course I don't send spam, affiliate offers or trade your emails. What I send is information that I consider useful.


Excellent viewing Michael,
Can I have a copy in PDF form so that I can download it and watch as a resource?
thank you
sincerely
Bruce
Thanks, Bruce!
Here’s the link to the pdf file. I’ve also added the link at the bottom of the article as usual.
Although I’ve written the article a while ago, it’s still actual. Perhaps only some minor things changed.
I’ve corrected the link
Plugins are updated on a daily basis. Every wordpress site has at least 15 plugins (if you’re actually selling anything).
Add to that wordpress updates, and each plugin updates at a different frequency and the result is that almost everyday there is a new update to something or the other. I don’t feel that creating a site, updating, testing, then repeating for the live site is a sustainable method for small businesses which have only 1 person handling everything. Granted that “it’s important” doesn’t mean that there’s not a better way than this.
Mugen,
I appreciate your input.
If you know a better way how to how to do it without a staging area option, feel free to share it.
I used to update the plugins and WP version as soon as I noticed newer versions (like most users do I think).
But one day I got my site broken and spent a whole day or so recovering my site. I decided that I can’t take these risks anymore and I need to check before updates.
Now I update ASAP only security updates (creating a test site too though). And if there are no security updates I wait for other updates to accumulate and then I create a test site, run updates on the test site, check everything and then update on the live site.
Great step by step tutorial and description of the methodology that we also typically follow before updating WordPress. The part that you don’t spend much time on is HOW to go about testing the staging site after plugins have been updated. For us, this is one of the most time consuming parts. It’s not too bad if you have one small site but if you manage dozens or hundreds of sites, it’s hugely time consuming to click through pages on each site to make sure nothing broke.
This problem is what compelled us to create our own tool to make reviewing/testing sites much quicker. The tool we built, which we are now offering other developers and site owners, allows you to quickly compare all pages in your site before and after an update and it tells you if anything has changed. If this sounds interesting, please take a peek and see if it can help you in this essential process Michael outlined.
http://www.wpboom.com
Interesting idea. But it’s a bit different approach. In my tutorial I want to make sure a website will not break without updating/changing the live WordPress site. It’s a precautious way.
Anyway, good luck with your tool!
Great article. Very detailed. Gives a reader so much insight about a test staging environment and its importance. And that’s exactly why we have mentioned that method in our blog post on How To Restore A WordPress Website Backup After A Broken Plugin Update.
We have written about how test staging environments ensure that the user experience isn’t interrupted by an update gone wrong. And also about what one can do before an update and post a crash!
You can take a look at our blog post here: https://www.pixelmattic.com/blog/restore-wordpress-website-backup-broken-plugin-update/
Hi Nithya,
Thanks for your comment. Nice addition to my article!
Hm, dear Michael,
I’m just thinking: What’s the use of looking for a solution for a problem which causes another problem which I can’t solve either?
I don’t know where this table with the beginning “_” comes from. I looked into my MySQL database, and there are only ordinary tables without a beginning “_”. And in the list of database tables shown by the plugin there is only “qnqpWzxToptions”, not “_qnqpWzxToptions”. I excludes “qnqpWzxToptions”, but the same result appeared.
Helmut,
Sorry to hear that you experience issues.
Plugins (not only free ones but also paid ones) may fail, unfortunately, due to different reasons. Sometimes the reason is not the flaw of a plugin, but some isolated issue with a website. I don’t know what causing the failure in your case.
I guess, you have several options – post your issue in a support thread of the plugin and see if the guys can help you resolve the issue. Or you can try other methods of creating staging areas.
It’s sad that the plugin did not work for you. For the most sites (according to the support forum and the feedbacks there) it works very well.
Hi Michael,
I contacted you today with another question elsewhere. Now I tried to clone my website with the staging plugin you recommended, gave the cloned site the name “Test”, excluded most of the uploaded images from being taken over to the cloned site, and then started.
But in the end I got an endless row of failure messages which only stopped when I cancelled the whole process:
DB has been cloned successfully
[13-04-2017 15:26:07] Fail: Replacing site url has been failed. DB Error: Table ‘db639225031._qnqpWzxToptions’ doesn’t exist
[13-04-2017 15:26:09] Fail: Replacing site url has been failed. DB Error: Table ‘db639225031._qnqpWzxToptions’ doesn’t exist
[13-04-2017 15:26:11] Fail: Replacing site url has been failed. DB Error: Table ‘db639225031._qnqpWzxToptions’ doesn’t exist
[13-04-2017 15:26:12] Fail: Replacing site url has been failed. DB Error: Table ‘db639225031._qnqpWzxToptions’ doesn’t exist
[13-04-2017 15:26:14] Fail: Replacing site url has been failed. DB Error: Table ‘db639225031._qnqpWzxToptions’ doesn’t exist
[13-04-2017 15:26:17] Fail: Replacing site url has been failed. DB Error: Table ‘db639225031._qnqpWzxToptions’ doesn’t exist
[13-04-2017 15:26:19] Fail: Replacing site url has been failed. DB Error: Table ‘db639225031._qnqpWzxToptions’ doesn’t exist
[13-04-2017 15:26:22] Fail: Replacing site url has been failed. DB Error: Table ‘db639225031._qnqpWzxToptions’ doesn’t exist
[13-04-2017 15:26:24] Fail: Replacing site url has been failed. DB Error: Table ‘db639225031._qnqpWzxToptions’ doesn’t exist
[13-04-2017 15:26:26] Fail: Replacing site url has been failed. DB Error: Table ‘db639225031._qnqpWzxToptions’ doesn’t exist
[13-04-2017 15:26:29] Fail: Replacing site url has been failed. DB Error: Table ‘db639225031._qnqpWzxToptions’ doesn’t exist
[13-04-2017 15:26:31] Fail: Replacing site url has been failed. DB Error: Table ‘db639225031._qnqpWzxToptions’ doesn’t exist
…
and so on… I cancelled the rest.
What might have gone wrong?
Hi Helmut,
The plugin creates copies of your WordPress database tables. And then it replaces URL in the copied tables. The error message says that the database table does not exist. Maybe it was not created when your WordPress tables were copied for some reason. But I’m not sure.
By the way, the name of your table looks strange: _qnqpWzxToptions. It’s not a standard WordPress table.
You may try posting a support request on the plugin’s support forum.
Also, if you don’t know what this table does, a quick suggestion is to exclude this table when creating a Staging copy.