Intro and Demo
My tutorial on creating interactive images on which users can select elements by moving a mouse over the elements received very positive feedback. As well as the tutorial on displaying additional information on clicking an interactive image element. And my readers wanted more 🙂
There was a request how to create an image with elements and when clicking on an element the previous element would not stay selected. In other words, how to make images with a single selecting option of image elements.
In this tutorial I will show you step by step how to do it. i.e. how to create both single-selecting and multi-selecting elements on your SVG image.
It’s really easy when you know how to do it. And you can do it in WordPress.
It was a super interesting brain-smoking time to find a way how to make it possible for anyone without coding. Sometimes coding is the fastest and more reliable way to do what you want. But I wanted to make a tutorial for people who are not coders.
And my research on how to do it was successful. You have a chance now to enjoy this tutorial and create the type of interactive images that were impossible before!
All examples and demos in this tutorial you can download in this section.
You will need to use Javascript and CSS. But don’t worry – this is just a copy-paste thing. And you can do everything right in your blog post or page, i.e. you don’t need to edit WordPress files or anything like that.
Here is a demo example what you can do with the help of this tutorial.
Move your mouse over the image elements (notes, images) and click on the elements to select them. When you select an element, other elements get deselected. Then click a button at the bottom of the image. It will read the selection and will open an article depending on which element you selected.
By the way, these articles are among my best stone corner researches for website owners.
This is an example of a single-selecting option. I.e. when you select another element, the previously highlighted element gets unselected.
In this tutorial you will be able to do also multi-selecting elements. The difference between single-selecting and multi-selecting of image elements is literally in changing just one symbol in your WordPress blog post.
Let’s see how you can do the magic!
Creating SVG image with clickable elements
The steps of creating an SVG image with interactive elements and how to add SVG to your WordPress site I described in my other article tutorial. If you are not familiar with SVG images and how to create the elements which a user can move a mouse over and click and how to correctly embed SVG images in WordPress, then take your time to have a look at that tutorial.
After you know the basics of working with SVG elements, this tutorial will be like a piece of cake for you.
The principles behind the functionality of selecting and deselecting image elements
There can be more than one way of manipulating the interactivity of image elements. I’ve selected an elegant, a professional and still a very easy way to add interactivity to your WordPress site.
The magic behind the interactive SVG with selecting elements consists of the following parts:
- SVG image with elements with just one event “onclick” specified. The event calls a function which has one argument – the ID of the element. Also, a secret sauce is to remove style properties such as a fill color, a stroke style etc (otherwise it will not work with CSS). Finally, add a new property “class” and specify its default value.
- CSS which specifies the styles of the interactive elements of your SVG image: the default state, hover state, selected state and hover-when-selected state. I will show you how you can create CSS super easily. No prior knowledge of CSS is required.
- Javascript which helps to manipulate single-selecting and multi-selecting of image elements. Basically the code determines which image element is clicked and it applies CSS to the image elements. You don’t need to understand the code, copy-paste is enough. Anyways, I will explain the code so that you could modify it for your purpose in case you need it.
This is a different approach compared to my previous tutorials on interactive SVG images. But this is a more powerful, more professional and more versatile approach. You can even create interactive applications using this approach.
Video tutorial (with a bit of fun)
Here’s the video walk-through of the tutorial. This video is helpful, but it can’t replace the tutorial below. Besides, I had some fun making this video. Enjoy!
The working example of interactive image with selecting and unselecting elements
For educational purposes I will explain the example which is not beautiful, but it contains everything you need for this tutorial.
Here is the interactive SVG with single selection of image elements (hover over the image elements and click them):
And this is the same SVG image with multiple selection option (hover over the image elements and click them):
The difference is in just one character in the code 🙂 A bit later you will see which character is responsible for switching between single-selection and multi-selection option.
And since the both options are practically the same I will explain the option with a single-selection of the image elements since this option is one step more advanced.
Let’s see now how this SVG with interactive elements is built.
SVG image with elements which are to be interactive
Adding image elements (areas, objects) that can be selected in the SVG
Like in my other tutorial about creating SVG images with help of existing raster images, I took an existing image:
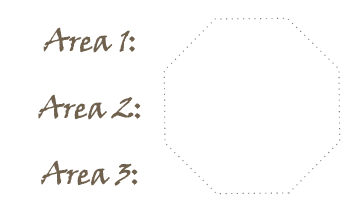
The raster image (.png) that I will use when creating the SVG image
Then I opened Inkscape software (you can use other alternatives if you want), imported this raster image, and added elements (areas) that will be clickable and selectable. Of course, you can create your SVG image entirely using vector graphics from scratch without using a raster image template to import.
Then I added elements (areas, objects) to the SVG image. But unlike the previous tutorial, I specified the areas (objects) properties a bit differently.
Let’s see an example of one image element (area, object) and how I set it up in Inkscape.
I selected an image element “path4507”:
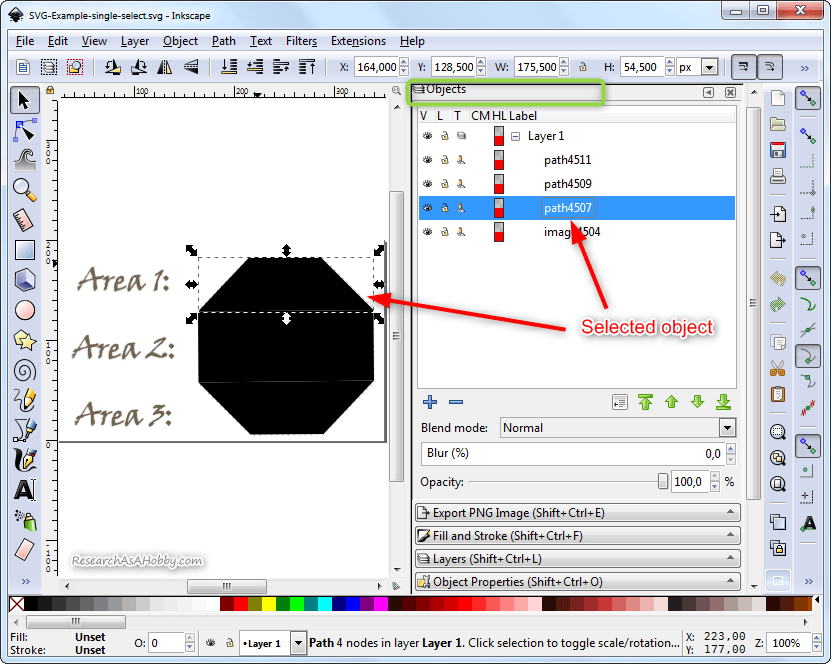
Selected image element (object) in SVG. The “Objects” panel.
Specifying “onlick” event for the clickable image elements
Then I opened “Object Properties” panel, added onlick event “areaclicked” with the string parameter (in the quotes) which is the ID of the selected object.
areaclicked("path4507");
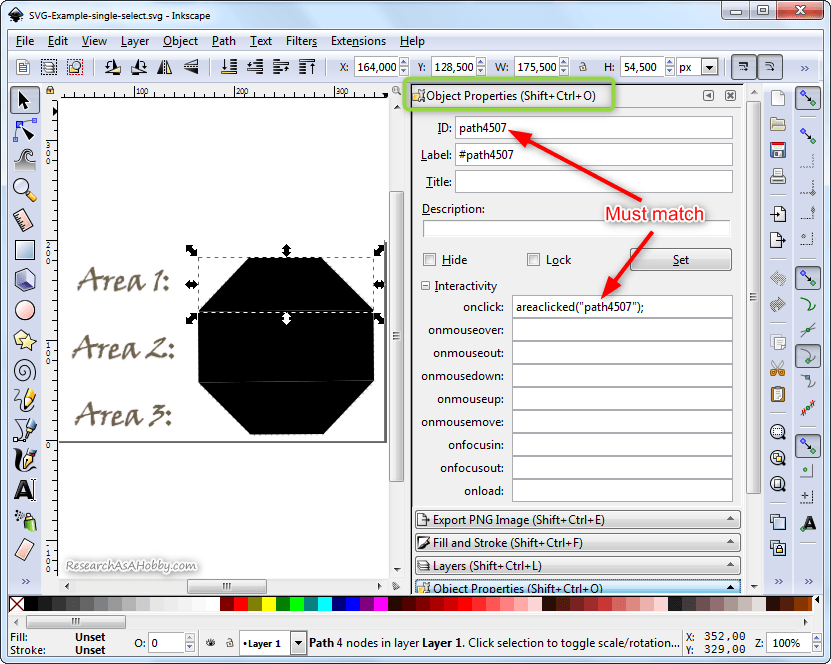
Specifying onlick event parameter in SVG
I will explain this function in the javascript section below.
Please note that I did not specify the events “onmouseover” and “onmouseup”. In the previous tutorial these event were responsible for handling mouse hover events. But in this tutorial I use more professional and versatile approach which is CSS (I explain it further).
Removing “style” attribute
Since all the styles (fill color, stroke color, opacity etc) will be manipulated via CSS, I removed the style attribute from the SVG image (from the XML Editor tab).
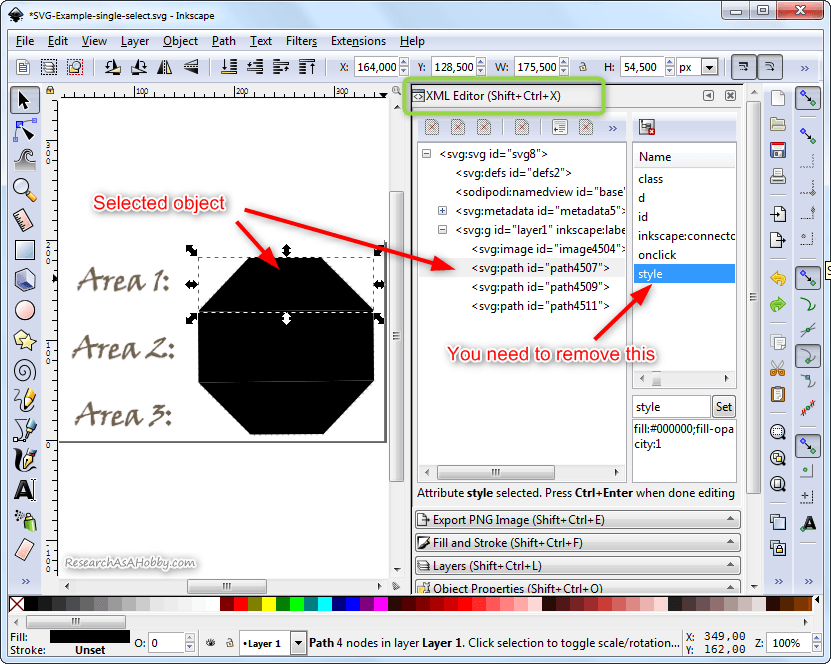
“Style” property for the selected image element in XML Editor
If you don’t remove “style” property for the interactive image elements in your SVG image, changing style with CSS will not work for them.
Here’s how to remove it. When the image element (area, object) is selected do the following:
- Select the “style” attribute in the list.
- Remove the “style” attribute value.
- Click the “Set” button. It will remove the “style” attribute from the list.
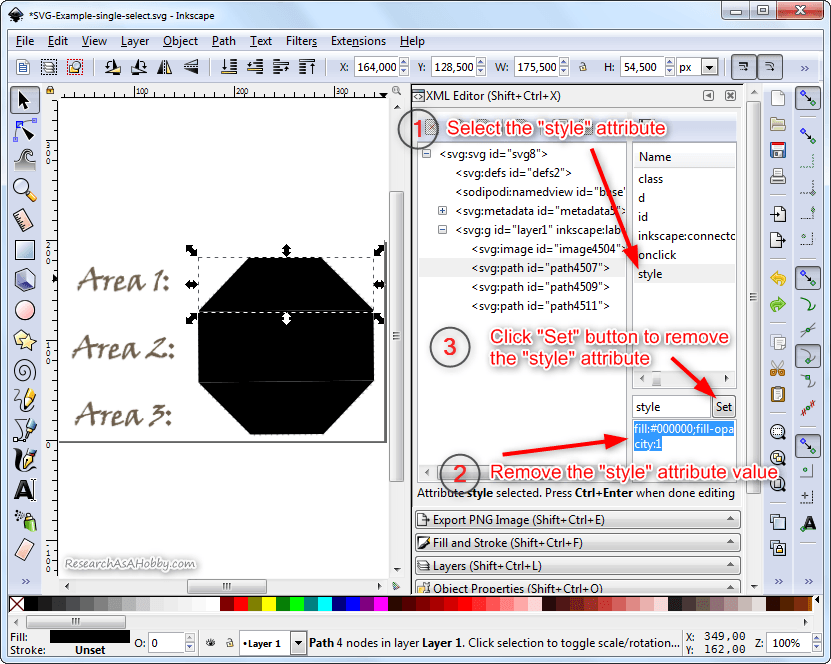
Removing the “style” attribute for the image element
Adding “class” attribute to specify the image element’s default style
Adding class to an image element is required for connection with CSS. The CSS is responsible for colors, opacity etc for the object. I will show you how to add the CSS later.
Here’s how to add the class for the selected object in the XML Editor panel:
- Input “class” in the Attribute name field.
- Input “classRaahDefault” (or any other your class name) in the “Attribute value” field. This class name will be responsible for the default state (color, opacity etc) of the image element. This class will be specified in the CSS later.
- Click “Set” button. It will add the class for the currently selected image element.
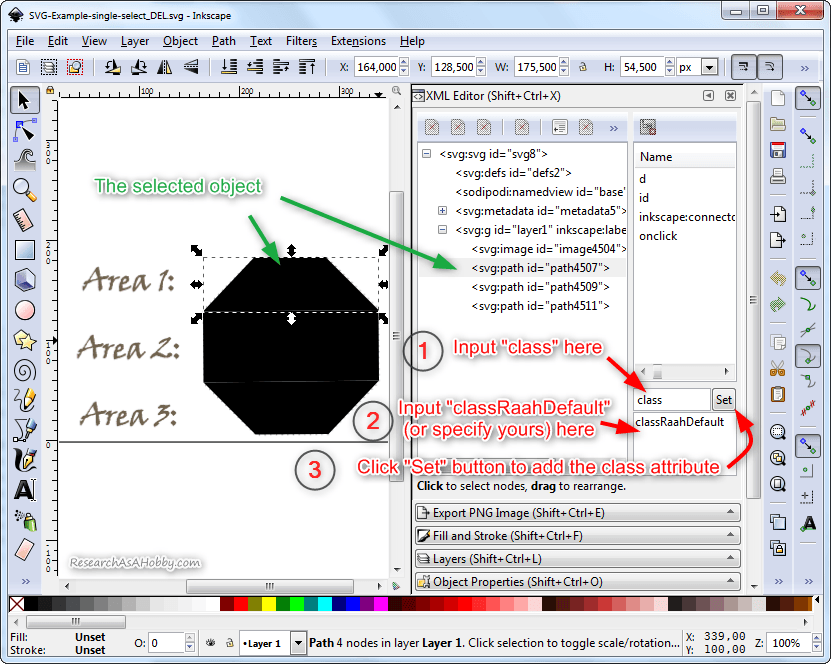
Adding “class” attribute to the selected image element
Styles (CSS) for the image elements
Four states of image elements
To put it simply, CSS is a piece of code that specifies how image elements look like. SVG image creates a CSS-like code and stores it in itself (the SVG file) when you specify the colors, stroke style, opacity etc.
Specifying the styles outside of the SVG image give us more flexibility and makes it easier to manage it programmatically. In other words, for manipulating four states of an image element (default state, hover state, selected state and hover-when-selected state) it is much easier when the styles are stored separately from the SVG image.
The structure of the CSS code that I used for my example is the following:

The structure of the CSS code for the SVG image elements
On the image above I marked the code places for different states of the image elements with different colors. This is not a complete CSS code, this is just a structure for your understanding. I’ll show you how to fill in the CSS code into this structure now.
By the way, in the section above I input class “classRaahDefault”. Note that this class is specified in the CSS code. If you specified another name for this class, then in the CSS code you need to specify the same value.
There is more than one way to get a CSS code. But probably the easiest one is using Inkscape. Moreover, you can use it right inside the SVG image you are working on.
CSS for the default state of image elements
So here’s how I did it for the default state of an image element:
- Select an image element (area, object), and set up its fill color, opacity, stroke color and opacity etc in the Fill and Stroke tab. No matter what element you select. You just need to take the generated CSS code, and after that you will remove the style from the SVG image anyways. You can even use another SVG image for it.
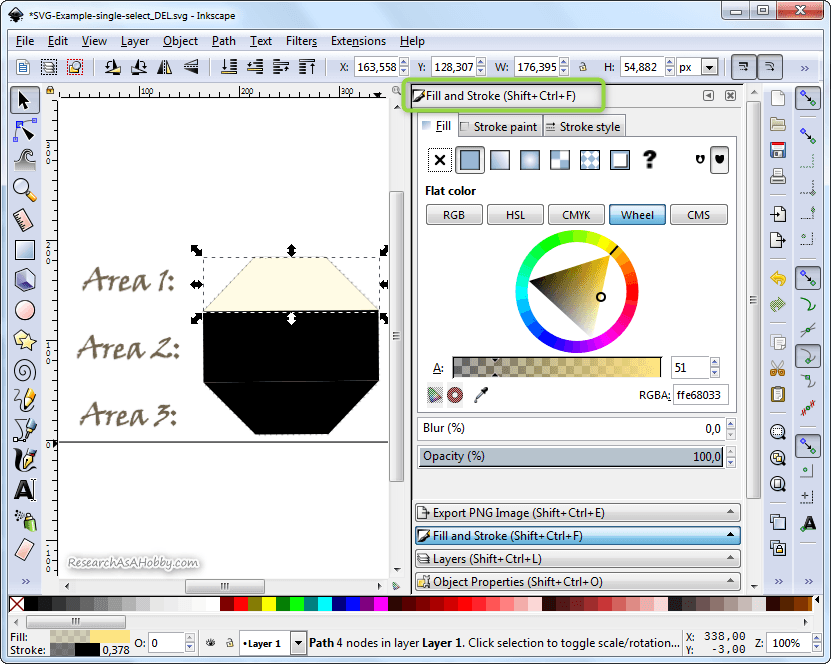
Specifying the default state for an image element
- Now it’s time to take the generated CSS code for the style you set up. Go to XML Editor tab. Click “style” in the Attribute names list. And in the Attribute Value field there’s the CSS code you need. Copy it.
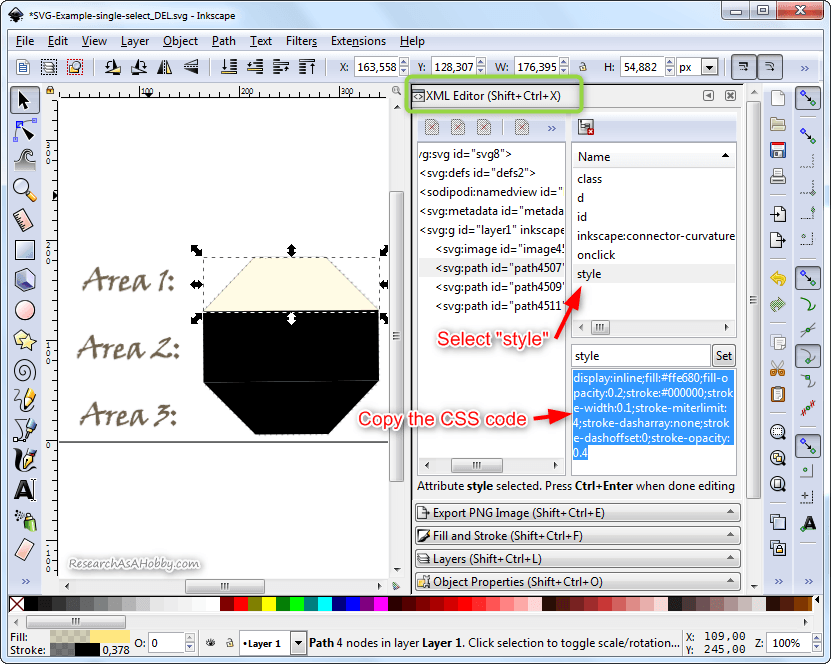
Copying CSS code for the selected SVG element
- To make the CSS code more readable and beautiful, use any free online CSS beautifier service (e.g. this one. It will format the CSS code into multi-line and easily readable format. Copy the result CSS code.
- Paste the CSS code into the .classRaahDefault section of the CSS code. So, in my case it looks like this:
/* Default style of an SVG element (area) - the style when the SVG/page just loads*/ .classRaahDefault { display:inline; fill:#ffe680; fill-opacity:0.2; stroke:#000000; stroke-width:0.1; stroke-miterlimit:4; stroke-dasharray:none; stroke-dashoffset:0; stroke-opacity:0.4 } - Save it somewhere (e.g. in a text file). You will use it later.
CSS for the hover-when-default state of image elements
Now let’s see how you can get the CSS code for the default state when hovering over an image element.
You have two options: either do the same steps as above to get the CSS code, or get only the value of the parameters that should be changed compared to the default state. For instance, in my case the style of image elements when hovering mouse over them stay the same compared to the default state, except the opacity parameter.
So, the only parameter change in my case is opacity. For the hover state this is the following:
fill-opacity:0.4;
Therefore, the CSS code for the default hover state of image elements looks like this in my case:
/* Default Hover style of an SVG element (area) */
.classRaahDefault:hover {
  fill-opacity:0.4;
}
All other parameter’s values are inherited from the default definition of .classRaahDefault class.
CSS for the selected state of image elements
You can get the CSS code for the clicked state of an image element in absolutely the same way as for the default state that I described above.
The CSS code for this state looks like this in my case:
/* style of an SVG element (area) when the element is clicked (selected) */
.classRaahSelected {
  display:inline;
  fill:#0000ff;
  fill-opacity:0.2;
  stroke:#ff000f;
  stroke-width:0.3;
  stroke-miterlimit:4;
  stroke-dasharray:none;
  stroke-dashoffset:0;
  stroke-opacity:1
}
CSS for the hover-when-selected state of image elements
You can get the CSS code for the hover state for a clicked image element the same way as a hover state for a default element state described above.
In my case only the opacity changes compared to the default clicked state. For the hover when selected state the opacity parameter is the following:
fill-opacity:0.1;
And the CSS code for the hover-when-selected state of image elements looks like this in my case:
/* Default Hover style of an SVG element (area) */
.classRaahDefault:hover {
  fill-opacity:0.4;
}
The whole CSS code for the SVG
Finally, the whole CSS code for all fours states of image elements looks like this:
<style>
/* Default style of an SVG element (area) - the style when the SVG/page just loads */
.classRaahDefault {
  display:inline;
  fill:#ffe680;
  fill-opacity:0.2;
  stroke:#000000;
  stroke-width:0.1;
  stroke-miterlimit:4;
  stroke-dasharray:none;
  stroke-dashoffset:0;
  stroke-opacity:0.4
}
/* Default Hover style of an SVG element (area) */
.classRaahDefault:hover {
  fill-opacity:0.4;
}
/* style of an SVG element (area) when the element is clicked (selected) */
.classRaahSelected {
  display:inline;
  fill:#0000ff;
  fill-opacity:0.2;
  stroke:#ff000f;
  stroke-width:0.3;
  stroke-miterlimit:4;
  stroke-dasharray:none;
  stroke-dashoffset:0;
  stroke-opacity:1
}
/* Hover style of an SVG element (area) when the element is clicked (selected) */
.classRaahSelected:hover {
  fill-opacity:0.1;
}
</style>
Note the opening and the closing tags <style>. These tags are requires because we will use the CSS code in the blog post (i.e. in the HTML format).
Save it somewhere (e.g. in a text file). You will use it later.
Some tips to use the CSS code
If you have never dealt with CSS before, I suggest simply taking my CSS code above and use it. And if it works, change it the way you want.
The point is that not everything you can do in Inkscape with style can be moved to CSS code. For example, the code for gradients can’t be simply copied to the CSS code the way I described. So, simply start from the CSS that already works (e.g. my CSS code), make sure that it works with your example, and then modify or replace the CSS code entirely.
Javascript for handling the events of the image elements
The core of this tutorial is using javascript. You need this for handling clicking events and changing the selection of areas programmatically in conjunction with the CSS code. Javascript makes it elegant and opens up a big potential if you want to develop a more complex functionality of your interactive image.
Basically, you can simply copy and paste the Javascript code I provide for my example. But if you need to modify or enhance the functionality, this section will be useful to you so that you could understand my JS code.
The logic of the javascript functionality of my SVG example
Let me explain what role exactly the javascript plays in my example (also, you can see the code below):
- By default all the image elements are in the default (non-selected) state (.classRaahDefault).
- Hovering over the image elements in the default state is handled the CSS (.classRaahDefault:hover).
- When user clicks an image element, the event (areaclicked) in the SVG fires up with a parameter value which identifies the clicked object. The event calls the JS function areaclicked(AreaID) where AreaID is the ID of the clicked object (the image element).
- The areaclicked(AreaID) does the following – it calls the function selectDeselectArea which changes the selection of the clicked image element. It the elements was deselected (i.e. in a default state – (.classRaahDefault), then the function selects the image element (i.e. sets the class . classRaahSelected for this element). And if the element was selected (i.e. if the element had class . classRaahSelected specified), then the function deselects the image element (i.e. specified the default state .classRaahDefault for this element).
- Also, if the mode of the SVG image is a single-selection (the function isMultiselect is responsible for that), then the function deselectOtherAreas is called. This function goes through all the selected image elements (they have class “classRaahSelected” specified) except the clicked image element (its ID is in the variable AreaID), and deselects these image elements.
- The SVG file.
- The Javascript and the CSS code for the demo.
- The SVG file.
- The Javascript and the CSS code for the working example.
- The CSS template with the Javascript used in the video tutorial.
- Basic SVG coding.
- Interactive SVGs.
- Also in this comment to my other SVG tutorial I mentioned a couple of tricks about using groups of image elements, i.e. when hovering over or clicking one element affects the style of other elements.
Here’s the whole JS code for my example
<script>
function isMultiselect() {
  // return 1 if you need multiselect; 0 - if single select
  return 0;
}
function areaclicked(AreaID) {
  // function on click event of SVG element
  // AreaID: ID of a image element (SVG object), e.g. "path4507"
  selectDeselectArea(AreaID);
  // deselect other areas if no multiselect
  if (isMultiselect() != 1) {
    deselectOtherAreas(AreaID);
  }
}
function selectDeselectArea(AreaID) {
  // if AreaID is selected, it gets deselected. If AreaID is deselected, it gets selected
  var obj = document.getElementById(AreaID);
  var currentClass = obj.getAttributeNS(null, 'class');
  if (currentClass == "classRaahDefault") {
    selectArea(obj);
  } else {
    deselectArea(obj);
  }
}
function selectArea(obj) {
  // selects the object (the SVG element) - sets 'selected' style for the area
  obj.classList.remove("classRaahDefault");
  obj.classList.add("classRaahSelected");
}
function deselectArea(obj) {
  // selects the object (the SVG element) - sets 'default' style for the area
  obj.classList.remove("classRaahSelected");
  obj.classList.add("classRaahDefault");
}
function deselectOtherAreas(AreaID) {
  // this function is used if you need single select. I.e. it deselects all areas except the AreaId
  var areas = document.getElementsByClassName('classRaahSelected');
  for (var i = 0; i < (areas.length); i++) {
    if (areas[i].getAttributeNS(null, 'id') != AreaID) {
      deselectArea(areas[i]);
    }
  }
}
</script>
Note the opening and the closing tags <script>. These tags are requires because we will use the JS code in the blog post (i.e. in the HTML format).
Explaining the Javascript code for the SVG
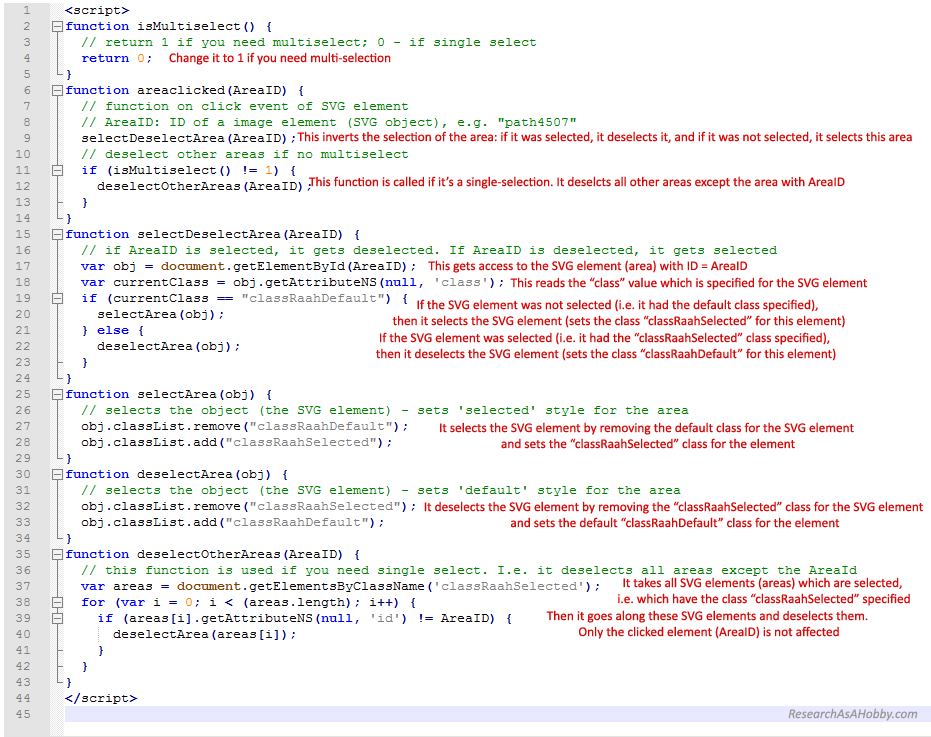
I explained the logic of the JS script above. In addition to that you can read the comments which I added to the screenshot of the code (you can click the image to enlarge):
Hope it helps!
Some tips to use the Javascript code
The tricky thing is that sometimes it’s hard to find out why your javascript is not working. I’ve prepared the javascript that works in my case. And it should perfectly work in your case. But you modify the code or if you use your own function names, string values etc, then pay extra attention to the changes you make.
If you have not dealt with javascript code before, then perhaps it’s a good idea to first implement the working code I have prepared for you. And after you make sure it works flawlessly in your case, then modify it according to your needs.
Adding Javascript and CSS to a WordPress blog post or a page
This is a simple part. Just take the CSS and the JS code and add it to your WordPress blog post or a page when editing the post/page in an HTML format. You can add the code wherever you like. For example, I add the code after the blog post page for my convenience.
Don’t forget to include opening and closing tags (<style>, </style>, <javascriptstyle> and </javascriptstyle>) to the code.
Download section
Here you can download the following files (0.7 MB in total).
The demo with a SVG image that I used in the demo section above:
The working example with a SVG image that I used in this tutorial above:
Some useful links
While doing my research for this tutorial I’ve used a couple of useful links that you can use too if you need to enhance the functionality of the SVG images powered by CSS and Javascript.
Conclusion
Adding interactive images to a website (and particularly to a WordPress blog post or a page) can be a pain. And if you don’t have enough coding experience it becomes quite impossible. That’s why I prepared this tutorial for you – to make it possible.
Creating a light-weight and reliable interactive image with elements that can be selected is a really great option. Moreover it’s absolutely free.
And if you need a more powerful application, then with a little bit more javascript you can develop it taking my examples as a starting point.
If you find my tutorial helpful, please share it. I shared the results of my interactivity experiments with you. And I hope you will share it with others too. Thank you!

BTW, I respect your privacy, and of course I don't send spam, affiliate offers or trade your emails. What I send is information that I consider useful.



Thanks for all that valuable information!! I just want to say your article is very helpful, that’s very clear.
Happy to hear! Feel free to ask any questions 🙂