Intro
My previous tutorial on a similar topic has become pretty popular. It covered how to make clickable and highlighted areas on your image easily and for free and use it in your WordPress website.
Since this topic is in demand I decided to make a further step so that anyone could take even more advantage of using SVG images on your website.
In this tutorial I explain how you can make a sort of an interactive web application right on your WordPress page or in a post. In particular, when clicking an image area you can display additional information nearby the image. The information can be presented in HTML format, i.e. it may contain not just a plain text, but a formatted text with images, hyperlinks and so on.
Like one of my readers wrote in the comments to my previous tutorial:
“The highlight is a nice touch but when the user clicks I want another control to the right of the image to display the proper text.”
So, this tutorial will help to make it possible. And you don’t need to know programming. Although, a basic HTML knowledge is desirable. I’ll show you the very simple way and give you enough details so that you can follow the steps and do what you need. And yes, you can do it for free.
Demo
Here’s an example below of what you can do. There is a SVG image which I created by exactly following my previous tutorial with a little tweak. And adding just some lines to your page or post HTML will do the rest.
Just move your mouse over the areas which are pointed at with red arrows. The areas get highlighted. And clicking the areas will open a specified URL. In my example I specified some of the the most popular pages on my website (researches on how hosts fools us, reports on real hosting performance, website security in depth for non-technicals, the opt-in marketing tool of my choice). Make sure you find time to check these pages out.
And, the new part in this tutorial is that the additional information for each highlighted area will display below the image when you move your mouse over these highlighted areas.
In this tutorial I will show you how to do it.
By the way, with a tiny tweak in the SVG file, the additional information can be displayed on click, not on moving over.
You can download my SVG image by saving this link. And the code to add to a WordPress post or a page you can find in the section below.
The structure of the solution
Before giving you exact tutorial on how to do it, let me show you the structure of the demo. It will help you get the idea if you will want to tweak the solution your own way. Basically, the structure is quite simple:
- SVG file. It contains the image, the highlighted areas and the event calls (the instruction calls which need to be done to show the additional information and to change the visibility of highlighted areas). See the previous tutorial on how to create such SVG file.
And in this tutorial I will just show how to tweak the SVG file for displaying additional information when you move your mouse over the image areas. - WordPress site with installed SVG Support plugin and a small CSS code. The plugin helps to make it possible to use SVG files within WordPress. And the CSS lines help display the SVG image in a responsive way. This part is entirely the same as I described in the previous tutorial.
If you don’t use WordPress, then what you basically need is to find an alternative solution to SVG Support plugin. - Several lines of code that you can insert right into an html view of your WordPress page or post. These code lines contain so called event handlers, i.e. the instructions which help display the additional information for the highlighted areas. Technically with these code lines you get an area (div) where the additional information will be displayed, and the javascript functions which put the additional information in that area.
Don’t worry if some of the words above sound technical to you. You don’t really need to understand the technical terms to follow the tutorial.
Now let’s get to the practical part.
Creating SVG image and adding to your WordPress site
This is exactly as described in my previous tutorial except a little tweak in this section> about adding interactivity settings (on-mouse-over and on-mouse-out events).
I suggest opening that section in a separate window or tab for better following this part of the tutorial.
Setting interactivity to the SVG image
As you followed the previous chapter and you are on your way creating your SVG image and highlighted areas, you can apply interactivity for the areas. This chapter is about how you can do it.
In addition to making the areas highlighted or transparent when you move your mouse over or out of the image areas (which is fully explained in my previous tutorial), you also need to make the additional information displayed (e.g. below the image like in my example).
You may have as many interactive areas as you need. And in my tutorial I will show you an example with just one area. The same procedure will apply for other areas.
Here is what you need to do for a selected area (which is an object in Inkscape). Add the following commands in the onmouseover and onmouseout fields (they are located in Inkscape at Object Properties tab / Interactivity section):
this.style.opacity=1; onMouseOverHosting();
Put this command line in the onmouseover field (see screenshot below).
It contains two commands. The first one (“this.style.opacity=1;”) sets Opacity to 100%, i.e. it makes an object visible. You need it when user moves a mouse over the object. This is the same command as in my previous tutorial.
The other command (“onMouseOverHosting();”) calls a function.
You can make up your own name for the function (for example “displayArea1();”).
This function will display the additional information in your WordPress content for the selected image area.
By the way, if you want to display the additional information when a user clicks on the area (and not when a user hovers over the area), you can put the function call to onclick event field (not to onmouseover event field).this.style.opacity=0; onMouseOutHosting();
Put this command line in the onmouseout field (see screenshot below).
It also contains two commands. The first one (“this.style.opacity=0;”) sets Opacity to 0%, i.e. it makes an object invisible (totally transparent). You need it when user moves mouse out the object. This is the same command as in my previous tutorial.
The other command (“onMouseOutHosting();”) calls a function. This is the difference with the previous tutorial.
By the way, you also can make up your own name for the function (for example “onMouseOutArea1();”).
In my example this function does nothing. But you can make it that the function will clear the additional information for the area (object). Thus, you can either leave the additional information or remove it when a user moves the mouse out of the area (object).
Further in this tutorial I will show you what code exactly (the body of the functions) you can use in your WordPress post or page.

Adding onmouseover and onmouseout events
As you have specified the command lines for onmouseover and onmouseout events, you can go on with the previous tutorial from this section and continue making your areas clickable if you need.
Also, the other parts of the previous tutorial apply exactly. You add your SVG file to your WordPress website, install and setup Support SVG plugin and add CSS code that provides correct scalability of your SVG image according to the previous tutorial.
Thus, so far the only different part compared to the previous tutorial was the different command lines specified for onmouseover and onmouseout events.
Adding the code for displaying additional information for highlighted SVG areas
This chapter is about adding the code of the functions and the code of the area for displaying additional information for the highlighted areas of your SVG image.
In order to complete adding interactivity to your SVG image inside your WordPress post or page you need to add a code to the post or the page.
For your understanding, the code contains basically three parts:
- The section on your page where the additional information for the highlighted SVG areas will display.
- The hidden sections with the HTML content which contain the additional information for each of the highlighted areas.
- Javascript code that manages the interactivity of your SVG image (displaying the additional information for the highlighted SVG areas).
Below I will show you the two examples of code:
- The first example contains the code for my SVG image with only one interactive area coded. I will use it for explaining the parts of the code.
- The second example contains the code for my actual SVG image with all interactive areas coded. Exactly this example you saw above
Explaining the code that adds interactive additional areas in your WP content
The following code example for my SVG image with only one interactive area coded. I use this example for explaining what this code does, so that you could modify it easily according to your needs. You can simply copy this code and modify it as you need.
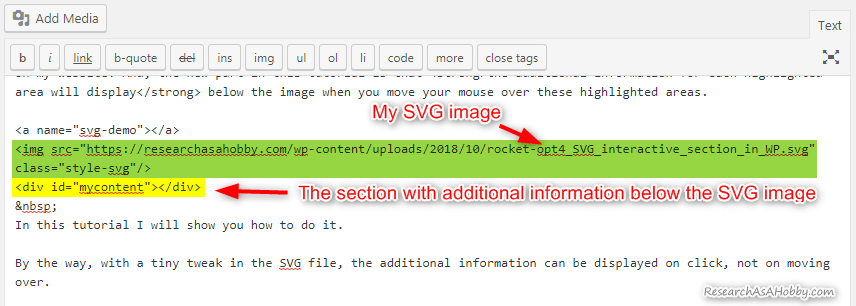
<div id="mycontent"></div>


<div id="infoHosting" style="display:none">
<strong>Fast and reliable hosting</strong>

<em>It's a critical infrastructure for your online business.
Click the rocket to see the recommended hosts.</em>
</div>


<style>
#mycontent {
	border: 1px solid #E9E9E9;
	padding: 15px;
	background-color: #E1E3FF;
	color: #414141;
	line-height: 23px;
	min-height: 180px;
	-webkit-box-shadow: 0 1px 3px rgba(0, 0, 0, 0.18);
	   -moz-box-shadow: 0 1px 3px rgba(0, 0, 0, 0.18);
	        box-shadow: 0 1px 3px rgba(0, 0, 0, 0.18);
	-webkit-border-radius: 3px;
	   -moz-border-radius: 3px;
	        border-radius: 3px;
}
</style>

<script>
function onMouseOverHosting() {
  var html = document.getElementById("infoHosting").innerHTML;
  document.getElementById("mycontent").innerHTML = html;
}
function onMouseOutHosting() {
  var html = "";
  //document.getElementById("mycontent").innerHTML = html;
}
</script>
And here is below the explanation of the code. Please note that the screenshots below have the code lines word-wrapped if it does not fit into one line, so that you could see the whole code. But when you add the code to your post or page, you need to put it onto one line if required (like on the example above.)

The section for displaying additional information for the highlighted SVG area
You need to put this line on your page or post where you want the section with the additional information appear for the highlighted SVG area. In my example I put this section (div) right below the SVG image.
The following piece is the content container with the additional content for the highlighted SVG area. This container invisible because it’s not needed to display implicitly. It’s used by the javascript that I explain below. The javascript takes the HTML content of this container and puts it into the section for additional information.
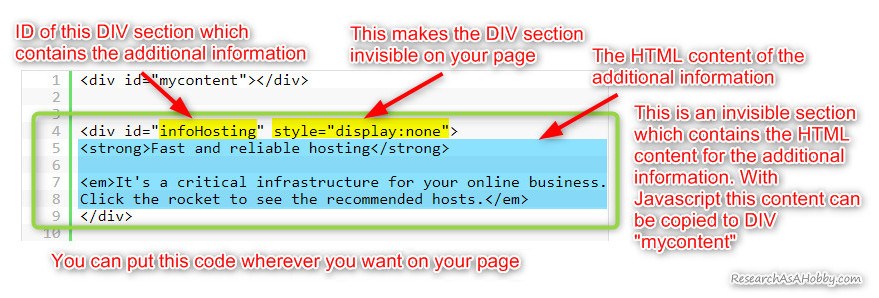
The content for the additional information for the interactive SVG area
If you have multiple highlighted areas, you need to create multiple code pieces like that. Just copy the piece (from <div> to </div>) and specify unique ID for it.
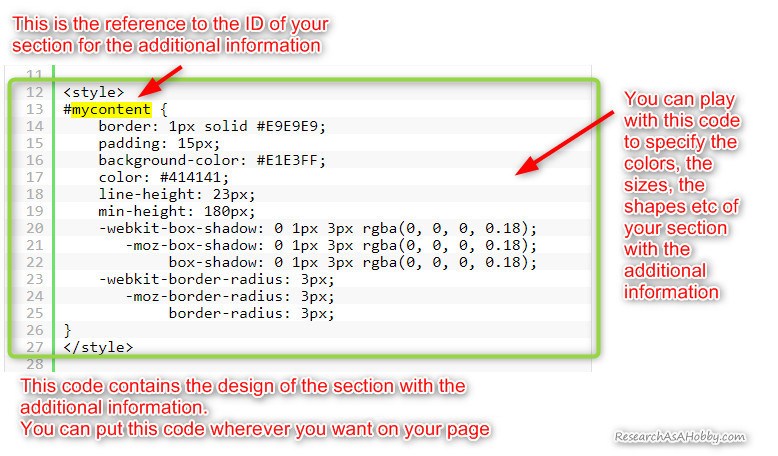
The code specifies the style of the section with the additional information
If you want to modify the style (colors, sizes etc) of this section, then you may need to look for the properties you need in the Internet (for example, you can start from here). This code piece is basically a CSS.
The following piece code is javascript.
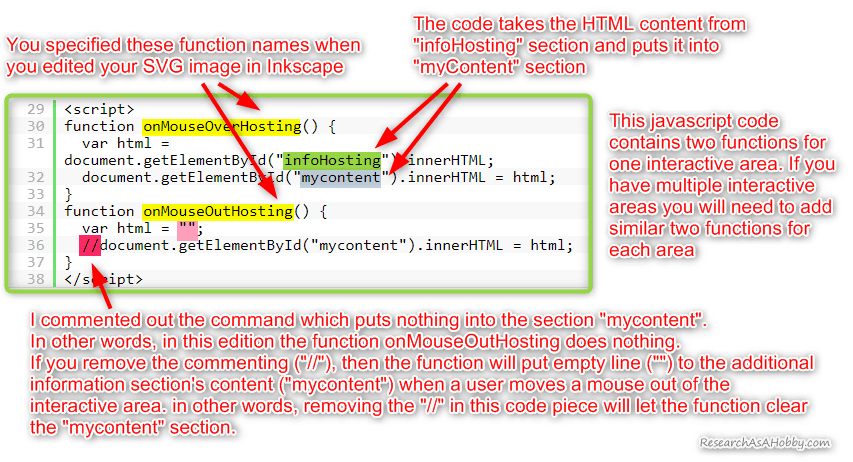
The Javascript for an interactive area which fills and clears the additional information section
You can put the javascript wherever you want on your page.
Please note that javascript has a quite sensitive syntax. And if you edit it and find out that it stopped working whereas the code seems correct, then you might have made a syntax error (e.g. added an empty line or a line break, forgot ”;” etc).
And finally, in case you are a bit lost in naming functions and DIV sections, here’s a combined screenshot with color markup that will help you see which names should match (you can click it to enlarge):
Example of my code to add to WP content for interactive SVG areas
This is the exactly code that I use on this page for my SVG image with multiple interactive areas. If you want, feel free to copy it, modify and use it.
<div id="mycontent"></div>


<div id="infoHosting" style="display:none">
<strong>Fast and reliable hosting</strong>

<em>It's a critical infrastructure for your online business.
Click the rocket to see the recommended hosts.</em>
</div>


<div id="infoAudience" style="display:none">
<strong>High opt-in conversions and loyal subscribers</strong>

<em>Your audience is why your business exists and flourishes.
Click the people to see the recommended tool for getting more loyal audience for your website.</em>
</div>

<div id="infoSecurity" style="display:none">
<strong>High-resistant website security</strong>

<em>Protection of your website is one of the most important aspects of your online business.
Click the pentagon fence to see the detailed article with practical approach on website security.</em>
</div>


<div id="infoMonitoring" style="display:none">
<strong>High-frequency non-stop performance monitoring</strong>

<em>Keeping a close eye on your website performance is important. Frequent downtime and slowness will harm your online business.
Click the radar to see the report on how 15 hosts performed since February 2016. The uptime and speed of the hosts have been checked in a non-stop manner (24/7) all these years.</em>
</div>


<div id="infoResearch" style="display:none">
<strong>Research for better decisions</strong>

<em>Doing your own research will help you find the fast and reliable hosting. Click the observatory to read the articles which will help you find the real star and avoid blackholes among hosing providers.</em>
</div>

<style>
#mycontent {
	border: 1px solid #E9E9E9;
	padding: 15px;
	background-color: #E1E3FF;
	color: #414141;
	line-height: 23px;
	min-height: 100px;
	-webkit-box-shadow: 0 1px 3px rgba(0, 0, 0, 0.18);
	   -moz-box-shadow: 0 1px 3px rgba(0, 0, 0, 0.18);
	        box-shadow: 0 1px 3px rgba(0, 0, 0, 0.18);
	-webkit-border-radius: 3px;
	   -moz-border-radius: 3px;
	        border-radius: 3px;
}
</style>

<script>
function onMouseOverHosting() {
  var html = document.getElementById("infoHosting").innerHTML;
  document.getElementById("mycontent").innerHTML = html;
}
function onMouseOutHosting() {
  var html = "";
  //document.getElementById("mycontent").innerHTML = html;
}
function onMouseOverAudience() {
  var html = document.getElementById("infoAudience").innerHTML;
  document.getElementById("mycontent").innerHTML = html;
}
function onMouseOutAudience() {
  var html = "";
  //document.getElementById("mycontent").innerHTML = html;
}
function onMouseOverSecurity() {
  var html = document.getElementById("infoSecurity").innerHTML;
  document.getElementById("mycontent").innerHTML = html;
}
function onMouseOutSecurity() {
  var html = "";
  //document.getElementById("mycontent").innerHTML = html;
}
function onMouseOverMonitoring() {
  var html = document.getElementById("infoMonitoring").innerHTML;
  document.getElementById("mycontent").innerHTML = html;
}
function onMouseOutMonitoring() {
  var html = "";
  //document.getElementById("mycontent").innerHTML = html;
}
function onMouseOverResearch() {
  var html = document.getElementById("infoResearch").innerHTML;
  document.getElementById("mycontent").innerHTML = html;
}
function onMouseOutResearch() {
  var html = "";
  //document.getElementById("mycontent").innerHTML = html;
}
</script>
And this is how I put the code displayed above into the HTML code of my WordPress post:
That’s it!
And by the way, if you want to share with me and others what you could do using my tutorial, we’ll be happy to check it out! You are welcome to post the link to your page with your SVG image in the comments below with your notes!
Conclusion
Adding interactivity to your WordPress content often requires either paid plugins or coding skills. I wanted to show you a free and easy way to do what many website owners need.
And I hope this article will help you to save some money and overcome the difficulties with a bit of coding that is required for this interactive functionality based on SVG image.
P.S.: You can find more useful stuff about interactive SVG on petercollingridge.co.uk‘s website.

BTW, I respect your privacy, and of course I don't send spam, affiliate offers or trade your emails. What I send is information that I consider useful.




Great guide, I used the previous some time ago, and found the new one.
Have some questions:
1. Can I use Click instead of mouse over and out?
2. How the mouse over and out work on mobile?
3. I have circle divide into 4 quarters, how is the best way to add the lines?
Hey Rubb,
> 1. Can I use Click instead of mouse over and out?
of course you can.
> 2. How the mouse over and out work on mobile?
These events do not work on mobile
> 3. I have circle divide into 4 quarters, how is the best way to add the lines?
I think bezier curve should help you, it’s a default way to add any non-standard lines
Dear Michael,
This was an amazing tutorial!! This will be a centerpiece on my home page! Thank you.
One question, is there a way to display default text in the box until one of the SVG areas is clicked on/hovered over? So that the purple box isn’t empty when the page first loads.
Thank you!!
Hi Eli,
Thanks for your feedback 🙂
Yes, you can add the text in the “mycontent” div section. It will display the text there by default:
<code><div id="mycontent">ADD YOUR TEXT HERE</div></code>Excellent set of tutorials. Thanks very much. Any hints on how to make this example work on an HTML page outside of Word Press? I am trying to get this working with your svg image and the code above. I know that the svg file must be in an object tag rather than an img tag for it to be interactive. That places it in a separate DOM and not able to call the functions. Clicking the svg image does activate the external href links, but I can’t see how to access the Javascript functions. Do you know a quick fix for that or perhaps a Javascript library that acts like SVG Support?
Thanks again for a great set of tutorials!
Hey Dave,
Doing all this stuff without WordPress should be even easier 🙂
I suggest looking through http://www.petercollingridge.co.uk/, e.g. you can start from this page.
Hi Michael,
Thanks for the quick reply. You would think it would be easier. As with so many things it is easy once you know the secret(s). It took a while but I was able to figure it out. Sharing what I did for others that may come along.
The working code:
<object id="svgObject" type="image/svg+xml" data="rocket-opt4_SVG_interactive_section_in_WP.svg"></object>Then in Inkscape I modified the onmouseover and onmouseout properties for each of the image objects by adding “window.parent” before the function name. One example:
this.style.opacity=1; window.parent.onMouseOverSecurity();
Finally, added in the .style-svg definition.
Now the example code above and the svg image work as expected on a simple HTML page in desktop browsers. Not quite right yet on mobile browsers where the mycontent text does not yet display. Hope to figure that out soon (update: it works fine on mobile with the working code above).
This capability is exactly what I’ve been looking for some time now. I wish I’d found your pages sooner! Thanks once again!!
Dave
Thank you for sharing your findings, Dave.
If you happen to make a tutorial for your case, feel free to let me know – I will add a link to it from my article.
Hey!
Thank you for the tutorials. It helped me a lot.
I have 2 problems:
Inserting the SVG doesn’t work. If I put it in like you did, with image tag, then it is an image. No animations nothing.
Second problem I have is that when I test it (for this I made a html Page, put in the SVG code from opening the SVG in brackets) and i hover over the first polygon I get the content. Then I go to the second one it won’t show the new content. I think it is something about reload? I tried location.reload(); inside each function but the constant reload is quite annoying.
(I haven’t put it on wordpress page because I am using Avada theme and I wanted to know if it works before I try and maybe destroy my hard work).
Not sure what I did wrong. I can mail you my code if you need it.
Thank you – Ela
I would appreciate some advice if possible.
Ela,
If you have issues with adding SVG to your WP site, make sure you installed the SVG Support plugin and that you made the proper settings withing the plugin. Also, there may be some conflicts with other software on your website. If your SVG works on a pure HTML page, then the SVG is fine, and the conflict is between your WP and SVG. I suggest then deactivating all the plugins on your website and make sure the SVG works. Then enabling the plugins one by one you will narrow down the conflicting plugin. It’s also possible that your theme’s elements are conflicting with SVG functionality.
As regards your second problem, I don’t think it’s about reload. The code I provided should work. I guess you’ve probably messed up with the ID or the function names you are calling.
Try to make a super simple example with just two areas. Everything should work without reload.
Or you can use my code to see if it works for you. And then you will realize where you got messed up.
Hey and thank you for answering so fast :)!
I did a simple SVG. I put this in Inkscape
document.getElementById(‘polygon13373’).style.color = ‘fa225bff’; mouseoverShop1();
onmouseover
AND
document.getElementById(‘polygon13373’).style.color = ‘777e96ff’; mouseoutShop1();
onmouseout.
I didn’t put the path into a parent item like you did on create a link in the previous tutorial.
Next I did put SVG Support into my WP page.
I did all the settings. Since I work with AVADA Theme I used the CMS and put a code block into the page
function mouseoverShop1() {
var html = document.getElementById(“Shop1”).innerHTML;
document.getElementById(“mycontent”).innerHTML = html;
}
function mouseoutShop1() {
var html = “”;
document.getElementById(“mycontent”).innerHTML = html;
// location.reload();
}
/*
function onMouseOverShop2() {
var html = document.getElementById(“infoShop2”).innerHTML;
document.getElementById(“mycontent”).innerHTML = html;
}
function onMouseOutShop2() {
var html = “”;
document.getElementById(“mycontent”).innerHTML = html;
// location.reload();
}
// document.getElementById(“mycontent”).reset();
// setObj.clear();
*/
I put this on the colum next to it
Test INTERAKTIVER SHOPPLAN 1
Das muss jetzt funktionieren.
This is the link which will be removed later as in page removed
https://fmz-imst.at/cms/test/
If you hover over the grey polygon with “SPORTSDIRECT.COM” blue and red logo, there comes my content but only the first time.
AND since I wrote yesterday, the color changing won’t work anymore.
I used
document.getElementById(‘polygon11748’).style.color = ‘cyan’
instead of
element.style.fill = ‘red’
because the last didn’t work at all.
this.style.fill didn’t too.
(On another note: I tried Adobe Illustrator too, because Inkscape wouldn’t open the Interactivity Section after opening the SVG on some tries. And it didn’t work, even though when I openend Inkscape after putting stuff in AI inside, the stuff was visible in Inkscape. )
Anyways I made a new SVG and tried everything you said and now nothing is working anymore. Maybe I am blind, dumb or I don’t know. Can you find the mistake?
Thanks in advance, yours Ela
Ela,
I opened your page with the SVG example and moved my mouse over the grey area with the “Sport Direct” label. The area became red and the text note “Test INTERAKTIVER…” appeared. I moved the mouse out and the color of the area became grey again, and the text note disappeared. I moved my mouse again over and out the area. And it works as the first time. So, it looks like everything is fine.
Do I experience different behavior than you, or did not I understand your issue?
Hi Michael,
thank you so much for this information and your blog as a whole! It has helped me a lot.
I wanted to ask if there is an easy way of not only getting the content into the “mycontent” div but of changing the style slightly, e.g. have a green border for the content related to the first highlighted section, a red border for the content related to the second highlighted section.
Because I can’t apply a class to the other content sections as they are display:none.
So would I need a completely different approach to the whole thing or is there a way to tweak what you describe in this blog post?
Thank you again,
Hannah
Hi Hanna,
I have not tried it, but I think this can easily help you: https://www.w3schools.com/js/js_htmldom_css.asp
I.e. you just need to specify properties you want when you call each function.
For example, in the function body “function onMouseOverHosting()” you add
document.getElementById(“mycontent”).style.your_property_here = the_value_of_your_property;
Thank you so much for your help!
It works perfectly
Great to hear!
Hello,
It is probably very simple, but is there a way to set a default message in the box, to be there until someone mouseovers or clicks? I.e.: “Welcome to XYZ Company! Choose a Star on the image to learn more!” Type thing?
Yes, just add the text in or HTML into the “mycontent” DIV section.
Hello Michael,
Thank you for providing us with this kind of information!
I was hoping if you could help me with something on this. I am trying to make something like this website here:
https://www.voestalpine.com/welding/downstream-app/PETROLEUM-REFINING/Refinery-Plant/Alkylation-Unit#
And i was hoping you could help me with the code, since I wanted to put the information on the side just like on the website here.
Hey Jolo,
Sorry, I can’t provide code for that. You need to hire a web developer.
good morning Michael and thanks for having replied to me again. I have already tried to insert the opacity on onclick and it works, only I wish that when I click on another element, the previous one would not remain highlighted and so also for the following elements … I hope I have explained correctly. Thanks for the new tutorial !!!
Hey Davide,
Yes, I understand.
This requires a bit of simple programming in javascript. I guess the easiest way to do it is using a parameter in functions that you call in SVG. It will help you identify the clicked element which needs to stay highlighted, whereas other elements should be deselected (you do it in the javascript function).
Ok thank you so much… I’ll try it!!!
Hi Michael … thanks for your support and forgive me for taking the time … I tried to set the opacity 0 to focusout and it works but unfortunately the highlighting fades away even when I click anything else other than another element. I believe there is a need for a special function to integrate into Inkscape.
Well, it works how it is supposed to.
You don’t need a new function in Inkscape. You need to manipulate the properties of the SVG elements using a javascript. Onmouseover, onmouseout and onlick – that’s all you need.
Hi Michael … I have another question … I made sure that the description would appear at the click of the mouse. Now, however, I would like the area to remain highlighted after clicking. How can it be done? I’ve seen interactions on Inkscape but I haven’t found a solution. Thank you, as always, in advance …
Hi Davide,
You will need to manipulate with “onlick” event, as well as modify SVG’s “onmouseover” and “onmouseout” events and the corresponding javasript functions.
I will think on writing a tutorial on that.
Hi Micheal…great solution!!! But if I wanted hide the section “mycontent” and I wanted to appear only when hover with the mouse, how can I do? sorry for mistakes,,, I don’t speak english very well…
Hi Davide,
This will help you.
Thank you… you are so generous with all web users…
You are welcome, Davide.
Thanks Michael,
downloaded…
much appreciated.
Bruce
Coordinator – Menselectivenetwork.info
No problem, Bruce!
G’day Michael,
with this article – ” display-additional-information-by-clicking-image-componant”
can you arrange for a PDF link to download please…. I’d like to spend time studying this at a later time offline.
thank you
sincerely
Bruce Bennett
Hey Bruce,
Here you go – you can download it here.
Hello Michael
I can see that you are passionate about educating and sharing. Thank you very much indeed. Great tutorial an quality of detail.
Is there a way to have a hyperlinked popup appear onmouseover, instead of having the content box below (or outside) the image?
Thank you, kkc
Hello kkc,
Thanks for your feedback!
I have been trying to find an universal and free solution to make popup boxes work the way I want. But unfortunately I did not succeed. The main issue I’ve encountered is positioning the popup box in different browsers.
I could not find the way to satisfy the following criteria I wanted:
1. make it work on all major browsers, with any size of browser window and with any configuration of the browser window (e.g. with or without bookmarks bar),
2. make popup appear below the mouse pointer, not outside the area.
3. make it responsive,
4. make it beautiful (at least multiline, with ability to add a formatted text and images)
5. make it usable for non-coders.
For now this task stays unsolved. The best results I’ve got was with tippy.js library. But I encountered a positioning issue – the popup box did not appear in the place I wanted (i.e. under the mouse pointer) when I tested it on different browsers with different browser window size and different browser window configuration.
However, if you don’t need a popup window appear under the mouse pointer and it’s fine to you that a popup box appears outside the area (image), then you can try tippy.js or some other JS popup library.