If you want to create and add fantastic 3D interactivity (and even virtual reality) to your website for free, very easily and within minutes then continue reading this article. You don’t need to be a 3d artist; you don’t need to have any special skills. Look below at my examples and see that everyone can do it easily and with money spent (tutorial included).
Intro
Quite often blogs and websites lack visually appealing content not to mention user-friendly interactivity. My website is one of them, at least for now 🙂 And if your website is lacking awesome 3D interactivity, then you’ll find this article pretty useful.
Even such a simple thing as adding clickable areas to your images can make you benefit and increase your audience engagement. But this time I will show you really cool stuff.
I’ve been looking for free, very quick and easy ways how you and I can enrich blog content with interactive media. But with (shallow) research into this issue, I did not see an easy solution before.
I knew several options but they were either too heavy (e.g. too much time to load), inconvenient (e.g. requires installing an application), restrictive (not enough functions) or expensive.
Another big problem in this respect is that professional and beautiful assets like 3D models, scenes, animation, interactivity etc require a lot of money or time and skills to create. And I just wanted something both really simple to implement and beautiful, as well as free.
So, I just let myself relax (here’s what’s behind it) and started surfing the Internet trying to find something. I did not know what exactly I was looking for. But I knew that is going to be not so ordinary. I knew it looked like I wanted too much.
And in this article I will show you the results of my research journey and you’ll see how you can add gorgeous and user-friendly 3D interactive media to your website for free, with no skills, very easily and quick.
1. See what kind of 3D interactivity you can do on your website:
By the way, the models are interactive. You can zoom in/out and navigate with your mouse using a mouse wheel and a drag-n-drop technique. Also, they are ready to use with your virtual reality headset!
Example 1: Animated aquarium in a helmet with your notes on it
You can use your mouse to rotate, zoom in and out and navigate in other ways using Ctrl (Command) and Shift keyboard keys inside the scene 🙂
I will show you further in this article how easily I made it by duplicating this existing model.
Example 2: A 3D model of Vincent van Gogh’s room with annotations and external links
You can navigate in this 3d scene with your mouse and click the numbered annotations with the links.
I also created this 3D model by duplicating this model and by adding some notes on 3D objects and annotations easily. The annotations has links to some of my articles.
Example 3: A 3D scene with books and annotations as table of contents
You can also navigate in this 3d scene with your mouse and click the numbered annotations with the links.
I duplicated existing model and added annotations which serve as a table ofcontents for my article.
They look very cool, don’t they?
Sketchfab is what made it so easy and free to use 3D interactive models
The platform and the community that stands behind it is Sketchfab.
Normally for a professional 3D artist it takes days and weeks to create something like any of these 3D models I used in this blog post. But Sketchfab allows you to use the 3D models and scenes which have been created and shared by others. And it may take just tens of minutes (or maybe a couple of hours if you struggle in the beginning) to duplicate a model and tune it for your needs like I did. It took me a day to play with Sketchfab and create all these three models I show you above.
You’re welcome to use my personal invitation link to Sketchfab if you want to join Sketchfab and use it. (By the way, my invitation link is not affiliate, but if you sign up through it I’ll get bonuses which will allow me to upgrade my Sketchfab account). Anyway, it’s free to join and use Sketchfab and you are not very likely to upgrade.
A free Sketchfab account lets you use a lot of options and possibilities (e.g. unlimited number of 3D objects). And upgraded accounts have even more options (e.g. to handle huge 3d scenes, more background options etc). Free account is probably what you will suffice.
By the way, everything I show you in this article I’ve made using my free Sketchfab account.
What is Sketchfab in the first place? Basically it’s a platform for demonstrating and sharing 3D models, 3D scenes and short 3D animations. Sketchfab is a fantastic platform because it’s easy to use for anyone without special skills. It’s fast, very functional and free without much restrictions (unlike many its alternatives).
2. How you can use Sketchfab and its 3D scenes and animtations
Within minutes you can create something like the examples above using 3D models available at Sketchfab.
Here are some ways how you can use Sketchfab on your website without being a 3D artist:
- As a high-quality image for using in your blog post (you can add your notes, logo or any other images on 3d objects)
- Embed 3D model for rich experience including virtual reality (interactivity -> better visitor engagement -> better conversions)
- Empower interactive experience on your website using annotation (add affiliate links, organize your table of contents, links to your best articles etc)
- Use appealing graphics and annotations with links to generate more sales or views of your blog posts. For example, I’m thinking how I can use it to better present the results and statistics of the Hosting Performance Contest, promote reliable and fast hosts, best website security products and website backup solutions. I’ll probably write another post about it when it’s ready. But now you can borrow these ideas for your own needs
- Use 3D models and graphics in email opt-in form and special offers forms.
- Capture video of your 3D model and upload it to your Youtube channel.
- Easily create animated gif from 3D animations
- As a 3d showcase of your products if you have a e-commerce website
By the way, the options above is just what lies on the surface. Unleash your creativity and find out other ways how you can use this source of visually appealing content!
3. How you can create your copy of a 3D model and tune it for your needs (briefly)
I will show you how you can duplicate an existing 3D model (scene), add your note to a 3D object in that scene and add 3D interactivity (with clickable links) on it.
In very short: find the model from the gallery, download the file with the model, edit image (the color material of the 3D object), upload the file with the updated model (you’ll need to sign up to Sketchfab.
What software you will need: any graphic editor (e.g. Paint, Gimp or Photoshop etc), that’s it!
What skills you need: no skills, just being able to edit image (e.g. add your text or logo)
What is the process in short:
- find a downloadable model on Sketchfab you want to use
- download it (zip file)
- extract zip, find the image that is responsible for the particular part of the model which you want to edit
- edit the image
- zip the files (your new model)
- upload the file (to create your model on Sketchfab)
- enjoy! (embed your model on your website, create animated gifs etc)
Note that there are different licenses that the original 3D model may have. You may want to choose the models which allow commercial use (if you intend to use them on your commercial blog or website). You’ll simply need to credit the original model with the link. (All the examples I’ve used in this article have this kind of license). There are many fantastic 3d models and scenes on Sketchfab which can be used commercially.
4. Easy tutorials how to create your copy of a 3D model on Sketchfab and add 3D interactivity to your website
4.1. Adding notes (your logo, text, website name etc) on a part of a 3D model
Here are the steps:
Create a Sketchfab account (it’s free). You will need it to upload your copy of a 3D model.
When browsing Sketchfab models find a model that you want to use. The model needs to be downloadable and with Creative Commons (or other appropriate) license. Also, to filter only probably the best models you can select “staff picks”. “All time” filter lets you see the best models throughout any time, not just among the most recent ones.
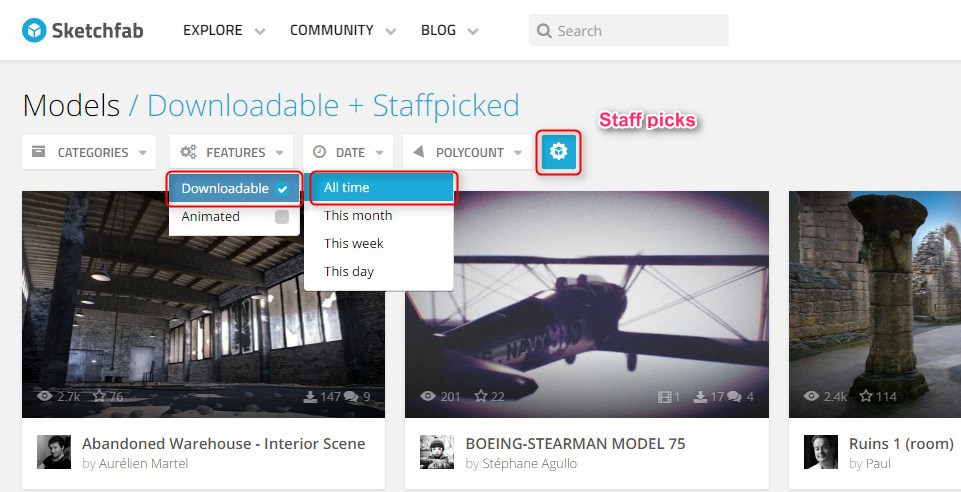
Filter models for better results
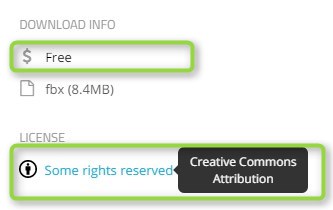
Creative Commons allows you to use/modify models for even commercial purpose
Decide what you want to do with the model. In this tutorial I will show you one of the easiest things that you can do – to add some text on a model part, e.g. your article title, your website name, or your logo etc. I will use the model of aquarium in a helmet as an example.
Here’s a still image of the original model:
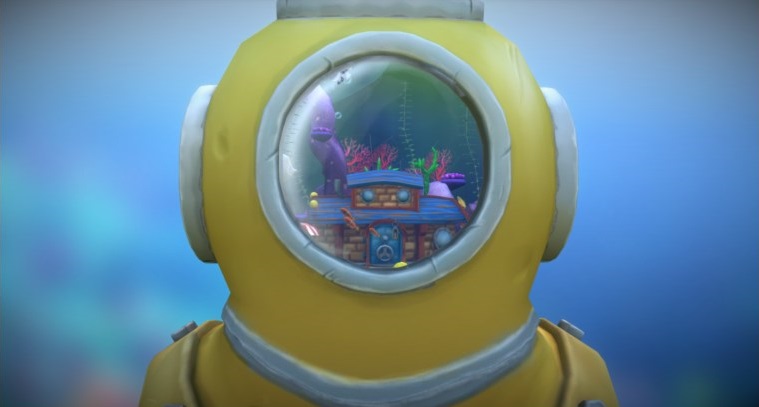
Original 3D model
And here’s the image of the modified model that I created (I added notes on a helmet as an example of a modification you can easily do):
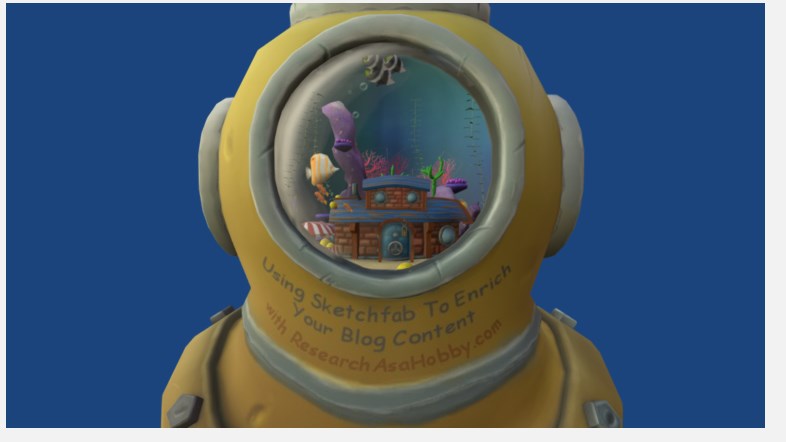
Modified 3D model
And here’s a video tutorial which contains a whole process of duplicating the Aquarium 3D model:
Download original 3D model (in a zip file) to your computer (just click a Download button from the page with the model).
Extract the zip file.
Find the image which is responsible for painting the part of the model you need.
In our example here’s the part of the image with the element we need (the color material for the yellow helmet):
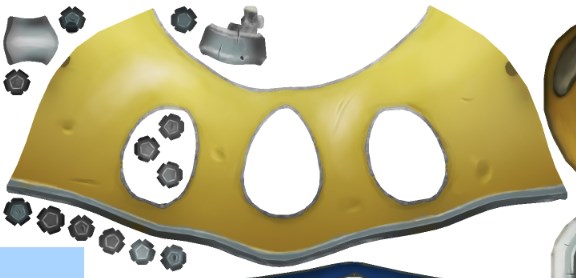
Original color material for the helmet
Edit the image in your favorite editor (e.g. add your text, logo etc to the required element).
I’ve added some notes and here’s the result color material:
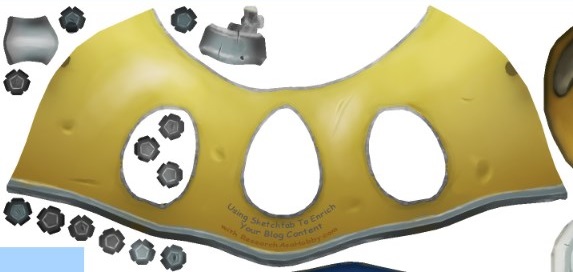
Modified color material for the helmet
Zip the files (create an archive again).
Upload the zip file as a new model to your Sketchfab account and credit the original model according to the license in your model description. (E.g. if it’s Creative Commons, then simply give a link, Author name and the original model title. Actually, when you download the original model, all this information is given to you in a popup window). Uploading is simple – just click the Upload button from your account.
Check out your uploaded model (compare it with the original). If your 3D model looks good, then you are done! You can publish your model and use it on your website. But sometimes your model may kind of lose its position (e.g. show up upside down), lose colors or transparency due to some settings falling off. I guess, this is a bug and it is not fixed yet. But no worries, you can go around it quite easily in 3D settings.
Here’s for example see right below how you can change colors issue:
– go to 3D settings:
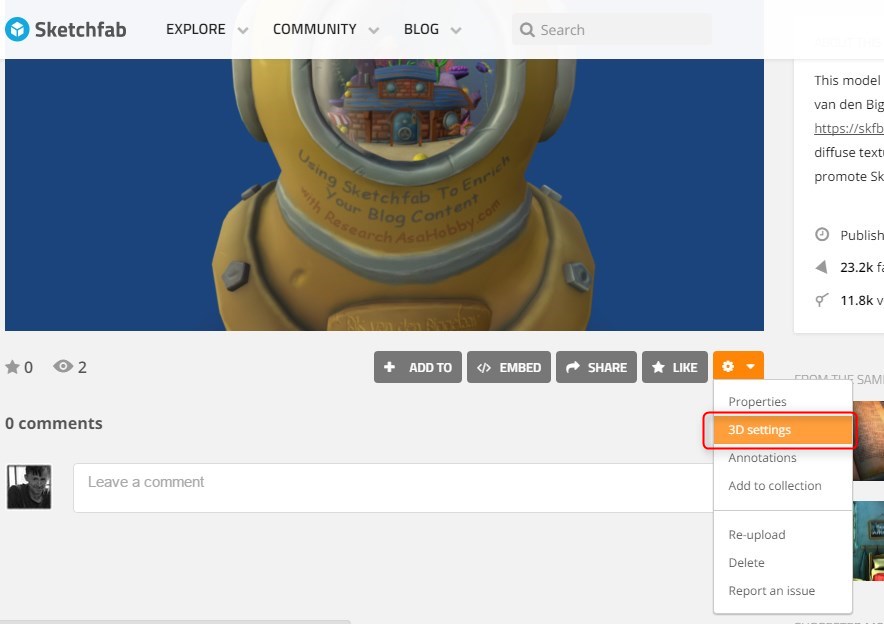
– go to Materials tab:
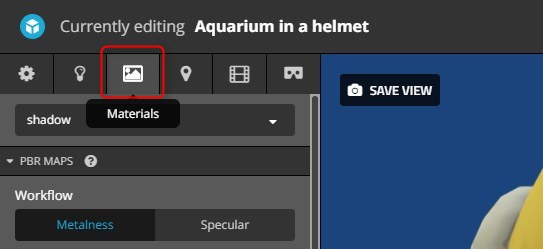
– make sure all existing materials (textures) are specified for each 3d-object:
If you have never worked with 3D modeling before, here is something you need to know to understand what it is about.
Your 3D model consists of 3D objects. Each object is almost always colored or painted. Its color texture is stored in an image file (diffuse material). By the way, we edited it in one of the previous steps.
Also, a 3D object may be transparent to some extent. 3D Objects in Sketchfab may have transparency (opacity) masks. This is also stored in a graphic file like a color (diffuse) material. Besides, 3D objects may or may not have other settings like emission, glossiness and some others which also are stored in files.
Above all, I’d say that color (diffuse) and transparency materials are the basic (and the most important) ones you need to consider.
So, these materials (masks) are stored in graphic files and in your 3D model settings you need to specify them for each of your 3D object if these settings have fallen off during your manipulations with uploading the model. Without it your uploaded 3D model may look not so beautiful.
And here’s how you specify materials and other masks for your 3D objects in Sketchfab after uploading if your 3D model does look as good as the original.
Let’s for example make sure that a material for the object “helmet” is specified:
- Select the object (helmet in our case); the object will be outlined in the view area of your 3D model.
- Make sure that a corresponding image file (DIFFUSE_Helm.jpg in our case) is specified in the list “PBR Maps / Metalness / Base Color” and in the list “PBR Maps / Specular / Base Color”:
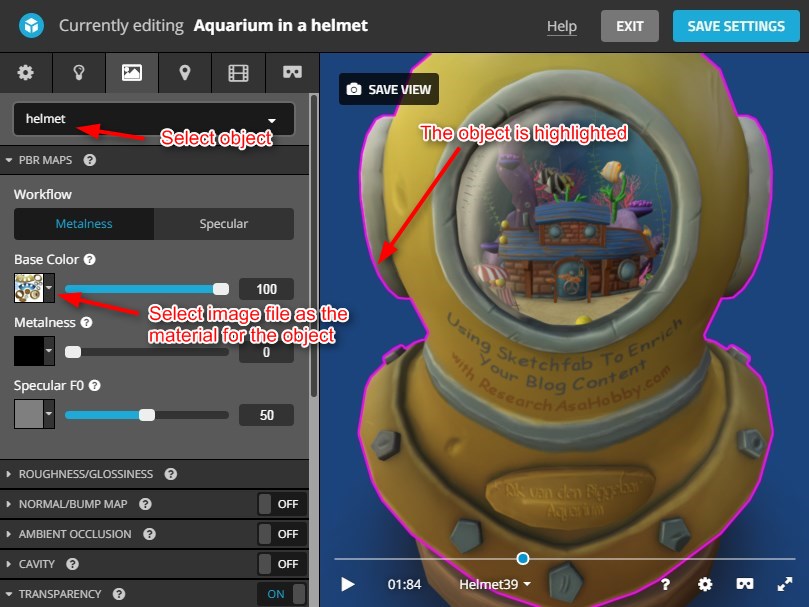
Specify image files for object materials - You can do the same for transparency: specify corresponding image file (OPACITY_helm.jpg) in the lists “Transparency / Alpha Blending” and “Transparency / Alpha Masking” if they are not specified automatically after the upload.
- Also, you can do the same for other materials (e.g. emissions etc).
- Don’t be afraid of playing with it. Never mind that you may not understand what all these settings mean (I don’t :), at least for now). Just try and see what it affects and if you like the result.
The general idea is to use all the image files (materials) that go with your model in these settings. Playing with these settings may take some time if you have never used 3D modeling/painting tools before.
But again, ideally after uploading all these materials should be assigned automatically. And you will need to do these manual actions only if your 3D model does not look good after the uploading.
Finally, if your 3D model looks good, publish it. Published models can be embedded into your website and shared in social media. You can also create animated gifs from your 3D model if it has animation (Sketchfab allows making animated gifs easily). Enjoy!
4.2. Adding annotations to your Sketchfab model
The annotations may contain external links e.g. to your blog posts, or your affiliate links etc. Annotations is a great way to add more 3D interactivity to your model. You can see my examples of 3D models with annotations in the beginning of this article.
Here’s how you add annotations:
- Find a 3D model you like in Sketchfab and duplicate it to use in your Sketchfab account like I described in the previous section.
- In the edit mode, go to Annotations tab; then double click on any 3D object in your model to add annotation to it.
You can add external clickable links to the annotations. Here’s an example of the code for a link that you can insert to your annotation: [This link](http://example.net/) (here’s more info)
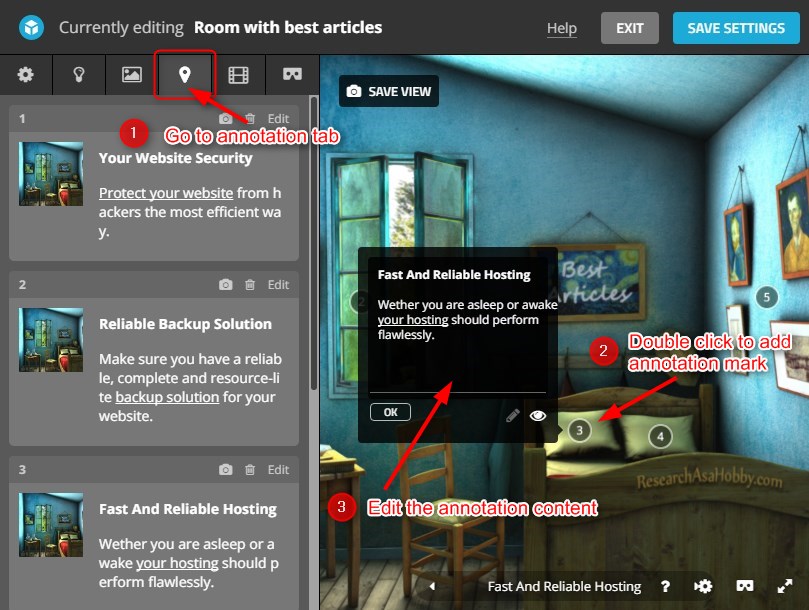
Adding annotations to your 3D model
Conclusion
Adding 3D interactivity (and even virtual reality) to your website is very cool and trendy. But usually it is expensive, time-consuming and skills-demanding.
Sketchfab, a fast and very functional platform for sharing and tuning 3D models, gives you a great opportunity to use what other 3D professionals have created, shared for free and made downloadable. With its free account you can do everything I could.
In my article I described how you can easily and for free add 3D interactivity to your website using stellar 3D models (scenes), modify them (add your notes or any other graphic on 3D models) and put clickable links in them.
Sketchfab is a great way to meet 3D interactivity and 3D world. You don’t need any special skills for that. And it does not cost anything.
P.S.: Here’s the next article in this series – the easiest way I know so far to create 3D infographic from scratch easily, with no skills and for free (with my own example).

BTW, I respect your privacy, and of course I don't send spam, affiliate offers or trade your emails. What I send is information that I consider useful.


Really struggling how to progress my hobby, with choices such as;
Monthly/annual subscription.
– Sketchfab – awesome features, but very pricey for the functionality I’m after. Free is too limited.
– P3D.in – very similar features compared to Sketchfab, but the way more affordable for the hobbiest.
– Airtable Pro appears to have a 3D App, however even with the simplest of settings I couldn’t get it to work, so haven’t tested its embed functionality.
One off Purchase – self hosted;
– Canvasio3D Pro – same price as P3D for a year, but no ongoing costs. Limited to self hosted models, but comes with WordPress plugin.
– Free WordPress plugins support OBJ but don’t support material or colours 🙁
Keen to hear about other alternatives if anyone has any to mention. 🙂
Yeah, recently this sphere has been having a good progress 🙂
thanks! It was a great article for me!!
You are welcome, Sam!
Feel free to share how you implemented this.